# Haptique OS Docs
---
---
This file contains public Haptique OS documentation for LLM context. Prefer the linked live pages for the latest rendered docs.
---
---
# Overview
Browse the Haptique OS docs by setup task, product area, HOS tools, AI, mobile apps, integrations, licensing, and support.
Source: https://haptique.io/docs/
Slug: docs
Start with **Getting Started**. It is the short first path for installing licensed Haptique OS on a supported Mac, Linux, or Windows machine, creating the [first project](/docs/getting-started/first-setup), adding the first [integration](/docs/integrations/adding-devices), exposing [logical devices](/docs/advanced-os/logical-devices), and signing in to [mobile apps](/docs/mobile/overview).
For licensing in that first path, myHOS uses email-link sign-in rather than a separate password login. If you open the licenses area while signed out, myHOS redirects you to the email sign-in flow and then returns you to the same licenses page after verification.
Using AI is part of the normal Haptique OS setup once [Spaces](/docs/advanced-os/spaces), [logical devices](/docs/advanced-os/logical-devices), scenes, and permissions are ready. Start with the [Native AI Engine](/docs/ai-engine/overview), then use the [AI Setup Guide](/docs/advanced-os/ai-setup-guide) and [AI Chat on Mobile](/docs/mobile/ai-chat-on-mobile).
Current beta path
Install from the official channel, then prove one room end to end.
For Haptique OS Beta 1.1.1, use the public download and setup flow here rather than copied installer links. The strongest first test is one host, one licensed project, one Space, one integration, one mobile app, and one real control action.
Download
Install
Claim license
Release notes
## Common first jobs
Download HOS
Install server
Activate license
First project
Mobile app login
Set up AI
Add devices
Check network
## Documentation Map
Getting Started
7 guides
Download Haptique OS, install the local server, activate licensing, create the first project, and connect the first control surfaces.
Getting Started
Download
Installation
License Claim
First Project
Network Checklist
With RS90
HOS
8 guides
Understand Haptique OS, then shape the project model with Spaces, logical devices, AI setup, and pro tools.
Overview
Spaces and Rooms
Logical Devices
AI Setup Guide
Program Scripts
UI Lab
Configurator
Fleet Releases
Haptique Music
5 guides
Set up music sources, outputs, zones, favorites, scenes, and troubleshooting.
Overview
Setup
Outputs and Zones
Favorites and Scenes
Troubleshooting
Native AI Engine
7 guides
Use AI for natural-language control, scene creation, suggestions, and safe confirmations.
Overview
AI Chat
Controlling Devices
Creating Scenes
Automations and Suggestions
Privacy and Local Processing
Troubleshooting
Mobile Apps
9 guides
Download the iPhone, iPad, and Android apps, then sign in for rooms, favorites, scenes, media, and mobile AI chat.
Overview
HOS Mobile App
Rooms and Devices
Favorites
Scenes
AI Chat on Mobile
Media Control
Notifications and Presence
Troubleshooting
Desktop and Mac Menu Bar
5 guides
Set up the desktop app, first launch, licensing, and Mac menu bar control.
macOS App
Mac Menu Bar App
First Launch
Licensing and Activation
System Requirements
RS90 Remote
7 guides
Pair RS90 and map buttons, scenes, favorites, IR, IP, Bluetooth, and firmware updates.
Overview
Pairing
Button Mapping
Scenes and Favorites
IR, IP, and Bluetooth
Firmware Updates
Troubleshooting
Everyday Use
5 guides
Control rooms, devices, scenes, media, HomeKit, automations, and multi-room flows.
Rooms, Devices, and Scenes
Media and AV Control
HomeKit and Siri
Automations
Multi-Room Control
Integrations
6 guides
See supported systems, add devices, and connect common home and AV systems.
Supported Systems
Adding Devices
HomeKit
AV Receivers
Lighting and Climate
IR Devices
Licensing
3 guides
Review plans, activate Haptique OS, and move a license when the controller changes.
Plans
Activation
License Transfer
Support
5 guides
Find common fixes, network checks, diagnostics, and the support contact path.
Common Issues
Network Checklist
Logs and Diagnostics
LLM Access
Contacting Support
Release Notes
1 page
Track notable product and docs changes over time.
Changelog
Developers
Wiki
Developer material lives separately so these docs can stay focused on setup and use.
Developer Wiki
:::note[Developer documentation]
Driver SDKs, API testers, schemas, platform internals, and advanced extension guides live in the [Haptique Developer Wiki](https://wiki.haptique.io).
:::
---
# AI Setup Guide
Set up Haptique OS AI for everyday control, mobile chat, scenes, and safe confirmations.
Source: https://haptique.io/docs/advanced-os/ai-setup-guide
Slug: docs/advanced-os/ai-setup-guide
Use this guide after the first project has at least one Space, one integration, and a few logical devices. AI works best when Haptique OS already has a clean model of the home.
## Setup order
1. Create clear Spaces for the rooms or zones users control every day.
2. Add logical devices with names people naturally say out loud.
3. Assign each logical device to the right Space.
4. Create the main scenes and favorites before testing AI.
5. Enable AI for the Spaces and devices that should be controlled by chat.
6. Pair the mobile app so users can try AI chat from the same project.
7. Test a few small commands before allowing broad room or whole-home actions.
## Naming for AI
Use names that match how people describe the home.
- Use Main Lights instead of a channel or endpoint name.
- Use Theater Projector instead of a model number.
- Use Kitchen Music instead of an output identifier.
- Use West Shades instead of a motor name.
Avoid duplicate names in the same Space. If two devices sound similar, add the room or purpose to the name.
## Permissions and confirmations
Start with narrow permissions. Let AI control one Space first, then expand once the behavior is predictable.
Actions that affect many devices, change scenes, or create automations should ask for confirmation before they run. This keeps AI useful without making it careless.
## First tests
Try commands that prove the model is understandable.
- "Turn off the living room."
- "Set the kitchen lights to evening mode."
- "Start Movie Night in the theater."
- "What devices are in this room?"
- "Create a reading scene for the bedroom."
If a command targets the wrong device, fix the Space, logical device name, or scene name before adding more rooms.
## Mobile AI chat
After the setup works on the controller, test the same project from mobile. Mobile chat is useful for quick room-level changes when users are away from the main screen.
Continue with [AI Chat on Mobile](/docs/mobile/ai-chat-on-mobile).
## Related pages
- [Native AI Engine](/docs/ai-engine/overview)
- [AI Chat](/docs/ai-engine/ai-chat)
- [Creating Scenes with AI](/docs/ai-engine/creating-scenes-with-ai)
- [Privacy and Local Processing](/docs/ai-engine/privacy-and-local-processing)
---
# Configurator
Use the Configurator to assemble integrations, logical devices, Spaces, scenes, favorites, and control surfaces.
Source: https://haptique.io/docs/advanced-os/configurator
Slug: docs/advanced-os/configurator
The Configurator is where the Haptique OS project becomes a usable control system. Use it after the controller is licensed and the first integration is reachable.
## Configuration order
1. Confirm project name, license, and network.
2. Add integrations.
3. Select endpoints that should become logical devices.
4. Name and group logical devices.
5. Assign devices to Spaces.
6. Create scenes and favorites.
7. Sign in to mobile apps and pair RS90.
8. Enable AI control only for approved Spaces and devices.
9. Test state updates across all connected surfaces.
## Practical guidance
Keep the Configurator focused on the user model. Technical integration details matter, but the final project should expose names and actions that a homeowner, guest, operator, or showroom staff member can understand.
If the project uses Fleet, publish or receive the approved release before final acceptance testing.
---
# Fleet Releases
Understand how Fleet releases deliver HOS devices and integration capabilities to licensed Haptique OS controllers.
Source: https://haptique.io/docs/advanced-os/fleet-releases
Slug: docs/advanced-os/fleet-releases
Fleet releases are how managed HOS deployments can receive approved device definitions, integration packages, firmware-supported capabilities, or project updates depending on the product release.
## Release flow
1. A release is prepared for the target device group or site.
2. The Fleet server makes the release available to the licensed Haptique OS controller.
3. Haptique OS receives the release through the supported deployment path.
4. New HOS devices or capabilities become available in the project.
5. The installer exposes them as logical devices.
6. The devices are assigned to Spaces, scenes, favorites, mobile apps, RS90, and AI permissions.
## RS90 behavior
RS90 reacts to the Haptique OS project after the controller receives and applies the release. The remote should not need a separate copy of integration logic. It receives the relevant rooms, favorites, scenes, media zones, and button mappings from Haptique OS.
When a button is pressed, RS90 sends the action to Haptique OS. Haptique OS runs the integration, updates state, and the result appears across mobile apps, desktop, RS90, and other connected clients.
## Acceptance checks
- The Haptique OS controller shows the expected release.
- New HOS devices appear in the Configurator.
- Logical devices have user-facing names.
- Spaces and scenes use those logical devices.
- RS90 and mobile apps show the updated controls.
- AI commands only operate approved devices and Spaces.
---
# Logical Devices
Understand how Haptique OS turns technical endpoints into user-facing devices.
Source: https://haptique.io/docs/advanced-os/logical-devices
Slug: docs/advanced-os/logical-devices
Logical devices are the user-facing control objects in Haptique OS. They sit between raw integration endpoints and the apps, RS90, scenes, favorites, and AI commands that people actually use.
A logical device can represent one real endpoint, a group of endpoints, or a normalized control surface built from an integration. The goal is to expose names and actions that match the room, not the installer-only identifiers from the source system.
Logical Devices are the stable controls HOS can publish to Spaces, scenes, mobile apps, RS90, AI, and Fleet release workflows.
## Examples
- A lighting channel becomes Main Lights.
- A projector power endpoint and input endpoint become Projector.
- Several music service outputs become Kitchen Music.
- A climate zone becomes Bedroom Climate.
- A set of shades becomes West Shades.
## Why they matter
Logical devices make the rest of the project understandable. Spaces use them to organize rooms and zones. Scenes and favorites use them as stable targets. Mobile apps and RS90 display them as controls. AI uses their names to interpret natural requests.
## Modeling rules
1. Name devices for users, not for installers.
2. Keep technical endpoint names hidden unless they are useful during support.
3. Group endpoints when users expect one control.
4. Split endpoints when users need separate everyday control.
5. Assign every user-facing logical device to the Space where it belongs.
6. Keep names consistent across mobile apps, RS90, scenes, favorites, and AI.
## Related pages
- [Spaces and Rooms](/docs/advanced-os/spaces)
- [Configurator](/docs/advanced-os/configurator)
- [Adding Devices](/docs/integrations/adding-devices)
---
# HOS Overview
What Haptique OS is, why it is local-first, and how the main product surfaces fit together.
Source: https://haptique.io/docs/advanced-os/overview
Slug: docs/advanced-os/overview
Haptique OS is a local-first control system for smart homes, media rooms, and professional AV spaces. It gives the project one central controller for rooms, devices, scenes, automations, media control, mobile apps, HomeKit, RS90 remotes, and native AI.
## Why local-first matters
Routine control should not depend on every action reaching a cloud service. Haptique OS keeps the core control path on local hardware so rooms, scenes, device state, and local automations can keep working on the home or site network.
Internet access may still be used for account access, license claiming, software updates, remote access, or vendor integrations that require a cloud account.
## How it works
Haptique OS runs on supported local hardware and stores the project model: Spaces, logical devices, scenes, favorites, automations, license state, and integration settings.
Control surfaces read from that same controller:
- HOS mobile app for iPhone, iPad, and Android.
- Desktop app and Mac menu bar companion.
- RS90 physical remotes.
- HomeKit and Siri, when enabled.
- AI chat inside supported Haptique apps.
When one surface changes something, the others should reflect the same state from the controller.
## Native AI
Native AI works from the configured project model. It can help control supported devices, create scenes, explain room or device state, and suggest automations when those features are enabled and permitted.
Broad or sensitive actions should ask for confirmation before they run.
## Where to go next
- [Spaces and Rooms](/docs/advanced-os/spaces)
- [Logical Devices](/docs/advanced-os/logical-devices)
- [AI Setup Guide](/docs/advanced-os/ai-setup-guide)
- [Mobile Apps](/docs/mobile/overview)
- [RS90 Remote](/docs/rs90/overview)
---
# Program Scripts
Use Program Scripts for advanced Haptique OS behavior that should run behind scenes, automations, and integrations.
Source: https://haptique.io/docs/advanced-os/program-scripts
Slug: docs/advanced-os/program-scripts
Program Scripts are for behavior that is too specific for a simple scene but should still run inside the Haptique OS project.
## Common uses
- Prepare a room based on time of day.
- Coordinate AV power, inputs, and lighting.
- Add conditional behavior around device state.
- Normalize integration responses into logical device state.
- Run installer-defined actions from a scene, favorite, RS90 button, or AI-approved command.
## Safe setup steps
1. Start from one small behavior.
2. Name the script by what the user outcome is.
3. Limit the devices the script can control.
4. Add confirmations for destructive or broad actions.
5. Test the script from Haptique OS before mapping it to mobile, RS90, or AI.
6. Log important state changes for support.
## Where scripts fit
Scripts should support the project model. A script can power a scene or favorite, but the user should still see understandable Spaces, logical devices, scenes, and labels in the apps.
---
# Spaces and Rooms
Use Spaces to organize rooms, zones, logical devices, scenes, mobile apps, RS90, and AI.
Source: https://haptique.io/docs/advanced-os/spaces
Slug: docs/advanced-os/spaces
Spaces are the room and zone model in Haptique OS. A Space can be a physical room, a media zone, a showroom area, or another control area that users recognize.
## Setup steps
1. Create the main Spaces first.
2. Add logical devices to the Space where users expect to control them.
3. Keep device names short and natural.
4. Add scenes that match real behavior in the Space.
5. Add favorites for the controls used every day.
6. Pair RS90 to the Space it should control.
7. Confirm the mobile app shows the same Space model.
## Design rules
- Use one Space for one user context.
- Do not put installer-only device names in user-facing Spaces.
- Keep technical endpoints hidden behind logical devices.
- Put shared AV or music zones where users will look for them.
- Use consistent names across Haptique OS, mobile apps, RS90, and AI.
## Why it matters
Spaces are how Haptique OS decides what a room-level command means. They help mobile apps display the right controls, help RS90 target the right room, and help AI understand natural requests such as "turn off the theater" or "start music in the kitchen."
---
# UI Lab
Prototype and validate Haptique OS screens, controls, labels, and room experiences before publishing them.
Source: https://haptique.io/docs/advanced-os/ui-lab
Slug: docs/advanced-os/ui-lab
UI Lab is for shaping the user-facing control experience before it is treated as production configuration.
## What to validate
- Space names and room order.
- Logical device labels.
- Scene names and icons.
- Favorite placement.
- Music and AV control layout.
- RS90 button behavior.
- Mobile and tablet views.
## Workflow
1. Pick one Space.
2. Review the controls users need most often.
3. Remove duplicate or installer-only labels.
4. Confirm scenes and favorites are easy to scan.
5. Test the same user flow from mobile and RS90.
6. Publish the approved layout through the normal project or Fleet release process.
## Good outcome
The UI is ready when a non-installer can enter the Space, understand the main controls, and operate the room from mobile or RS90 without knowing which integration is underneath.
---
# AI Chat
How to use AI chat in Haptique OS to control rooms, devices, scenes, and media.
Source: https://haptique.io/docs/ai-engine/ai-chat
Slug: docs/ai-engine/ai-chat
AI chat is the conversational control surface for Haptique OS. It is available from supported Haptique apps and is designed to understand the home you have configured.
## What AI chat can understand
- Room names such as Living Room, Theater, Kitchen, or Bedroom.
- Device names such as Apple TV, Projector, AVR, Main Lights, or AC.
- Scene names such as Movie Night, Dinner, Away, and Good Night.
- Device categories such as lights, shades, media, climate, and remotes.
- Natural phrases such as "downstairs," "everything in this room," or "make it warmer" when the home model supports them.
## Good prompts
Use clear intent and include the room when needed:
- "Turn on Movie Night in the theater."
- "Set the living room lights to 30 percent."
- "Pause the media in the lounge."
- "Create a Good Night scene for the whole house."
## Review before saving
When AI creates a new scene or automation, review the proposed actions before saving. Confirm:
- The right rooms are included.
- The right devices are included.
- Brightness, volume, input, temperature, and timing values are correct.
- The scene name is clear.
## When AI asks for confirmation
AI should request confirmation for broad actions such as turning off an entire floor, changing security-related devices, deleting scenes, or creating schedules that repeat automatically.
---
# Automations and Suggestions
How AI can help draft automations and suggest useful Haptique OS routines.
Source: https://haptique.io/docs/ai-engine/automations-and-suggestions
Slug: docs/ai-engine/automations-and-suggestions
AI can help turn habits into automations. Instead of building every rule manually, you can describe the desired behavior.
## Example automation requests
- "Every weekday at 7 AM, turn on the kitchen lights and start morning music."
- "When I activate Away, turn off all media and lights."
- "At sunset, turn on the porch and garden lights."
- "If the theater starts a movie, dim the lights after 10 seconds."
## Review every automation
Before saving, check:
- Trigger type.
- Time and repeat schedule.
- Rooms and devices affected.
- Safety implications.
- What happens if a device is offline.
## Suggestions
AI suggestions should feel practical, not noisy. Useful suggestions include repeated actions, common scene combinations, and cleanup tasks such as unused scenes or duplicate favorites.
## Safety
Avoid automating sensitive devices without a clear confirmation step. Security, locks, gates, garage doors, and critical climate behavior should be treated carefully.
---
# Controlling Devices with AI
Use AI to control supported rooms, devices, scenes, and media in Haptique OS.
Source: https://haptique.io/docs/ai-engine/controlling-devices-with-ai
Slug: docs/ai-engine/controlling-devices-with-ai
AI can control devices that are already added to Haptique OS and available to the current user.
## Typical control requests
- Lights: turn on, turn off, dim, change color, set a scene.
- Climate: adjust target temperature or mode where supported.
- Media: play, pause, change volume, change source, or select a zone.
- AV: switch input, power devices, control projector or TV functions.
- Rooms: apply a scene or set a group of devices to a desired state.
## Be specific when needed
If two rooms have similar devices, include the room name:
> "Set the theater AVR to Apple TV."
If the request affects many devices, AI may ask you to confirm:
> "This will turn off 18 devices across 5 rooms. Continue?"
## If a command does not work
Check:
- The device is online in Haptique OS.
- The device name is unique and easy to understand.
- The integration supports the requested command.
- The current user has permission to control that device.
- The app is connected to the correct Haptique OS instance.
---
# Creating Scenes with AI
How to create and refine Haptique OS scenes using AI chat.
Source: https://haptique.io/docs/ai-engine/creating-scenes-with-ai
Slug: docs/ai-engine/creating-scenes-with-ai
AI scene creation turns a plain-language idea into a saved Haptique OS scene.
## Example
You can say:
> "Create a Movie Night scene for the theater."
AI can propose actions such as:
- Dim lights.
- Close shades.
- Turn on projector or TV.
- Set AVR input.
- Set volume.
- Prepare the media source.
- Adjust climate.
## Recommended workflow
1. Ask AI to create the scene.
2. Review the proposed actions.
3. Remove anything that should not be included.
4. Adjust device values.
5. Save the scene.
6. Test the scene while you are in the room.
7. Add it to favorites or RS90 buttons if needed.
## Refining a scene
After saving, you can ask for changes:
- "Make Movie Night use 20 percent lights instead of 10 percent."
- "Add the projector to this scene."
- "Remove the kitchen from this scene."
Always test scenes that control AV, shades, climate, or multiple rooms.
---
# Native AI Engine
Overview of Haptique OS native AI, AI chat, scene creation, automation suggestions, and privacy.
Source: https://haptique.io/docs/ai-engine/overview
Slug: docs/ai-engine/overview
The Haptique OS native AI engine is built to make the home easier to control and configure. Instead of forcing every action through menus, AI chat lets users describe what they want and have Haptique OS translate that into device commands, scenes, or setup suggestions.
## Core ideas
- AI understands the configured home model: rooms, devices, scenes, favorites, media zones, and integrations.
- AI chat can control supported devices when permissions allow it.
- AI can help create scenes and automations from natural language.
- Sensitive or broad actions should ask for confirmation.
- Local processing is preferred wherever supported.
## Example commands
- "Turn off everything downstairs."
- "Create a movie night scene for the theater."
- "Dim the living room lights and switch the AVR to Apple TV."
- "Set the bedroom to evening mode."
- "Why is the lounge too bright?"
- "Make a morning scene with lights, climate, and music."
## Recommended pages
- [AI Setup Guide](/docs/advanced-os/ai-setup-guide)
- [AI Chat](/docs/ai-engine/ai-chat)
- [Controlling Devices with AI](/docs/ai-engine/controlling-devices-with-ai)
- [Creating Scenes with AI](/docs/ai-engine/creating-scenes-with-ai)
- [Automations and Suggestions](/docs/ai-engine/automations-and-suggestions)
- [Privacy and Local Processing](/docs/ai-engine/privacy-and-local-processing)
---
# Privacy and Local Processing
How Haptique OS approaches AI privacy, local processing, and user control.
Source: https://haptique.io/docs/ai-engine/privacy-and-local-processing
Slug: docs/ai-engine/privacy-and-local-processing
Haptique OS is local-first, and the AI experience should follow the same principle wherever supported.
## What local AI means
Local AI means the model or AI capability runs on hardware you control, or the control decision is executed by your local Haptique OS instance. This reduces dependency on cloud services and keeps routine home context closer to the home.
## What to document clearly
Every AI feature should be clear about:
- Whether it runs locally or uses an online service.
- What context is used, such as room names, device names, or scene data.
- Whether conversation history is stored.
- Whether actions require confirmation.
- How to disable AI features.
## User control
Users should be able to decide where AI is used. Recommended controls include enabling or disabling AI chat, limiting device access, requiring confirmations, and reviewing AI-created scenes before saving.
---
# AI Troubleshooting
Common AI chat and AI scene creation issues in Haptique OS.
Source: https://haptique.io/docs/ai-engine/troubleshooting
Slug: docs/ai-engine/troubleshooting
## AI does not understand a device
Check that the device has a clear name and is assigned to the correct room. Avoid duplicate names such as "Light" in multiple rooms without room context.
## AI suggests the wrong action
Cancel the action and rephrase with the room, device, and desired state. For example:
> "Set the theater lights to 20 percent, but do not change the projector."
## AI cannot create a scene
Check that the devices are online, controllable from the regular UI, and available to your user account.
## AI chat is unavailable
Check your license, AI feature settings, local runtime status, and whether the app is connected to the right Haptique OS instance.
---
# Changelog
Public release history for Haptique OS.
Source: https://haptique.io/docs/changelog
Slug: docs/changelog
This page summarizes public Haptique OS release changes. Use the [downloads page](/downloads) for current installers and the rest of these docs for setup guidance.
---
## Unreleased
The next tagged beta release will be inserted below this section.
---
## [1.2.0] - 2026-07-23
Haptique OS 1.2.0 Beta - Core Driver Updates, Package Alignment, and Runtime Diagnostics
### Added
- Runtime diagnostics and performance reporting for release and operational troubleshooting.
- Roku driver package support with the bundled driver manifest and update package.
- Release checklist hardening for shell package publishing verification.
### Changed
- Packages UI labels were simplified for consumers, and package cards now show the active installed version.
- Core driver update logic now follows the active package and release version state more reliably.
- macOS control surfaces now publish clearer invalidation events for runtime state changes.
### Fixed
- Core driver updates now resolve active packages, invalidate cached catalogs, and reload driver processes during live updates.
- Update checks now compare remote packages against the active or bundled version without false-positive install prompts.
- Driver update archives now accept supported partial package manifests.
- Release validation was hardened for HomeKit, Roku, macOS artifacts, and hosted build environments.
## [1.2.0-rc.5] - 2026-07-21
Haptique OS v1.2.0-rc.5
Haptique OS 1.2.0 RC5 Release Candidate.
### Added
- Settings now provides an explicit Port Change choice for network configuration.
- Core driver remote updates are supported through the release update flow.
### Changed
- Shell update handling was improved for more reliable package updates and clearer update state.
- The RC5 release train now runs its TypeScript release-gate tests on Node 22.
### Fixed
- Fixed UI bugs across Settings, update flows, and driver management screens.
## [1.2.0-rc.3] - 2026-07-12
Haptique OS Beta v1.2.0-rc.3
### Added
- Add support for Amazon Bedrock as an AI provider
- Add custom inference provider support and free coding models retrieval
- Enhance AI settings tests and update styles for improved layout handling
- Add new AI capabilities and enhancements
- Add sync-class truth and Music Bridge subordinate endpoint model
- Authoritative queue, session, and transfer engines
- Add shared provider execution truth contract and discovery health elevation
- Gate placeholder and incomplete source providers, tighten Local Library and Qobuz truth surfaces
- Add AI connection overlay and network settings form
- Add multi-provider registry with OpenAI and Custom provider support, fix build types
- Add release smoke tests, notification management, and readiness reporting
- Enhance shell package updates and UI improvements
### Changed
- Refactor code structure for improved readability and maintainability
- Prepare Haptique OS 1.2.0-rc.3
- AI scroll issue fix
- Bug fixes for AI setup
- Bug fixes in AI settings
- Add debugging support and fix test cases in AI settings flow
- Fix test cases for AI settings tabs: update error context and ensure visibility of provider catalog
- Add error context files for Playwright tests and new OpenCode configuration
- Fixed issue after rc2
- Refactor font sizes across various views to improve consistency and readability. Changed font size from 11px to 10px in multiple components including license, logical device details, matter automations, and settings. This update enhances the overall UI by standardizing text dimensions.
- Remove deprecated API endpoints and associated files from Haptique OS Mobile API
- Fix docker license public key bundling
- Disable auto Windows builds on Feature-development
### Fixed
- Filter built-in players and haptique-os logical device from mobile media surface
- Capture raw cloud API error body on registration failure
- Route IR library proxy to production cloud and add admin credential recovery
### Documentation
- Complete 04-03 queue/session/transfer authority plan
- Complete 04-02 provider execution truth plan
### Maintenance
- Harden RC3 release train runners
- Fix self-hosted release checkout and Docker startup
- Remove free coding models provider functionality and update related UI elements
- Add sync-class and Music Bridge subordinate endpoint regression tests
- Queue, session, and transfer authority regression tests
- Add cross-provider regression coverage for execution truth
- Add source-gating and failure-state regression coverage
- Remove obsolete GitHub workflows for server builds
- Revert unsupported mac workflow override
- Fix self-hosted non-Windows workflow parse
- Add self-hosted non-Windows release workflow
- Allow manual Windows release handoff
- Add self-hosted release train path
- Add fallback self-hosted Windows release workflow
- Add minimal local Windows release workflow
- Run Windows release workflow on self-hosted runners
- Allow unsigned Windows builds on Azure, add arm64 matrix
## [1.1.9] - 2026-06-25
Haptique OS Beta v1.1.9
### Added
- Add Haptique Music and HomeKit as AppShell packages
- Synchronize local playback session with server state and enhance stream handling
- Update package dependencies and add postinstall script for expo cleanup
- Add initial index route file for server
### Changed
- Refactor code structure for improved readability and maintainability; removed redundant code blocks and optimized function calls.
- Add initial UI layout for mobile application in ui8.xml
- Call promote script via bash directly
- Make promote script executable
- Fix Azure CLI install on macOS self-hosted runner
- Add self-hosted runner option to promote workflow
- Add missing HOS_METADATA_CLOUD_URL env var
- Fix void return in releaseAssetUrl helper
- Fix duplicate comingSoon property in download config
- Pin actions/checkout and setup-node to @v4 for older runner compat
- Refactor code structure for improved readability and maintainability
### Fixed
- Quote Windows cleanup fallback safely
- Harden Windows runner cleanup
### Documentation
- Capture phase context
- UI design contract
## [1.1.8] - 2026-06-20
Haptique OS Beta v1.1.8
### Added
- Enhance MediaRadioStation with providerKey, providerId, and bitrate fields
- Align cross-shell target semantics
- Add command owner validation helper
- Preserve Kitchen fallback UI coverage
- Bind dashboard modules to shell ownership
- Reuse target semantics in Mac-control music
- Add shell target semantics helper
- Add shell ownership registry
- Add packaged route smoke coverage
- Add packaged startup diagnostics
- Add dashboard module update lane
- Add Kitchen promotion workflow
- Add verified app update lane
- Gate runtime catalog overrides by activation
- Stage driver app activation records
- Formalize Haptique App package contract
- Define protected app update boundary
### Changed
- Add error context files for Playwright test failures in music storage page
- Fix packaged HomeKit startup runtime
- Add script to create Haptique OS social media assets
- Pilot Roku as bundled Haptique App
- Fix mobile media and room test drift
- [verified] gate packaged HomeKit runtime release artifacts
- Verify Haptique app artifact signatures
### Fixed
- Stabilize x64 packaged smoke
- Stabilize packaged smoke shutdown
- Align 1.1.8 certification tests
- Preserve embedded navigation links
- Validate root media command routes
- Enforce shell command validation at dispatch
- Address shell contract review findings
- Stabilize packaged runtime smoke
### Documentation
- Add operations guide
- Add security audit
- Complete phase tracking
- Add clean code review report
- Complete cross-shell verification plan
- Add cross-shell verification summary
- Document shell verification matrix
- Update plan progress metadata
- Complete command owner routing plan
- Complete dashboard module shell boundary plan
- Complete shared target semantics plan
- Complete shell ownership registry plan
- Add shell ownership registry summary
- Add shell boundary traceability guard
- Plan core app shell contract
- Complete packaged route smoke plan
- Complete startup diagnostics plan
- Add verification evidence
- Audit milestone slice
- Complete dashboard module update plan
- Record Wave 2 mobile root-gate debt
- Complete Driver Kitchen promotion plan
- Complete verified app update plan
- Record Wave 1 mobile root-gate debt
- Complete staged activation plan
- Complete protected core boundary plan
### Maintenance
- Bump server to 1.1.8
- Verify shell runtime interactions
- Add shell duplicate action regression
- Add failing cross-shell target semantics tests
- Add failing command owner validation tests
- Add dashboard fallback UI regression
- Add dashboard shell boundary regression
- Add failing Mac-control semantics coverage
- Add failing test for target semantics
- Add failing shell traceability guard
- Add failing test for shell ownership registry
- Complete UAT - 5 passed, 0 issues
- Add failing dashboard module UI tests
- Add failing Kitchen promotion tests
- Add failing app update lane tests
- Add failing runtime catalog activation gate
- Add failing staged activation tests
- Guard MOD traceability and protected domains
- Add failing Haptique App contract tests
- Add failing boundary policy tests
## [1.1.7] - 2026-06-18
Haptique OS Beta v1.1.7
### Added
- Add Community Code of Conduct and link in documentation
- Enhance mac control popover with debugging capabilities and improve AV flow handling
- Add new tools and workflows for Haptique OS integration
- Enhance AI settings UI with new styles and layout adjustments
- Unify server version resolution across components and update version to 1.1.6
- Add script to cleanup orphaned Node/Electron processes holding locks on haptique.db
- Add radio directory search and featured endpoints
- Enhance Home Media Handling and AI Integration
- Enhance HmusicSurface and HmusicTransport for responsive UI
### Changed
- Add circular backgrounds to projector source icons
- Replace Sony projector source icon
- Refactor icon handling and improve accessibility in mac-control-popover
- Add Sony projector Fleet integration
- Add error context for Playwright test failures related to navigation issues
- ATVworker state issue fixed
- Db bug fixed
- Remove invalid server surge dependency
- Fix Docker image license key bundling
- Align Docker docs with license-first flow
- Tighten license gating and persist runtime machine IDs
- Improve mobile music playback and transport layout
- Fix Docker one-click bootstrap runtime
- Add one-click self-hosted Docker bootstrap
- Finishing Tablet Hmusic transport
- Refine Haptique OS UI and integration flows
- Refactor code structure for improved readability and maintainability
- Preserve OTA artifact aliases for release updates
- Canonicalize music titles and refine home mobile layout
### Fixed
- Clear released runtime licenses from local state
- Centralize runtime license lifecycle through myhos client
- Require signed remote access entitlement
- Restrict license bypass to dev runtimes
- Remove master password auth fallback
- Remove runtime secret fallback bootstrap
- Use canonical OTA asset names
### Documentation
- Complete security remote auth phase execution
- Complete remove runtime auth, secret, and bypass fallbacks plan
- Update wiki api surfaces
### Maintenance
- Allow asset-only Windows release upload
- Invoke npm reliably during release certification
- Run release certification tests on Windows
- Certify Windows assets before release upload
- Support Windows upload-only release reruns
- Harden Windows release cleanup
- Tighten Windows self-hosted release reruns
- Omit unsupported Windows ARM64 optional BLE modules
- Use embeddable Python for Windows runner
- Bootstrap Windows ARM64 build tools
- Install Python in Windows self-hosted release
- Harden unsigned Windows self-hosted builds
- Allow unsigned Windows self-hosted release builds
- Route Windows release builds to self-hosted runner
- Disable gha cache for self-hosted docker bump
- Configure self-hosted registry auth without keychain
- Use docker desktop buildx on self-hosted bump
- Avoid docker desktop keychain on self-hosted bump
- Skip qemu on self-hosted docker bump
- Use workspace docker config for self-hosted build
- Isolate docker config on self-hosted runner
- Make docker owner normalization portable
- Allow docker bump on self-hosted runner
- Update .gitignore and .dockerignore to exclude database files and runtime states; remove obsolete database files
- Update network status handling to improve module compatibility and error handling
- Disable self-hosted release cache restore
- Allow release publish on self-hosted runner
- Fix 1.1.7 release certification expectations
- Prepare Haptique OS 1.1.7 release
## [1.1.6] - 2026-06-15
Haptique OS Beta v1.1.6
### Added
- Unify server version resolution across components and update version to 1.1.6
- Add script to cleanup orphaned Node/Electron processes holding locks on haptique.db
- Add radio directory search and featured endpoints
- Enhance Home Media Handling and AI Integration
- Enhance HmusicSurface and HmusicTransport for responsive UI
### Changed
- Remove invalid server surge dependency
- Fix Docker image license key bundling
- Align Docker docs with license-first flow
- Tighten license gating and persist runtime machine IDs
- Improve mobile music playback and transport layout
- Fix Docker one-click bootstrap runtime
- Add one-click self-hosted Docker bootstrap
- Finishing Tablet Hmusic transport
- Refine Haptique OS UI and integration flows
- Refactor code structure for improved readability and maintainability
- Preserve OTA artifact aliases for release updates
- Canonicalize music titles and refine home mobile layout
### Fixed
- Packaged integrations prefer unpacked resource manifests
- Clear released runtime licenses from local state
- Centralize runtime license lifecycle through myhos client
- Require signed remote access entitlement
- Restrict license bypass to dev runtimes
- Remove master password auth fallback
- Remove runtime secret fallback bootstrap
- Use canonical OTA asset names
### Documentation
- Complete security remote auth phase execution
- Complete remove runtime auth, secret, and bypass fallbacks plan
- Update wiki api surfaces
## [1.1.5] - 2026-06-11
Haptique OS Beta v1.1.5
### Added
- Add caching and metadata handling for Haptique Music
- Add Hmusic player components and functionality
- Implement global search functionality with caching and multiple providers
- Implement Sonos households retrieval and token refresh logic
- Update Sonos API URLs and add tests for authorization flow
- Add detailed execution plan for music engine playback ownership and provider truth
### Changed
- Add error context files for Playwright tests and implement route tests
- Add error context documentation for Playwright test failure and implement Volumio driver tests
- Polished Profile screen UI, scaled text for readability, fixed tablet AV activity launcher
### Fixed
- Preserve canonical assets and publish handoff
- Restore mac sqlite guard and docker context
## [1.1.4] - 2026-06-09
Haptique OS Beta v1.1.4
### Added
- Add resolve_and_play_music and music_diagnostics tools
- Add Haptique Music tools and functionality
- Add Anthem and Onkyo integrations
- Add certification process for local release artifacts
### Changed
- Exclude Docker build records from release assets
- Keep Docker overview update from blocking releases
- Make release train Windows signing optional
- Disable auto Windows builds on Feature-development
- Remove obsolete music and update screenshot assets
- Add error context files for Playwright test failures related to OS updates
- Fix OTA update bridge precedence for packaged builds
- Refine OTA release verification and upload scripts
- Refactor release artifact handling and enhance SQLite database recovery mechanisms
- Enhance release workflows and application screens
- Allow Docker workflow to build from a release ref
- Restore tag-driven release train
- Use canonical release artifact names
- Add media library home endpoint and related functionality; improve error handling in DSP operations
- Fix release workflow certification
- Fix release certification blockers
- Bump server release to 1.1.4
- Add Playwright tests for music player and screenshot functionality
- Fix HomeKit plugin catalog UI and compatibility
- Fix Windows compiler define syntax
- Fix Windows ARM64 native rebuild
- Add Windows ARM64 release target
- Fix mac linux Azure release publish
- Prepare unsigned Windows x64 release 1.1.3
- UI fixes
- Allow explicit unsigned Windows hosted builds
- Build Windows release assets on GitHub runners
- Music services fixed
- UI changes Server
- Install Windows release dependencies from workspace root
- Harden Windows local release script
- Bypass execution policy in Windows workflow shell
- Use Windows PowerShell for self-hosted release
- Add self-hosted Windows release workflow
### Fixed
- Harden sonos local stream playback
### Maintenance
- Remove outdated debug log files and unused assets
## [1.1.3] - 2026-06-06
Haptique OS Beta v1.1.3
### Changed
- Prepare unsigned Windows x64 release 1.1.3
- Allow explicit unsigned Windows hosted builds
- Build Windows release assets on GitHub runners
- Install Windows release dependencies from workspace root
- Harden Windows local release script
- Bypass execution policy in Windows workflow shell
- Use Windows PowerShell for self-hosted release
- Add self-hosted Windows release workflow
- UI fixes
- Harden Windows local release runner
- Normalize GitHub release asset names for Azure publish
- Release 1.1.2 local publish tooling
- Mobile UI fixes
- Basic chages to Hmusic UI
- Hmusic bsaic fixed and Frontend AV activity fixes
- Bug fixes on OS
- Enable independent Haptique music outputs
- Light theme fixed
### Maintenance
- Add direct Haptique Music browse-mode navigation and embedded player library section tests
- Add OTA release verification and Docker Hub overview sync
## [1.1.2] - 2026-06-06
Haptique OS Beta v1.1.2
### Changed
- Split Windows out of main release workflow
- Use hosted Windows runners for full release
- Set up Python for Windows release builds
- Avoid Bash workflow steps on Windows runner
- Bypass PowerShell policy on Windows release runner
- Use Windows PowerShell on self-hosted release runner
- Prefer direct Apple notarization credentials
- Use hosted Mac and Windows runner for full release
- Fix hosted release DMG signing
- Run x64 Windows release on self-hosted runner
- Allow x64 release workflow to build feature branch
- Load Windows signing certificate for self-hosted release
- Sign Windows portable release artifacts
- Fixes for releases
- Install Windows release dependencies from workspace root
- Harden Windows local release script
- Bypass execution policy in Windows workflow shell
- Use Windows PowerShell for self-hosted release
- Add self-hosted Windows release workflow
- UI fixes
- Harden Windows local release runner
- Normalize GitHub release asset names for Azure publish
- Release 1.1.2 local publish tooling
- Mobile UI fixes
- Basic chages to Hmusic UI
- Hmusic bsaic fixed and Frontend AV activity fixes
- Bug fixes on OS
- Enable independent Haptique music outputs
- Light theme fixed
### Maintenance
- Add direct Haptique Music browse-mode navigation and embedded player library section tests
- Add OTA release verification and Docker Hub overview sync
## [1.1.1] - 2026-06-03
Haptique OS Beta v1.1.1
### Changed
- Update rooms screens and related tests
- Fix HOS license pairing resume
- Simplify HOS license activation page
- Fix HOS license activation page behavior
- Add cloud pairing to locked license page
- Bump server release version to 1.1.1
- Publish Windows x64 test build to Azure Blob
- Fix compact player row actions
- Remove OS live design script from runtime shell
- Refine OS updater status UI
- Flatten existing artifacts before release publish
- Add release publish from existing artifacts workflow
- Refine mobile media and discovery flows
### Documentation
- Add Icon Copy Restraint Rule for minimal icon-adjacent text
- Preserve RS90 Apple TV Companion session-start fix and narrow protocol usage
### Maintenance
- Add Haptique Music volume control and live status precedence tests
- Add AV Flow power control and multi-flow mode tests
## [1.1.0] - 2026-06-01
Haptique OS Beta v1.1.0
### Changed
- Disable npm cache on self-hosted macOS release build
- Fix OS license claim release build
- Bump server release version to 1.1.0
- Refine mobile media and discovery flows
- Point HOS licensing to myHOS API
## [1.0.13] - 2026-06-01
Haptique OS Beta v1.0.13
### Changed
- Guard release tag version before builds
- Bump server release version to 1.0.12
### Fixed
- Ship browser server OTA release path
### Maintenance
- Remove update URL assertions from OS updates settings spec
- Add comprehensive layout and image prefetch tests for Haptique Music tablet view
## [1.0.12] - 2026-05-31
Haptique OS Beta v1.0.12
### Added
- Use self-hosted runner for macOS ARM64 builds to save costs
### Changed
- Document Azure metadata cloud for beta
## [1.0.11] - 2026-05-31
Haptique OS Beta v1.0.11
### Added
- Add keyboard navigation and accessibility to color controls
- Refactor media controls and add state streaming
### Changed
- Bump version to 1.0.11 for OTA release
- Fix AV Activity flow creation
- Improve Macbar music player controls
- Fix AirPlay handoff local playback ownership
- Fix completed AirPlay stream health
- Clarify AirPlay pairing controls
- Fix AirPlay transport timeline
- Fix direct AirPlay output routing
- Harden music playback routing
- Fix haptique music airplay pairing
- Remove .kilo directory and agent workspaces
- Enhance music refresh UI and update test fixtures
- Remove GSD agent definitions and update code review workflow
- Add OTA installer progress UX
- Add browser OTA update fallback and packaged runtime protocol
### Fixed
- Checkout tag instead of main branch to ensure correct version
- Resolve remote page UI alignment bugs and pending flows
- Report AirPlay startup stream exits
- Mobile auth controller transport and discovery improvements
- Light theme UI fixes for music output selector and OS sidebar
- Wire music endpoint update route
- Enable discovered AirPlay music outputs
### Documentation
- Add hover states and flow builder support
- Finalize verified phase plan
- Create phase plan
- Map implementation patterns
- Record phase 1 UI-SPEC approval
- Approve UI design contract
- UI design contract
- Research packaged runtime smoke gate
- Record phase 1 context session
- Capture phase context
- Create roadmap (7 phases)
- Define v1 requirements
- Complete project research
- Initialize project
- Map existing codebase
### Maintenance
- Clean server release directory before builds across all platforms
- Add retry logic for macOS notarization with 3 attempts and 30s delay
- Add project config
- Complete impeccable UI generation sessions and update agent rules
- Update impeccable server config and enhance music player routing with AirPlay pairing
- Add music services e2e controls spec, update AGENTS.md and deps
- Split HMusic AirPlay worker
## [1.0.10] - 2026-05-28
Haptique OS Beta v1.0.10
### Added
- Replace browser history navigation with sequential page navigator in web topbar
- Add scroll position persistence across media tabs and forward navigation button
- Redesign multiroom music players page with hero card, dashboard layout, and enhanced player cards
- Remove action map integration from interface lab
- Remove action maps UI from driver integration details page
- Add auto-open player navigation, unified roster/candidates merge, and manage sheet improvements
- Add opening device control, home recommendations, and enhanced light/device resolution
- Add single playback instance guardrail and type safety
- Add MusicBrainz enrichment, remote cloud fallback, and parallel processing
- Add remote relay support, light UI improvements, and library filtering
- Add accessibility, light device submenus, and local playback support
- Add online claim code activation and Linux machine ID support
- Add system prompt, noise filtering, and terminal env hardening
- Public-facing developer portal for external driver authors
- Public-facing developer portal — getting started, driver lifecycle, architecture, domain ref, entity types, troubleshooting, driver manifest, updated nav/sidebar, Azure SWA config
- Add driver_builder_repackage_package tool for revising existing Driver Builder artifacts
- Add MCP Migration Architecture Design documentation
- Add shell navigation transitions
- Implement UPnP/DLNA player provider and discovery
- Enhance device management and testing infrastructure
- Add OS launch QA report and remediation plan
- Update TypeScript configuration and extend from Expo base config
- Add StormAudio integration with TCP/IP control
- Add StormAudio driver with comprehensive snapshot management and command catalog
- Implement refresh logic for Bravia TV apps and add unit tests for adapter functionality
- Enhance Bravia TV integration with app management and control features
- Enhance profile and scenes screens with safe area insets and improved styles
- Enhance tab sanitization to ensure unique IDs and update memory logs with new scene run entries
- Add Sonos player provider implementation
- Implement final design enhancements for RoomieRoomsHomeScreen
- Enhance compact display for systems grid with improved button styles and layout
- Enhance device filtering logic and add scene run entries to logs
- Add user prompts and tool calls for YouTube on Apple TV integration
- Port Feature-development OS voice updates
- Add OS voice and TV app updates
- Implement Apple TV voice stream pilot feature with device gating and environment configuration
- Add Generic IR driver support and related functionality
- Enhance HVAC control with cooling and heating threshold temperatures, add media shuffle and repeat functionality
- Enhance Sonos artwork proxy handling and prioritize targets in artwork retrieval
- Add AI model path configuration and enhance Samsung TV client connection handling
- Enhance Samsung TV discovery and client functionality
- Implement Samsung TV discovery and pairing support
- Enhance HVAC support for MirAIe devices in HomeKit integration
- Add VolumeSlider component for media control and integrate AI features into mobile app
- Update AI model references and add Gemma 4B model support
- Add LLaMA integration and AI module management
- Implement AI service management and module downloading functionality & Updated Readme
- Add SafeLinearGradient component for fallback handling of expo-linear-gradient
- Expand API spec to cover fleet bridge and full OS API surface
- Add interactive API tester powered by Scalar
- Add dev setup wiki page (WIKI-06)
- Write mobile app wiki page (WIKI-04)
- Add API reference wiki page (WIKI-05)
- Write server internals wiki page (WIKI-03)
- Add HOS overview page with driver ecosystem and control flow
- Add monorepo map page and configure ignoreDeadLinks
- Scaffold VitePress wiki site at /wiki/
- Create driver-lifecycle.md with all 5 lifecycle phases
- Create troubleshooting.md for common driver errors
- Create architecture.md with ASCII system diagram
- Create entity-type-reference.md with all type schemas
- Create getting-started.md for HOS Driver SDK
- Create domain-reference.md with all 5 domains
- Enhance Apple TV integration and designer features
- Enhance device pairing logic and add app icon resolution for Apple TV
- Add simulated device sample driver
- Implement HosDriver class with WebSocket client, reconnect, and typed message builders
- Scaffold /sdk/ workspace with package.json, tsconfig, types, and barrel export
- Add HOS Fleet device list and detail pages with integration-detail-layout
- Add HOS command dispatch method and route
- Add HOSCategory export and POST /device/hos/category route
- Wire HOS device routes in app router
- Create HOS device controller with store and addedDevices
- Create helpers/control/hos/ with hosControls router and 10 entity files
- Register HOS as device source in constant.ts and category-allow.ts
- Add system check script and Playwright E2E tests
- Fix homebridge stability bugs and add auto-restart
- Stage all in-progress work for cross-machine build compatibility
- Harmonyactivity entity domain + dedicated activity widget on logical device page
- Harmony hub always active, Power Off activity, now-playing support
- Editable domain chips on list page
- Render online/offline status block on Harmony device detail page
- Pass harmonyConnectionStatus from controller to template
- Restore premium Media UI with compact Apple Music card and side drawer management
- Integrate fleet credentials with fallback and legacy aliases
- Add fleet release manager groundwork
- Patch renderPagesTree with live nav tree fallback and wire generateFromSetup
- Add getNavTree API endpoint to designer controller and route
- DynamicRenderer hidden node filter + SpaceDevices widget
- Restructure designer left panel into Pages/Tools dual-tab layout
- Mobile socket.io-client hook + Socket.IO listeners in TabConfigContext and useDesignFetch
- Server Socket.IO designer channel + emit on publish
- Visibility toggles and hidden preview state (DES-02, DES-05)
- Add publish toast notification (DES-04)
- Auto-populate on open and draft choice dialog
- Add Homey Pro integration with discovery sync and control
- Add IP audio drivers and StreamMagic integration
- Add anthem and bluesound integrations with dirac controls
- Improve logical-device UX and add integration device info
- Add global button click feedback and update desktop download README
- Improve sensor mapping flow and canvas publish reliability
- Complete phase 2 sensor trigger conditions
- Add sensor widget with live mapper and preview support
- Upgrade media player card mapping and source start flow
- Implement System Awareness v1 backend layer
- Add strict v1 websocket typed command protocol
- Refine logical device table and stabilize programs drawer interactions
- Ship UI lab canvas sharing, zones, and integration UX updates
- Standardize logical light controls and driver UX
- Add discovery, metadata-rich integration, and core adapter wiring
- Checkpoint UI, protocol, and integration manager updates
- Add entity model APIs and integration-first logical device workspaces
- Add projects, wizard, and responsive OS UI
### Changed
- Modify npm install command to ignore scripts
- Restore music transport waveform and controls
- Use Linux source packaging for branch Windows build
- Fix branch Windows workflow checkout on Windows
- Add branch-scoped Windows server build workflow
- Add lightweight HOS EJS shell navigation
- Fix React music services UI wiring
- Split large code files - Mobile
- Fix routine API endpoints and add monthly trigger support with improved parameter validation
- Add Gemini CLI inference provider and OS Builder destructive action confirmation gates
- Add Gemini inference provider and OS Builder Chat preview-only mode with approval gates
- Remove sensors navigation links and duplicate sensor routes, add save icons to buttons
- Redesign fleet releases page with compact table layout and bulk submission
- Add macOS menu bar dashboard panel with music player controls and device management
- Fix admin device list user display and pagination, add profile link in header
- Wiim integration add (cherry-picked from RatanDG/cantata)
- Add macOS menu bar helper app and enhance Mac controls with audio quality display
- Render markdown in AI driver builder chat
- Complete music services phase 7 control surface
- Enhance Mac control popover device controls
- Add opt-in Mac control popover
- Improve music service group transfer handling
- Add controlled web sources to AI driver builder
- Update Music Services Phase 6 execution plan with v2 authoritative reads and queue playlist features
- Add queue shuffle/repeat controls and save queue as playlist feature
- Clarify AI Driver Builder MCP architecture and add parentArtifactId to repackage tool
- Add AI chat MCP development mode
- Enhance RoomDashboard styling with environment indicators and add humidity display
- Add floor and location fields to RoomTile, RoomDashboard, and space management components, sensor display on RoomScreen
- Refactor code structure for improved readability and maintainability - Rooms list improved.
- Update HOS branding across server assets and views
- Add comprehensive guide for Haptique OS Music Services usage
- Generate iOS project in TestFlight workflow
- Add mobile TestFlight upload workflow
- Add Roon-class replacement research document for Haptique OS Music Services
- Add manual x64 server DMG publisher
- Use macos-14 for x64 release DMG
- Find release DMG artifacts recursively
- Publish server DMGs without desktop zip jobs
- Use legacy peer deps in release installs
- Split release builds by architecture
- Harden license public key prep paths
- Track server license public key source
- Make license key prep path explicit
- Limit tagged releases to macOS assets
- Prepare 1.0.6 release with bundled licensing
- Add manual server DMG publish workflow
- Publish server notarized DMGs in releases
- Track server macOS signing assets
- Fix notarized build signing identity
- Fix macOS notarized server workflow install
- Tizen power power fixed
- Samsung Tizen is now solid.
- Add new logo and home icon images for iOS simulator
- Refactor code structure for improved readability and maintainability
- Fleet Release device list and status change api
- Remote. Response chnages and Mobile Device list changes
- Generic IR token fixed
- Refactor HVAC Control Screen and HomeKit Bridge Service
- Update AI provider configuration and enhance Sonos adapter tests
- Add OpenRouter provider configuration for AI integration
- Improve rooms home favorites panel wiring and coverage
- Refactor HaptiqueContext and related components for improved performance and readability
- Fixed_broken frontend loading
- Home page issues solved
- Apple TV fixed
- Fleet sorted
- Zones and Actions out
- Phone home layout fixed
- Tablet home page solid work
- Enhance home scene tap animations
- Fix home favorite device persistence
- Refine mobile home dashboard favorites
- Major UI change on the Mobile App
- App development phase 2
- UI alignment and loading solved
- Matter Bridge added
- Bump version, add CHANGELOG, HOS fleet UI + Android TV driver
- Fleet submit improved
- HOS device category
- API response(fleet) fixed
- Fix infinite render loop in RoomsDataContext
- Redesign light controls, room dashboard, and media player UX
- Restructure into monorepo with apps/server, apps/mobile, packages/shared
- Save current workspace changes
- Add GitHub Actions workflow for quality and security checks
- Restore browser dashboard opening and fix driver integration view
- Add spaces room dashboards across OS API and UI
- Tighten mobile media-player target filtering
- Refine Canvas media player card
- Fix Sonos seek command resolution
- Tighten media service logical device filtering
- UI Lab: enable free section move/resize with persistent canvas layout
- Fix light-theme rendering and restore H logo assets
- Refactor interface lab into partials and fix light view contrast
- Add remote custom-ui APIs and fix light-group filtering
- Harden driver websocket session lifecycle
- Add x64 Ubuntu AppImage artifact
- Stabilize mac menubar beta app and update docs
- Refine Programmer UI history timeline with compact snapshots
- Fix remote pairing PIN flow and ownership checks
- Add legacy app API compatibility and enforce strict JWT auth
- New OS driver features, fix for current Admin
- Add driver upload flow, integrations, and Docker/dev docs
- Self-hosted mode + docker setup + update check-only
- Live
- Rf device add and add in extender
- Message add
- Clone sequence
- Home Assistant add multiple integration
- Sequence command delete
- Sequence sorting api
- Changes
- Mqtt config add
- Backup
- Trinnov device add
- Ir library key suggestion make unique
- Sequence name make unique
- Clear invalid fcm tokens, and module wise notification send; web publish button fix and status show
- Ir extender device details api and message add
- Ir extender list add in remote api, make ir library public private
- Ir extender list add in remote api
- Ir extender remove from device
- Admin fire base notification
- Ir extender add sequence details
- Ir extender device add and room add in extender
- Mute unmute keymapping fix
- Env modify
- Import changes with shorthand
- Env common make
- Icon folders change
- Icons changes
- Ac key mapping revise
- Ac key mapping complete
- Live move
- Key mapping change
- Ac command grouping
- Android tv add brand based commands value, irlibrary add ac device data
- Ir library api count add
- Custom url change
- Version issue fix
- Set live
- New bluetooth device add
- Remote software update
- Key mapping "_" remove refactor
- Apple-tv device add
- User ir library module
- Merge for live
- Message backup
- New icon add and web pages
- Web hook cb screen re design
- Move to live
- Homey integration add
- Yamaha integration and device edit add
- Ir extender allow for all users
- Live merge
- Ir extender device add and key mapping
- Live upload
- Fire tv remove
- Android tv command refactor
- Custom url remove reset room and quick buttons
- Android tv add command
- Devices add in default room
- Changes backup
- Home assistant add automation device; ad room images
- Dummy remote connect for store demo
- Ios update, room default background image list add
- Ios update
- Remote name rename
- Multiple remote support
- Remote config api
- Sequence add command execution delay
- Portuguese language add
- Custom urls icons list apis; add update custom urls
- Reset remote; sequence name update; mobile dashboard : app update popup info
- App live
- Socket fix
- Project live
- Media box category add and key mapping
- Phone remove merge
- Fixing and new predefine sequence add
- Keymapping details add in sequence details api
- Sequence create collect remote key mapping and update; source and device icon add in category
- Predefine activities list and details; ac expand key make
- Ac timer key mapping
- Fan keys add
- Key changes
- Integration and device source name change
- If key mapping add DVD, projector, avr, lamp
- Ir data socket changes; denon device add give already exist
- Denon device direct add without integration
- Denon integration list; device details update with access details; delete singe integration device
- Refactor partial complete
- Device add refactor on process
- Ir device add api with refactor
- Social login fix
- Ir chines data logic scrap
- Ir kookong integration start
- Log add
- Key mapping update api
- Predefined activities steps object prepared
- Remote and sonos key change
- Remote - config integration filter
- Sonos - added devices ids, sonos integration details update api
- Sonos add devices
- Sonos create web hook and generate token
- Philips integration create
- Avr ir data add
- Remote api add integration key details
- Integration details add in remote api
- Philips list api added devices; integration delete remove all devices refactor
- Phillips device add and integration merge with old integration
- Add phillips integration and remove
- Remote key add
- Room and sequence icons add
- Home assistant device merge at add time
- Widget list api add selected widget
- Tasmota switch and light multiple add
- Facebook login fix
- Facebook login email optional
- Remote category add; nodemon change
- Demo app merge
- App account delete api
- Volume and chanel key swipe
- Move in live
- HA media player add
- Other devices add and changes
- Denon third party device add
- New ir device add
- Change
- Custom device key change
- Implement ir db custom device
- Spotify fix
- Server restart fix;facebook login account delete; and success lending html
- Sonos add; other icons add
- Remove button type and position from control
- Home asst key changes
- Home asst complete
- Backup before home asst restore
- Remote response add key source; integration get api; spotify refresh token api;
- Spotify auth integration on progress
- Spotify integration start
- Demo app create api connect remote
- Third party device key mapping
- Admin app upload add validation check
- Admin app upload add validation
- Admin app upload fixing
- Admin app upload change
- Changes make live
- App & remote api add dynamic app update config
- Admin add app update setting develop; remote api add app update; set opacity in room api
- App update data inc config api
- Particular room details reset api
- Changes live
- Config change
- Add en and fr messages
- Language translate add in api and socket
- Update auth.ts for local field issue
- Language message method implement
- Add local option in auth module
- Reset all device api send otp and opt verification
- Reset all device api
- Reset room api
- Projector key map change
- Power key grouping for all categories
- Commands filter unused commands
- Ir change with live data; add device light color grouping add; filter commands
- Ir change with live data
- Remote details add favourite controls
- Bin controls comment
- Device favourite channel list set and get
- Third party device source wise listing
- Third party device add update method
- Ir command grouping; ac create separate temperature
- Remote add profile details api
- Key map add data
- Data ser refactor
- Ir device control data set prepared; set key map
- Remote disconnect api and remote disconnect socket remove
- Socket device ir data test socket
- Room list ordering
- Icon compress added
- Icons add compress; remote details add device config; integration add validation
- Icons add
- Icons folder refactoring
- Third party changes
- _id refactor with id; socket multiple remote connect disabled
- Seeder make
- Device name edit api
- App room details api add quick button details
- Remote room list with in details
- Ir category language translate fixing; socket connect remote add access token
- Device category and model list add google translate
- Third party integration set & get api; sequence get command list & command device list
- Env and validate env update
- Dashboard add room count
- Remove device clear from sequence and room
- Existing ir device ir data copy module
- Room change action name and icon option add; room action icon list add;
- S3 bucket connection validation; room details changes
- Icon add
- Room details; third party device icon list; third party device add;
- Room add layout type
- S3 store image
- Room set details api; room set actions api; room list api; room details api;
- Ir device find and get existing control with update keys
- Ir device find and get existing control
- Air-conditioning IR data command generate,using loop
- Sequence device list api; sequence device details api; sequence icon list api;
- Icon remove
- Admin dashboard add room count
- Dashboard device count chart
- Admin device status filter
- Admin data able search highlight
- Admin data table add no record found
- Connected remote list api;
- Remote list; device list; image preview
- User details; user device list; disconnect remote;
- Admin logout
- Admin middleware; dashboard add count
- Setup flash message
- Users datatable pagination and apply filters; login page design
- Admin sb-admin setup; dashboard & user data table design
- Admin material ui backup
- Device control command array to string convert
- Ir data add on/off ir data dynamic; pair device add model id;
- Ir data add on/off ir data dynamic
- Dashboard add device count, ir devise test data api, ir device generate controls
- Dashboard add device count
- Add ir device, device list
- Device category, brand, model, api
- Dashboard remote list add
- Remote disconnect socket api for remote & app
- Dashboard connected remote list add on progress
- Models add row data formatter, created data cleaner
- Encrypt decrypt helper, country details update api, phone number update api, profile details update api, socket remote pairing update
- Profile set locality api
- Integration make hub auth details store
- Home Assistant auth token end point
- Device remove
- Sequence delete then remove froom room
- Remote room list
- Device details
- Macro layout add edit details delete list
- Sequence add, edit, details, list; add sequence icon list
- Add device; device list
- Ir data icon add
- Remote connect socket complete
- Config api
- Dashboard
- Login with google
- Register, login, logout api
- Basic app setup and helpers create
- Init
### Fixed
- Run OTA publish script via bash
- Use supported macOS Intel runner
- Avoid MSYS path conversion for MSVC define
- Require serialport for release builds
- Stage Windows release artifacts
- Stabilize release artifact workflow
- Add @scalar/api-reference dep, wiki tsconfig, Node 22, checkout@v4
- Remove invalid-path zip from git, add libudev-dev to Linux CI, fix Swift concurrency capture
- Add wiki-scoped tsconfig to prevent expo/tsconfig.base resolution error in VitePress build
- Remove runtime npm install - esbuild bundles all deps into index.js
- Set Docker build context to repo root for monorepo workspace resolution
- Use monorepo root context to resolve @haptique/shared workspace dep
- Clarify Node.js only needed for TS/JS SDK, point Python users to Driver Manifest
- Consolidate Node.js prereq to top of getting-started
- Remove all dead links to removed contributor pages
- Remove Contributor Docs from nav and sidebar
- Remove all internal repo structure references from public pages
- Resolve merge conflict markers in wiki docs
- Restore Apple TV AV contrast and ON-state highlight
- Harden homebridge runtime recovery
- Use listTypedCommands() instead of LogicalDevice.commands — property does not exist on type
- Device.store() fetches OS commands and populates HOS controls
- Revise plans based on checker feedback
- Suppress MaxListenersExceededWarning on HomeKitBridgeService
- Correct isIntegrated for Apple TV & Hue; suppress IR proxy forward logs
- Fix Harmony state never reaching Home app; surface dispatch errors
- Scope activity dropdown to Harmony activities only; hide App/Content for smarthubs
- Move online/offline status into Device Info block, remove extra bar
- Revise 02-02-PLAN based on checker feedback
- Fix tab bar scroll, add-tab creates linked screen
- Compact section render and improve mobile viewport handling
- Refresh favicon assets and stabilize sidebar toggle
### Documentation
- Add Haptique Music API navigation links and reference section
- Mark reachability detection task as in-progress
- Add OS list layout standard, platform-specific UI rules, and integration default guidance
- Add Kitchen submission MVP and automation phases with completion status
- Streamline UI verification rules and remove redundant guidance sections
- Add program YAML scripts guide
- Expand guardrails with UI verification requirements, music playback rules, and HomeKit plugin branding
- Complete API reference and dev setup wiki pages plan
- Complete server internals and mobile app wiki pages
- Complete VitePress wiki scaffold, monorepo map, and HOS overview plan
- Research repo developer wiki phase
- Evolve PROJECT.md after phase completion
- Complete phase execution
- Complete core developer docs plan 1 - getting-started, architecture, driver-lifecycle
- Complete reference documentation plan
- Create phase plan
- Capture phase context
- Complete sdk-scaffold-helper-library plan - HosDriver with typed WebSocket client and protocol types
- Add validation strategy and phase plans
- Research phase domain
- Create roadmap and state
- Define requirements
- Initialize project
- Map existing codebase
- Build core driver for BlueOS integration to control BlueOS wireless speakers and also NAD AVR in the OS
- Complete Bluesound and NAD AVR driver test coverage plan
- Plan BlueOS and NAD AVR driver test coverage
- Complete HOS Fleet UI plan automated tasks, checkpoint reached
- Complete HOS command dispatch plan — checkpoint reached
- Complete HOS controls fix and category route plan
- Fix spacing contract — lg to 24px, freeze legacy 18px and non-4x tap targets
- Fix UI-SPEC checker blocks — typography weights, font sizes, spacing lg token
- UI design contract
- Add validation strategy
- Research HOS Fleet Manager UI Polish
- Complete HOS device controller and routes plan
- Complete HOS source registration and control scaffold plan
- Record phase 5 context session
- Capture phase context for HOS fleet integration
- Complete fix-homebridge-stability-and-add-system-check plan
- Add online/offline status info block for Logitech Harmony in Logical Device UI
- Complete Harmony online/offline status block plan
- First-run onboarding; root npm start and Turbo packageManager
- Add root README and standardize app documentation
- Complete designer UAT gap closure plan 02-03
- Create gap closure plan 02-03
- Complete mobile-integration socket push plan
- Complete designer Pages/Tools panel and MDI icon preview plan
- Record phase 2 context session
- Complete visibility toggles and hidden preview state plan
- Add execution summary for tab bar scroll fix
- Build intel Mac build
- Complete intel mac dmg build plan
- Complete auto-populate, draft dialog, publish toast plan
- Record phase 1 context session
- Create roadmap (3 phases)
- Define v1 requirements
- Add v1.0.4 release write-up
- Add linux arm64 appimage download link
- Publish v1 driver handoff and updated smoke client
- Add Ubuntu x64 AppImage quickstart for testers
- Expand docker usage
### Maintenance
- Add macOS Intel (x64) and Windows arm64 build jobs to release workflow
- Bump version to 1.0.10
- Consolidate release — single workflow only, disable duplicate platform builds
- Bump version to 1.0.9
- Trigger Azure SWA wiki deployment
- Add pre-build step for VitePress wiki before Azure deployment
- Allow manual wiki deployment runs
- Rerun wiki deployment after checkout fix
- Bump version to 1.0.8
- Bump version to 1.0.7, configure OTA, fix Windows build trigger
- Trigger wiki deployment
- Add tag-triggered Linux x64 AppImage+deb release build
- Add Linux builds, OTA publishing to Azure, and Docker Hub registry support
- Add tag-triggered Windows x64 EXE release build
- Push image to both GHCR and Docker Hub on tag/dispatch
- Add docker-compose.yml for beta testers
- Revert docker image target to personal ccs777 GHCR
- Push Docker image to Cantata Communication Solutions org GHCR
- Trigger Docker build+push to GHCR on tag push with semver tags
- Add Windows x64 build job to tag-triggered release workflows
- Add generate-license workflow for on-demand .lic file generation
- Add arm64 DMG individual publish workflow for testing
- Add Windows x64 EXE publish workflow
- Fix release-builds x64 to checkout main and use tag name as version
- Fix release-builds arm64 to checkout main and use tag name as version
- Fix release builds to checkout main and use tag name as version
- Remove npm cache logs and add smarthome device import selection UI
- Remove npm cache artifact for jest-message-util package metadata
- Move contributor docs to docs/internal/, remove from public wiki
- Add Azure Static Web Apps workflow file on-behalf-of: @Azure opensource@microsoft.com
- Improve layout and styling of device header and quick command panels
- Redesign program builder selection UI with enhanced visual hierarchy and illustrations
- Replace hardcoded color values with palette tokens in driver integration and logical device views
- Replace hardcoded color values with palette tokens across mobile and server views
- Update package.json with Tailwind CSS and dependencies
- Add mac signed build workflows and server docker build workflow
- Rename RoomieRoomsHomeScreen to RemoteUI and update navigation
- Optimize media fetching and reduce re-renders in HaptiqueProvider and RoomsDataProvider
- Persist human verification items as UAT
- Fix plan file naming convention (PLAN-01 → 01-PLAN)
- Add project config
- Wipe GSD planning directory — starting fresh
- Remove scrapped Phase 4 mobile redesign, renumber phases
- Add NAD AVR adapter unit tests
- Add Bluesound adapter unit tests
- Add Wave 0 test stub for HOS command dispatch
- Add Wave 0 HOS category and controls test stubs
- Add failing stability tests for homebridge service
- Set ios bundle id to com.hos.frontend
- Complete UAT - 7 passed, 0 issues
- Publish stable latest asset names and bump to 1.0.4
- Allow partial linux publish and bump to 1.0.3
- Harden CI runners and bump to 1.0.2
- Add tag-based build+publish workflow and bump to 1.0.1
- Refresh desktop artifacts and compact dashboard settings
- Checkpoint after docker shareable build
- Track dist runtime output for release
- Skip dmg notarization hook when no dmg artifact is produced
- Add AppImage packaging config and libfuse compatibility check
- Remove local artifacts
- Sync current state
## [1.0.5] - 2026-03-26
### Added
- **HOS Fleet Manager UI** (Phase 06): full web UI for managing HOS device fleet
- **Android TV driver**: ADB-based control of Android TV and Google TV devices
- **Integration Release UI overhaul**: redesigned driver-integration releases page
- **Driver test coverage**: 93 unit tests across Bluesound (BluOS) and NAD AVR adapters
- **Fleet bridge auto-expose**: automatic device exposure through fleet bridge
- **Mock device manager**: `mock-device-manager.ts` for test isolation
### Fixed
- `LogicalDevice.listTypedCommands()` called correctly
- Fleet submit flow improvements
### Drivers
- Bluesound (BluOS): HTTP API, port 11000, full command/state support
- NAD AVR / Anthem AVR: TCP, port 23, Dirac Live commands
- Android TV: ADB over TCP, full media + power control
---
## [1.0.4] - 2026-03-18
### Added
- HOS backend dynamic device support (Phase 05)
- HOS source registration and control scaffold
- HOS device controller with store and addedDevices routes
- Designer web UI: hidden node support, draft/publish model
- Mobile integration: socket push, dynamic renderer, pages tab navigation
### Fixed
- Intel Mac x64 build pipeline and notarization script
- Homebridge stability bugs; system check script with Playwright E2E
---
## [1.0.3] and earlier
Older public notes may be folded into this page over time. Use the current docs and official download channel for active setup guidance.
---
# Desktop First Launch
What to expect when opening Haptique OS for the first time on desktop.
Source: https://haptique.io/docs/desktop/first-launch
Slug: docs/desktop/first-launch
The first launch flow prepares your local Haptique OS instance.
Open Haptique OS from the installed app or package, not from a development terminal. The release path should work after a normal system restart.
## Typical first launch steps
1. Open the Haptique OS app.
2. Confirm the local service starts.
3. Open the dashboard.
4. Create or sign in with your Haptique account.
5. Activate your license.
6. Name your home.
7. Configure network and discovery settings.
8. Add your first room.
9. Add your first device or integration.
10. Sign in to mobile apps and pair RS90 remotes.
## What to keep nearby
- License claim code or license file.
- Wi-Fi and local network details.
- Device IP addresses where needed.
- HomeKit pairing plan, if using Apple Home.
- Mobile phone or tablet for app sign-in testing.
## Before calling setup complete
- Quit and reopen Haptique OS once.
- Restart the host if this is a permanent controller.
- Confirm the dashboard still opens.
- Confirm license status is still active.
- Confirm one mobile device can reach the controller.
---
# Desktop Licensing and Activation
Activate Haptique OS from the desktop app or dashboard.
Source: https://haptique.io/docs/desktop/licensing-and-activation
Slug: docs/desktop/licensing-and-activation
Haptique OS uses a machine-bound license for the local controller. Activation connects your installed instance with your Haptique license.
## Activation methods
- Online activation with a claim code or myHOS email-link sign-in.
- Offline activation with a license file when supported.
## Recommended path
1. Open Haptique OS on the desktop.
2. Open Dashboard from the app or menu bar.
3. Go to License settings.
4. Use the myHOS email-link sign-in flow or enter your claim code.
5. Confirm the license status changes to active.
## Offline activation
If offline activation is supported for your license:
1. Generate the hardware identity from Haptique OS.
2. Use the license portal on a device with internet access.
3. Download the license file.
4. Upload the license file in Haptique OS.
5. Confirm the license status is active.
See [Activation](/docs/licensing/activation) for more details.
---
# Mac Menu Bar App
What the Haptique OS Mac menu bar companion does and how consumers use it.
Source: https://haptique.io/docs/desktop/mac-menu-bar-app
Slug: docs/desktop/mac-menu-bar-app
The Mac menu bar app is the lightweight companion that comes with the macOS version of Haptique OS. It gives quick access to local runtime status without opening the full dashboard.
## What it should show
- Haptique OS running status.
- Local dashboard URL.
- License or activation state.
- Network status.
- Quick access to logs or diagnostics.
- Start, stop, or restart controls when supported.
- Open Dashboard action.
## Why it matters
For consumers and installers, the menu bar app makes the local controller feel understandable. You can quickly confirm whether Haptique OS is running, open the UI, and verify the local runtime before users sign in from the mobile apps.
## First launch
After installing the macOS app:
1. Open Haptique OS.
2. Confirm the menu bar icon appears.
3. Open the menu and choose Dashboard.
4. Complete licensing and first setup.
5. Keep the Mac awake or configured for always-on control.
## Troubleshooting
If the menu bar icon is missing, reopen the macOS app and check login item permissions. If the dashboard does not open, confirm the local service is running and that no firewall rule is blocking local access.
---
# macOS App
How the Haptique OS macOS app fits into the local home controller experience.
Source: https://haptique.io/docs/desktop/macos-app
Slug: docs/desktop/macos-app
The macOS version of Haptique OS is designed for users who want to run the home controller on a Mac. It includes the main Haptique OS runtime and a Mac menu bar companion for quick access.
## What the macOS app does
- Runs the local Haptique OS controller.
- Opens the Haptique dashboard.
- Helps manage first launch, licensing, and setup.
- Provides local access to rooms, devices, scenes, integrations, and AI features.
- Ships with a menu bar companion for status and quick actions.
## Best fit
The macOS app is a good fit for homes using a Mac mini, iMac, Mac Studio, or other supported Mac as the always-on local controller.
## Before installing
Confirm:
- The Mac can stay powered on when home control is needed.
- The Mac is connected to the same network as the devices you want to control.
- The user account has permission to run the app and local services.
- Sleep settings will not interrupt the controller.
Continue with [Installation](/docs/getting-started/installation).
---
# System Requirements
Recommended hardware and network requirements for Haptique OS.
Source: https://haptique.io/docs/desktop/system-requirements
Slug: docs/desktop/system-requirements
Use hardware that can stay online and connected to the same local network as your devices.
## Recommended desktop hardware
| Hardware | Best for |
| :-- | :-- |
| Apple Silicon Mac mini | macOS app, always-on home controller, AV rooms. |
| Intel NUC or mini PC | Dedicated Linux or local server deployments. |
| Raspberry Pi 5 | Small homes, testing, and lightweight setups. |
## Network requirements
- Stable local network.
- Same LAN or routed access between Haptique OS and controlled devices.
- Multicast or mDNS enabled when discovery depends on it.
- Static or reserved IP address for the Haptique OS host.
## Notes
Device support and performance depend on enabled integrations, AI model size, number of devices, and whether the system is used for heavy media or automation workflows.
---
# Developer Wiki
Developer documentation lives in the Haptique Developer Wiki.
Source: https://haptique.io/docs/developer-sdk/introduction
Slug: docs/developer-sdk/introduction
This consumer documentation explains how to understand, install, and use Haptique OS.
Developer documentation lives separately at [wiki.haptique.io](https://wiki.haptique.io).
Use the Developer Wiki for:
- Driver SDKs.
- API reference.
- AI based API testers.
- Driver builder workflows.
- Runtime architecture.
- Schemas and manifests.
- Advanced debugging.
- Extension guides.
[Open Developer Wiki](https://wiki.haptique.io)
---
# Developers
Bridge from consumer documentation to the Haptique Developer Wiki.
Source: https://haptique.io/docs/developers
Slug: docs/developers
This documentation site is focused on consumers, homeowners, and installers who want to understand and use Haptique OS.
For deep technical documentation, use the Haptique Developer Wiki.
[Open Developer Wiki](https://wiki.haptique.io)
## The wiki includes
- Driver SDKs.
- API reference.
- AI based API testers.
- Driver builder internals.
- Manifest and schema details.
- MCP and platform tooling.
- Runtime architecture.
- Advanced integration workflows.
---
# Automations
Create simple automations in Haptique OS.
Source: https://haptique.io/docs/everyday-use/automations
Slug: docs/everyday-use/automations
Automations let Haptique OS run actions based on time, events, state, or other triggers.
## Common automations
- Turn on outdoor lights at sunset.
- Run Good Night at a fixed time.
- Turn off media when Away is activated.
- Adjust climate before evening.
- Run a scene when a device changes state.
## Create carefully
Start with low-risk automations. Test each one while you are home before relying on it.
## AI assistance
AI can help draft automations from natural language. Always review the trigger, schedule, affected devices, and repeat behavior before saving.
---
# HomeKit and Siri
Use Haptique OS with Apple Home and Siri.
Source: https://haptique.io/docs/everyday-use/homekit-and-siri
Slug: docs/everyday-use/homekit-and-siri
Haptique OS can expose supported devices to Apple Home through its HomeKit bridge path.
## Why use HomeKit
- Control supported Haptique devices from Apple Home.
- Use Siri voice commands.
- Include supported devices in Apple Home scenes.
- Keep Apple users in a familiar interface.
## Setup overview
1. Enable HomeKit bridge in Haptique OS.
2. Confirm the bridge is running.
3. Open Apple Home.
4. Add accessory.
5. Scan or enter the pairing code.
6. Assign devices to rooms.
7. Test Siri commands.
## Important
HomeKit pairing persistence is important. Do not reset or recreate the bridge unless instructed by support.
---
# Media and AV Control
Use Haptique OS for AV receivers, TVs, projectors, media zones, and playback control.
Source: https://haptique.io/docs/everyday-use/media-and-av-control
Slug: docs/everyday-use/media-and-av-control
Haptique OS is built for homes where AV matters. It can coordinate receivers, TVs, projectors, streamers, media zones, and lighting scenes.
## Common AV tasks
- Turn on an AV room.
- Select a source.
- Control volume.
- Mute or unmute.
- Control playback.
- Switch projector or TV input.
- Trigger a scene around media activity.
## Scenes for AV
Use scenes to prepare the room. Use media controls to handle playback once the room is ready.
Example:
1. Trigger Movie Night.
2. Haptique OS powers the room and sets the source.
3. Mobile app or RS90 handles playback and volume.
## Verify real state
AV systems are asynchronous. After sending a command, confirm Haptique OS reflects the real device state.
---
# Multi-Room Control
Control multiple rooms, zones, and scenes with Haptique OS.
Source: https://haptique.io/docs/everyday-use/multi-room-control
Slug: docs/everyday-use/multi-room-control
Multi-room control lets Haptique OS coordinate actions across more than one room.
## Examples
- Turn off all downstairs lights.
- Start music in the kitchen and dining room.
- Set the whole home to Away.
- Run bedtime scenes in bedrooms and common areas.
## Use clear scopes
When using mobile or AI, include the scope:
- "Living room only."
- "Downstairs."
- "Whole home."
- "All bedrooms."
## Safety
Broad actions should be reviewed carefully, especially when they affect climate, security, or many devices.
---
# Rooms, Devices, and Scenes
Understand the main building blocks of everyday Haptique OS use.
Source: https://haptique.io/docs/everyday-use/rooms-devices-and-scenes
Slug: docs/everyday-use/rooms-devices-and-scenes
Haptique OS is organized around how people think about a home: rooms, devices, and scenes.
## Rooms
Rooms group devices by physical space. Examples: Living Room, Theater, Kitchen, Bedroom, Patio.
## Devices
Devices are the things Haptique OS controls: lights, receivers, TVs, streamers, projectors, shades, climate systems, and other supported equipment.
## Scenes
Scenes change multiple devices together. A Movie Night scene might dim lights, close shades, turn on the projector, set the AVR input, and start the right media source.
## Best practice
Start simple:
1. Add the main room.
2. Add the most important devices.
3. Create one useful scene.
4. Add that scene to favorites.
5. Test from mobile and RS90.
---
# Download
Download Haptique OS and prepare for installation.
Source: https://haptique.io/docs/getting-started/download
Slug: docs/getting-started/download
Download Haptique OS from the official [HOS downloads page](/downloads). License activation is tied to this official HOS download flow, so use this page for every new install or reinstall.
The current public docs path supports Haptique OS Beta 1.1.3. Use the installer or package that matches the machine that will stay online as the local controller.
## Before downloading
Confirm:
- You know which computer will run Haptique OS.
- The computer can stay powered on when home control is needed.
- You have your license claim code or myHOS email address ready if required.
- You are downloading the correct installer for your operating system.
- You have read the [Network Checklist](/docs/getting-started/network-checklist) if this is a first install.
## Download steps
1. Open the [Haptique OS downloads page](/downloads).
2. Choose the installer for your platform.
3. Download the installer.
4. Continue to [Installation](/docs/getting-started/installation).
After Haptique OS is installed, open the local license screen and activate with your [myHOS](https://myhos.haptique.io/login?return=/licenses) email-link sign-in or claim code. For offline sites, use [Request a License File](/docs/licensing/request-license).
## Choose the right build
| Host machine | Use this build | Notes |
| :-- | :-- | :-- |
| Apple Silicon Mac | macOS Apple Silicon DMG | Recommended for current Mac mini, Mac Studio, and M-series Mac hardware. |
| Intel Mac | macOS Intel DMG | Use only for Intel-based Macs. |
| Windows x64 PC | Windows x64 setup or portable | Recommended for most Windows mini-PCs and workstations. |
| Windows on ARM | Windows ARM64 setup or portable | Use only for ARM Windows hardware. |
| Linux x64 host | Linux x64 AppImage | Fastest path for supported Linux hosts. |
:::note
Use the official downloads page for current release links. Do not rely on local development portal links, copied installers, or third-party mirrors for activation-ready HOS copies.
:::
---
# First Project
Build the first usable Haptique OS project with one integration, logical devices, mobile apps, and AI.
Source: https://haptique.io/docs/getting-started/first-setup
Slug: docs/getting-started/first-setup
The first project should prove the full control loop with a small, real setup. Do not start by configuring every room. Pick one [Space](/docs/advanced-os/spaces), one [integration](/docs/integrations/adding-devices), and a few devices that can be tested from Haptique OS, [mobile apps](/docs/mobile/overview), and AI.
## Build the project
1. Open Haptique OS and create a project with a clear site name.
2. Add one [Space](/docs/advanced-os/spaces), such as Living Room, Theater, Kitchen, or Showroom.
3. Add the first [integration](/docs/integrations/adding-devices) and test that Haptique OS can reach it.
4. Select the endpoints that should become [logical devices](/docs/advanced-os/logical-devices).
5. Give each logical device a plain name, such as Main Lights, Projector, AVR, Blinds, or Music.
6. Assign the logical devices to the [Space](/docs/advanced-os/spaces).
7. Create one [scene](/docs/mobile/scenes) that combines two or three actions.
8. Mark the most common actions as [favorites](/docs/mobile/favorites).
## Connect mobile apps
Sign in to the [mobile app](/docs/mobile/overview) after the first Space and logical devices exist. The app should show the assigned Haptique OS site, Space, devices, scene, and favorites.
Use [HOS Mobile App](/docs/mobile/pairing-with-haptique-os) for the download and fleet-server sign-in flow.
## Use AI
AI works best after the project model is clean. Use simple names and assign devices to Spaces before asking for control. Use the [AI Setup Guide](/docs/advanced-os/ai-setup-guide) before trying broad commands, and use [AI Chat on Mobile](/docs/mobile/ai-chat-on-mobile) when testing from a phone.
Good first commands:
- "Turn off the living room."
- "Create a movie night scene for the theater."
- "Set the kitchen lights to evening mode."
- "Mute the media zone."
- "What devices are in this room?"
## Definition of done
The first project is ready when one Space can be controlled from Haptique OS, the [mobile app](/docs/mobile/overview), and AI, with state updates visible across connected software surfaces.
Next: [Haptique Music](/docs/haptique-music/overview), [Mobile Apps](/docs/mobile/overview), [AI Setup Guide](/docs/advanced-os/ai-setup-guide), or [HOS](/docs/advanced-os/spaces).
---
# Installation
Install Haptique OS on macOS, Windows, Linux, or supported local hardware.
Source: https://haptique.io/docs/getting-started/installation
Slug: docs/getting-started/installation
Install Haptique OS on the computer that will act as your local home controller. This machine should stay online when rooms, scenes, RS90 remotes, mobile apps, or music control need to work.
## macOS
1. Download the macOS installer from the official [HOS downloads page](/downloads).
2. Open the downloaded file.
3. Move Haptique OS to Applications if prompted.
4. Open Haptique OS.
5. Allow required local permissions.
6. Confirm the Mac menu bar companion appears.
7. Open the dashboard in the browser.
Use Apple Silicon for current M-series Macs. Use the Intel DMG only on Intel-based Macs.
## Windows
1. Download the Windows build for the host machine.
2. Run the setup installer, or use the portable build where appropriate.
3. Allow local firewall prompts for private networks when Windows asks.
4. Open Haptique OS.
5. Open the dashboard in the browser.
6. Continue to license activation.
## Linux and dedicated hardware
Use the installer or deployment package provided for your release. The Linux AppImage is the fastest path for a supported x64 host. Managed deployments may use a package or container build when that matches the installation plan.
After launching Haptique OS, open the local dashboard from a browser on the host or another device that can reach the server.
## Recommended setup
- Keep the Haptique OS host on a stable network connection.
- Reserve its IP address in your router.
- Make sure it can reach devices you want to control.
- Prevent the host from sleeping during normal control hours.
- Keep the installer for the installed version until the first project is verified.
## First verification
Before adding every room, confirm:
1. Haptique OS opens after a normal app launch or host restart.
2. The browser dashboard loads.
3. License status is active or ready for activation.
4. The host has the expected reserved IP address.
5. A phone or tablet on the same network can reach the controller.
## Next steps
Continue to [License Claim](/docs/getting-started/license-claim) and [First Setup](/docs/getting-started/first-setup).
---
# Getting Started
The short first path for installing Haptique OS, creating a first project, adding devices, and connecting mobile apps.
Source: https://haptique.io/docs/getting-started/introduction
Slug: docs/getting-started/introduction
Use this page before the longer reference sections. Haptique OS is licensed software that runs on a supported Mac, Linux, or Windows machine and acts as the local controller for the project. The goal is to get one working project live first: Haptique OS downloaded from the official HOS page, installed and licensed, one [integration](/docs/integrations/adding-devices) connected, [logical devices](/docs/advanced-os/logical-devices) visible, [mobile apps](/docs/mobile/overview) signed in, and AI available for everyday commands.
Licenses are activated after you download your HOS copy from the official [Haptique OS downloads page](/downloads). Use that page for the current Mac, Windows, Linux, or Docker release, then activate the installed controller through [myHOS](https://myhos.haptique.io/login?return=/licenses) or the local license screen. myHOS uses email-link sign-in rather than a separate password login. Copies obtained outside the official HOS download flow may not be eligible for activation.
## First path
1. Open the [HOS downloads page](/downloads) and download the correct Haptique OS copy for the controller machine.
2. Purchase or claim a [Haptique OS license](/docs/getting-started/license-claim) in [myHOS](https://myhos.haptique.io/login?return=/licenses).
If you are not already signed in, myHOS redirects you to the email sign-in flow. Open the email link, and myHOS returns you to the same **Licenses and activation** page rather than showing a separate direct login form. The screenshot and full walkthrough for that page are in [License Claim](/docs/getting-started/license-claim).
Install and activate Haptique OS on the controller machine.
Create the first project for the home, showroom, or AV space.
Add the first integration , such as lighting, climate, AV, HomeKit, or a supported IP device system.
Convert real endpoints into logical devices with names users understand.
Place those logical devices in Spaces , which are rooms or zones.
Sign in to the mobile app with credentials created on the fleet server.
Enable AI features where licensed and allowed.
## License activation
After installation, open Haptique OS on the controller machine and go to the local license screen. Use the same myHOS email address used to claim the license and complete the email-link sign-in flow, or enter the claim code if your license was issued with one. When the controller has internet access, activation completes online and the status should change to active.
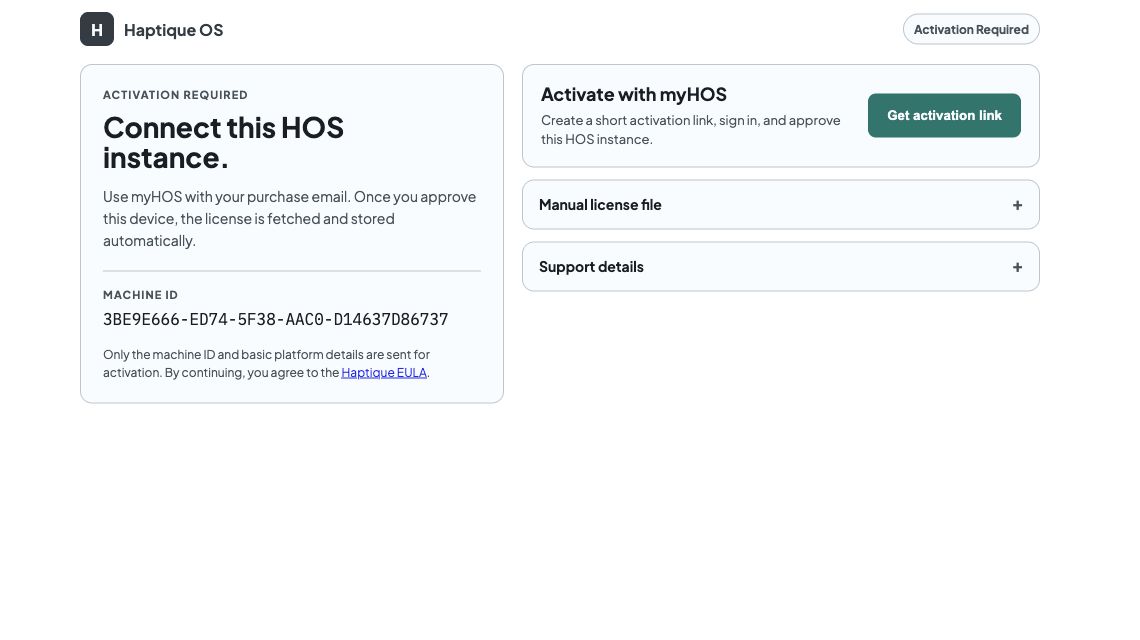 The local license screen before the controller is connected to your license.
For supported offline installs, generate the machine identity from Haptique OS, request a signed license file, then upload that file in the local license screen. See [Activation](/docs/licensing/activation) for the online flow and [Request a License File](/docs/licensing/request-license) for offline file activation.
## Using AI
AI is useful after the first project model is clean. Set up [Spaces](/docs/advanced-os/spaces), [logical devices](/docs/advanced-os/logical-devices), scenes, and permissions before testing chat commands, then confirm that the same behavior works from the [mobile app](/docs/mobile/overview).
- [AI Setup Guide](/docs/advanced-os/ai-setup-guide)
- [Native AI Engine](/docs/ai-engine/overview)
- [AI Chat on Mobile](/docs/mobile/ai-chat-on-mobile)
## Supporting references
- [Download](/docs/getting-started/download)
- [Installation](/docs/getting-started/installation)
- [License Claim](/docs/getting-started/license-claim)
- [Activation](/docs/licensing/activation)
- [Request a License File](/docs/licensing/request-license)
- [Network Checklist](/docs/getting-started/network-checklist)
- [Mobile Apps](/docs/mobile/overview)
- [HOS Mobile App](/docs/mobile/pairing-with-haptique-os)
Continue with [First Project](/docs/getting-started/first-setup).
---
# License Claim
Claim or purchase a Haptique OS license before activation.
Source: https://haptique.io/docs/getting-started/license-claim
Slug: docs/getting-started/license-claim
Claiming a license prepares your Haptique OS instance for activation. Download Haptique OS from the official [HOS downloads page](/downloads) before activation so the installed copy is eligible for the current license flow.
## Claim a license
1. Open [myHOS licenses](https://myhos.haptique.io/login?return=/licenses).
2. Enter your email address. myHOS sends a sign-in link to that inbox.
3. Open the email and continue back to the **Licenses and activation** page in myHOS.
4. Choose the available plan or promotion.
5. Complete the claim or purchase flow.
6. Save your claim code or continue directly to activation.
There is no separate password login for myHOS. Inbox access is the sign-in step, and after the first email-link sign-in the same browser should usually stay signed in for about 30 days.
If Haptique sends you a license, purchase, or activation email, the link in that message should bring you to this same **Licenses and activation** page in myHOS.
The local license screen before the controller is connected to your license.
For supported offline installs, generate the machine identity from Haptique OS, request a signed license file, then upload that file in the local license screen. See [Activation](/docs/licensing/activation) for the online flow and [Request a License File](/docs/licensing/request-license) for offline file activation.
## Using AI
AI is useful after the first project model is clean. Set up [Spaces](/docs/advanced-os/spaces), [logical devices](/docs/advanced-os/logical-devices), scenes, and permissions before testing chat commands, then confirm that the same behavior works from the [mobile app](/docs/mobile/overview).
- [AI Setup Guide](/docs/advanced-os/ai-setup-guide)
- [Native AI Engine](/docs/ai-engine/overview)
- [AI Chat on Mobile](/docs/mobile/ai-chat-on-mobile)
## Supporting references
- [Download](/docs/getting-started/download)
- [Installation](/docs/getting-started/installation)
- [License Claim](/docs/getting-started/license-claim)
- [Activation](/docs/licensing/activation)
- [Request a License File](/docs/licensing/request-license)
- [Network Checklist](/docs/getting-started/network-checklist)
- [Mobile Apps](/docs/mobile/overview)
- [HOS Mobile App](/docs/mobile/pairing-with-haptique-os)
Continue with [First Project](/docs/getting-started/first-setup).
---
# License Claim
Claim or purchase a Haptique OS license before activation.
Source: https://haptique.io/docs/getting-started/license-claim
Slug: docs/getting-started/license-claim
Claiming a license prepares your Haptique OS instance for activation. Download Haptique OS from the official [HOS downloads page](/downloads) before activation so the installed copy is eligible for the current license flow.
## Claim a license
1. Open [myHOS licenses](https://myhos.haptique.io/login?return=/licenses).
2. Enter your email address. myHOS sends a sign-in link to that inbox.
3. Open the email and continue back to the **Licenses and activation** page in myHOS.
4. Choose the available plan or promotion.
5. Complete the claim or purchase flow.
6. Save your claim code or continue directly to activation.
There is no separate password login for myHOS. Inbox access is the sign-in step, and after the first email-link sign-in the same browser should usually stay signed in for about 30 days.
If Haptique sends you a license, purchase, or activation email, the link in that message should bring you to this same **Licenses and activation** page in myHOS.
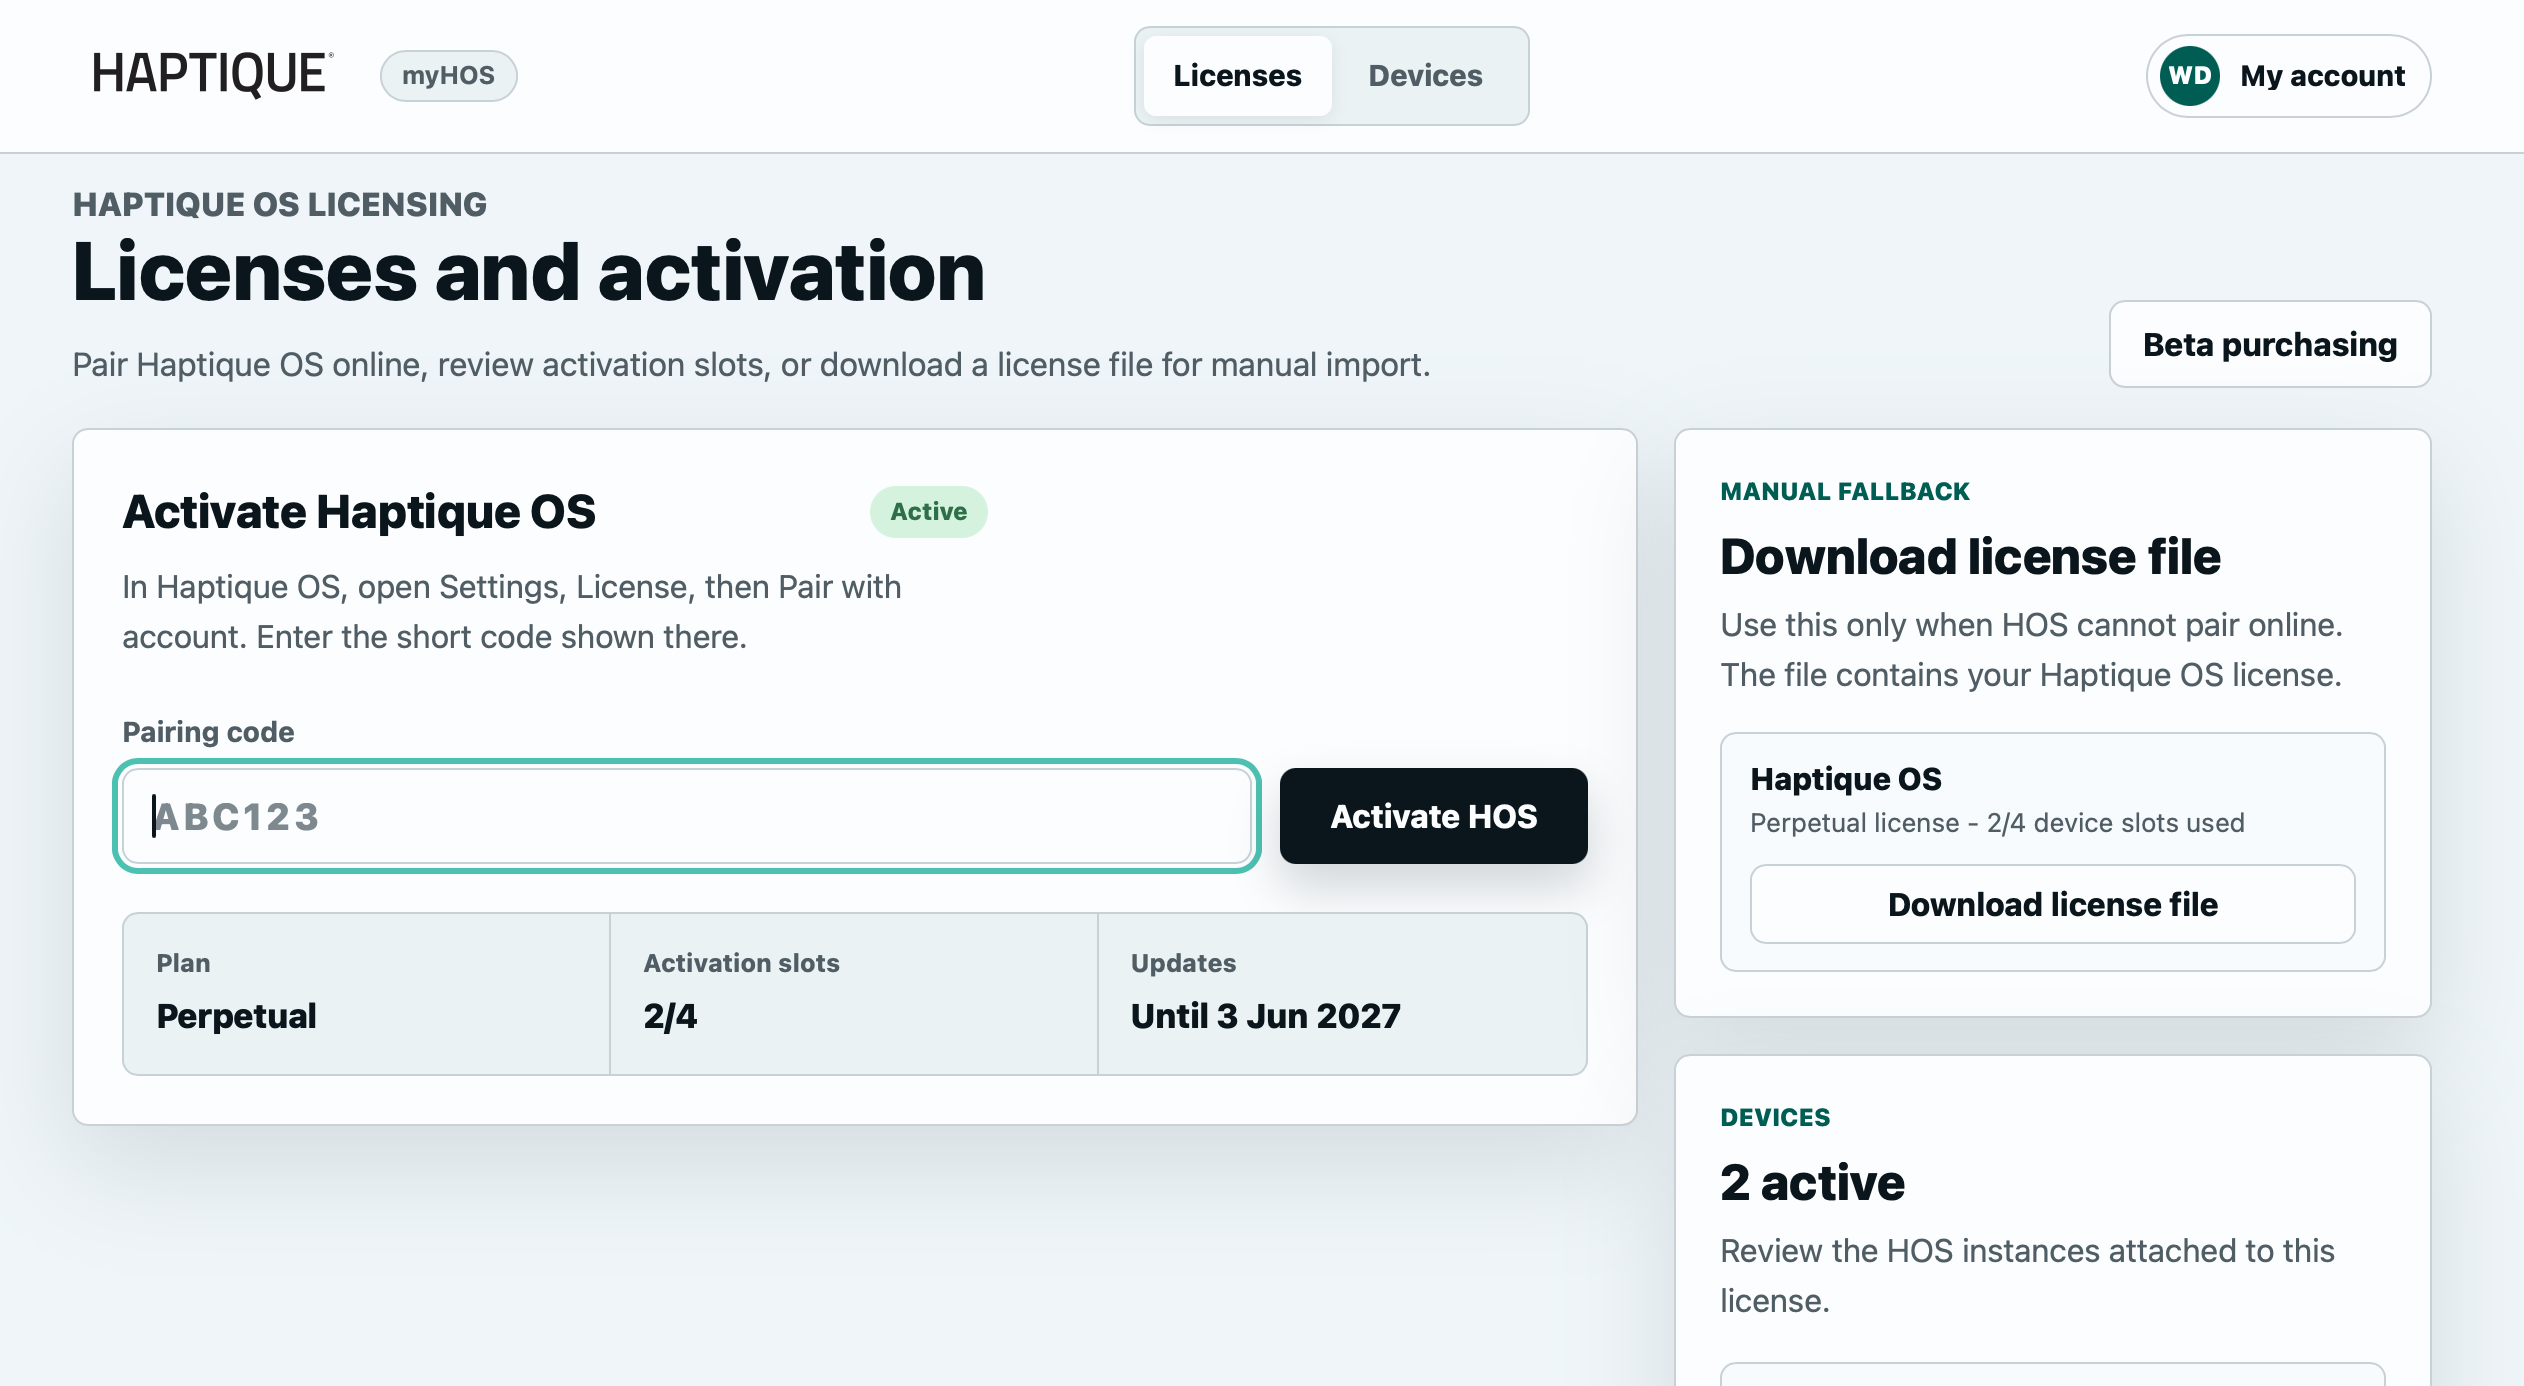 The myHOS Licenses and activation page where email links land and where you can pair Haptique OS or download a manual license file.
## Free and Pro plans
Promotions, free tiers, and Pro feature availability should always match the live portal. If the website mentions a limited offer, confirm it is still active before publishing.
## Next
Install Haptique OS from the official download, then activate from the desktop app, local dashboard, or [Activation](/docs/licensing/activation) flow.
---
# Licensing
Understand Haptique OS licensing during first setup.
Source: https://haptique.io/docs/getting-started/licensing
Slug: docs/getting-started/licensing
Haptique OS uses licensing to activate features on your local controller. The goal is to keep local home control reliable while still allowing account management, upgrades, and transfers through the license portal.
## During first setup
You may be asked to:
1. Enter your myHOS email address and use the sign-in link sent to your inbox.
2. Enter a claim code.
3. Upload a license file for offline activation where supported.
4. Confirm the license is active.
myHOS does not have a separate direct password login in production.
## What licensing controls
Licensing may control access to premium capabilities such as native AI, advanced account features, priority updates, or remote access features depending on the plan.
## Local operation
Once activated, Haptique OS should keep core local control available according to the license and product rules for your release.
See [Activation](/docs/licensing/activation) for the full activation guide.
---
# Setup Network Checklist
Prepare the local network before using Haptique OS.
Source: https://haptique.io/docs/getting-started/network-checklist
Slug: docs/getting-started/network-checklist
Before adding devices and testing app control, check the local network.
## Checklist
- Haptique OS host is connected to the home network.
- Host IP is reserved or static.
- Mobile devices have internet access for sign-in and the required network access for local control.
- Controlled devices are powered on and reachable.
- mDNS or discovery traffic is allowed where needed.
- Firewall allows local dashboard and app access.
- VPN, guest Wi-Fi, and client isolation are disabled for devices that must talk to the controller.
- The host will not sleep during normal control hours.
- AV, lighting, climate, HomeKit, RS90, and music endpoints are on reachable subnets.
## First test
After installation, test from the same network:
1. Open the Haptique OS dashboard from the host.
2. Open the dashboard from a phone, tablet, or second computer.
3. Add one integration or device.
4. Confirm state changes are visible after a real action.
5. Sign in to the mobile app and confirm the same project appears.
## Why this matters
Haptique OS is local-first. A stable LAN makes local mobile control, device discovery, RS90 control, HomeKit, Haptique Music, and AI-assisted control more reliable.
---
# With RS90
Add RS90 to a Haptique OS project, including Fleet release setup, licensing, room assignment, and button configuration.
Source: https://haptique.io/docs/getting-started/with-rs90
Slug: docs/getting-started/with-rs90
RS90 is optional. Haptique OS can be installed and used as software on a supported Mac, Linux, or Windows machine without owning RS90. Use this page only when the project includes the physical remote.
## Requirements
- A licensed Haptique OS controller.
- A working project with at least one Space and logical device.
- Network access between RS90 and the Haptique OS controller.
- A Fleet release assigned to the controller when RS90 configuration or HOS device definitions are delivered through Fleet.
## Fleet and license flow
Fleet releases are applied through Haptique OS. A valid Haptique OS license is required before the controller can receive or use licensed release content for the project.
1. Activate the Haptique OS license on the controller.
2. Assign the correct Fleet release to the site, device group, or controller.
3. Confirm Haptique OS receives the release.
4. Expose any Fleet-released HOS devices as logical devices.
5. Place those logical devices in Spaces.
6. Add scenes, favorites, or media zones that RS90 should control.
RS90 should not run the integration logic itself. Haptique OS receives the Fleet release, runs the integration, owns the project state, and publishes the relevant rooms, scenes, favorites, media zones, and button mappings to RS90.
## Configure RS90
1. Pair RS90 with the local Haptique OS controller.
2. Assign RS90 to the Space it should control first.
3. Map the primary buttons to common room actions.
4. Add media controls when the Space has a media zone.
5. Test each button from the room where RS90 will be used.
6. Confirm the mobile app reflects the same state after RS90 sends a command.
Good first mappings:
- Room on or off.
- Favorite scene.
- Volume, mute, and media transport.
- Lights, shades, or AV input.
- Space-level all off.
## How RS90 reacts
When someone presses RS90, the remote sends the action to Haptique OS. Haptique OS executes the integration command, updates the project state, and connected apps reflect the result.
If a mobile app or desktop app changes the same room state, RS90 should continue controlling the current Haptique OS project state for its assigned Space.
---
# Favorites and Scenes
Save Haptique Music favorites and use music inside HOS scenes.
Source: https://haptique.io/docs/haptique-music/favorites-and-scenes
Slug: docs/haptique-music/favorites-and-scenes
Favorites make repeated music actions fast. Scenes let music join the rest of the room setup.
## Create music favorites
Create favorites for music actions people use often:
- A playlist.
- A radio station.
- A saved filter or smart view.
- A frequently played album, artist, or track.
- A composer, composition, genre, or tagged collection.
- A source input.
- A common volume level.
- A preferred room or media zone.
Use names people would naturally say or tap, such as Morning Jazz, Dinner Playlist, Patio Radio, or Theater Intermission.
## Choose how specific a favorite should be
A music favorite can be broad or specific.
Use a broad favorite when the consumer should choose the output at the moment, such as Jazz Radio or Morning Playlist.
Use a specific favorite when the action should always play in the same place, such as Kitchen Morning Playlist or Patio Radio.
## Use bookmarks and saved filters
For large libraries, favorites are not the only shortcut.
- Use bookmarks for individual tracks, albums, stations, or playlists the consumer wants to return to.
- Use tags for personal groupings, such as Workout, Guests, Kids, Reference, or Late Night.
- Use saved filters for repeat searches, such as Jazz, Hi-res Albums, Kids Music, or Dinner.
- Use smart views when HOS can automatically group useful library shelves.
Keep these names short and human. They should work well in the mobile app, on RS90 labels, and in AI commands.
## Use presets carefully
When presets are available, use them for repeatable music setups such as a source, output, queue behavior, or preferred volume.
Use a scene when music should run with lights, climate, shades, or AV. Use a music preset when the shortcut is only about listening.
## Add music to a scene
1. Open the scene editor.
2. Choose the Space for the scene.
3. Add the lighting, climate, AV, or shade actions first.
4. Add the Haptique Music output or media zone.
5. Choose the favorite, source, or playback action.
6. Set a comfortable volume.
7. Save and test the scene from Haptique OS and the mobile app.
## Good first scenes
- Morning: kitchen lights on, Kitchen Music starts at low volume.
- Dinner: dining lights dim, Dinner Playlist starts.
- Party: selected zones start the same favorite playlist.
- Movie Night: music stops, AV scene starts, theater lights dim.
## Multi-room scenes
For multi-room scenes, decide whether the scene should start grouped playback or independent playback in each Space.
Use grouped playback when the same music should stay in sync across rooms, such as Party or Whole Home Morning.
Use independent playback when each Space may need separate volume, source, or stopping behavior.
## RS90 and AI
Map only the most common music actions to RS90 buttons. For AI, keep names short and specific so commands like "play Dinner Playlist in the kitchen" can resolve to the right Space and output.
---
# Haptique Music
Set up Haptique Music for services, libraries, outputs, rooms, mobile apps, RS90, and AI.
Source: https://haptique.io/docs/haptique-music/overview
Slug: docs/haptique-music/overview
Haptique Music is the music and media layer for Haptique OS. It should be configured as part of the home model, not as a separate app island.
## What you can do
- Use Music as the daily listening view after at least one source and one output are ready.
- Browse supported music sources and local libraries.
- Upload songs, add a local or NAS library folder, scan the library, and browse albums, artists, tracks, playlists, and artwork.
- Add internet radio stations for quick playback.
- Connect available streaming services where supported by the project.
- Discover and route playback to supported outputs, speaker groups, streamers, and media zones.
- Control volume, mute, play, pause, skip, and source selection.
- Build and edit queues with play now, play next, and append behavior where supported.
- See and control multiple active players when music is playing in more than one Space.
- Save common playlists, stations, albums, searches, or sources as favorites.
- Add music to scenes such as Dinner, Morning, or Movie Night.
- Control music from the HOS mobile app, RS90, scenes, and AI where enabled.
## Basic terms
- Source: where music comes from, such as a library, playlist, station, album, or service.
- Output: where music plays, such as a speaker, receiver, streamer, amplifier, or media endpoint.
- Zone: a room or listening area that contains one or more outputs.
- Player: the active playback control for one output or grouped set of outputs.
- Queue: the upcoming music for a player.
- Group: two or more outputs controlled together.
- Preset: a saved music setup, such as a source, output, volume, or queue behavior, when presets are enabled.
## Daily listening flow
After setup, most consumers should start with music selection, not configuration.
1. Open Music in Haptique OS or the HOS mobile app.
2. Choose a Space or output.
3. Browse the library, radio stations, connected services, favorites, or saved filters.
4. Start playback, add to the queue, or replace the current queue.
5. Use Now Playing for volume, mute, pause, skip, and queue changes.
Setup controls should still be available, but they should not crowd the normal listening path once the home has a working source and output.
## Main areas
Haptique Music is usually organized into these areas:
- Home: daily listening and Now Playing.
- Library: uploaded songs, local or NAS folders, scans, albums, artists, tracks, and playlists.
- Outputs: speakers, streamers, media zones, live rooms, and saved groups.
- Radio: custom internet radio stations.
- Services: available streaming-service connections.
- Advanced: pro setup details and technical state for installers.
## How it fits into HOS
Once Haptique Music is assigned to Spaces, it becomes part of the same control model as lights, climate, AV, scenes, and favorites.
- Mobile apps can show music controls for the active Space.
- RS90 can control playback and volume for the assigned media zone.
- Scenes can start music as part of a room setup.
- AI can help find music actions or create scenes when those controls are enabled.
## Where to go next
- [Setup](/docs/haptique-music/setup)
- [Outputs and Zones](/docs/haptique-music/playback-and-zones)
- [Favorites and Scenes](/docs/haptique-music/favorites-and-scenes)
- [Troubleshooting](/docs/haptique-music/troubleshooting)
---
# Outputs, Players, and Zones
Use Haptique Music outputs, players, zones, multi-room playback, and volume controls.
Source: https://haptique.io/docs/haptique-music/playback-and-zones
Slug: docs/haptique-music/playback-and-zones
Haptique Music works best when each output is assigned to the Space where people expect to control it.
## Understand outputs and players
An output is the destination where music plays. It may be a speaker pair, receiver zone, streamer, TV audio path, amplifier, or another supported media endpoint.
A player is the active playback control for an output. When music starts in the Kitchen, the Kitchen Music output has a player. When music also starts on the Patio, the Patio Speakers output has its own player.
In daily use, consumers usually think in this order:
1. Choose the room or Space.
2. Choose where music should play.
3. Choose what to play.
4. Control the player.
## Start music in one room
1. Open the Space that contains the music output.
2. Select the music control or media zone.
3. Choose the output if the Space has more than one.
4. Choose a source, favorite, playlist, station, album, or queue item.
5. Choose whether to play now, play next, append to the queue, or replace the current queue when those options are available.
6. Adjust volume to a comfortable level.
## Browse and play content
Haptique Music can show different shelves depending on what is enabled in the project:
- Local library albums, artists, tracks, playlists, and artwork.
- Uploaded songs.
- Internet radio stations.
- Connected streaming services.
- Favorites, bookmarks, saved filters, and smart views.
If the consumer cannot find music, first check that the source is connected, scanned, or saved. Then check that the user has permission to use that source.
## Use more than one player
When music is playing in multiple rooms, Haptique Music should show each active player separately. This lets a consumer pause the Patio without stopping the Kitchen, or lower the Living Room volume without changing the Bedroom.
Use the player for the specific output you want to control:
- Play and pause.
- Skip and previous where supported.
- Volume and mute.
- Source or favorite selection.
- Queue and play-next actions where supported.
- Current playback state.
If two players are visible, check the player name before changing volume or stopping playback.
## Queues
Queues are attached to the player or output that is playing. The available queue actions depend on the source and output.
Common queue actions:
- Play now or replace what is currently playing.
- Play next.
- Add to the end of the queue.
- Remove a track.
- Reorder tracks.
- Clear the queue.
- Select an item already in the queue.
- Toggle shuffle or repeat when supported.
Long queues may be shown in pages or with a summary so the player stays fast.
When moving playback to another output, Haptique Music can keep or copy the queue only when the source and target support it. If queue transfer is not available, start the same favorite, album, station, or playlist again on the new output.
## Multi-room playback
Some systems support grouped playback across more than one output. If grouping is available, use it when the same music should play in several Spaces at the same time.
Common multi-room actions:
- Start the same favorite in several Spaces.
- Add another output to the current playback group.
- Remove one output from a group.
- Change group volume.
- Change one output's volume inside the group, if supported.
- Stop the whole group.
If grouping is not supported by the connected system, start separate players in each Space instead.
There are two common group types:
- Same-system sync groups, where the connected audio system can keep rooms in time.
- Best-effort groups, where HOS sends commands to multiple outputs but exact sync is not guaranteed.
Use same-system sync groups for rooms where timing matters. Use best-effort groups for casual whole-home control, mixed systems, or places where slight timing differences are acceptable.
## Live rooms and saved groups
The Outputs area can show standalone rooms and saved groups as live playback rows.
- A standalone room controls one output or media zone.
- A saved group controls multiple outputs together.
- A group can show its member rooms.
- A group can also have a coordinator, which owns transport and queue behavior for that group.
Use the group row when the whole group should pause, resume, skip, or change queue. Use the member room control when only one room's volume should change.
For Sonos groups, HOS can use native join, leave, and coordinator-led playback behavior where supported. For mixed-provider groups, treat grouping as best-effort unless HOS labels it as synchronized.
## Volume behavior
Volume can work differently depending on the connected audio system.
For one output, the volume control should change that output only.
For grouped playback, there may be two levels:
- Group volume changes the overall group.
- Output volume changes one room or speaker inside the group.
If a receiver, amplifier, or speaker does not expose volume control to Haptique OS, the music player may show playback controls while volume is handled by another device.
## Move music to another output
To move music from one room to another:
1. Open the current player.
2. Stop or pause the current output.
3. Open the target Space.
4. Choose the target output.
5. Start the same source, favorite, or queue item.
If the connected system supports transfer or grouping, you may be able to add the target output first and then remove the original output.
When a Transfer action is available, use it instead of manually stopping and restarting. Transfer works best when Haptique Music owns the queue and the destination supports the same source.
## Choose the right output
Some rooms have more than one output. For example, a Theater may have Theater Music for casual listening and AVR Main for movie playback.
Choose the output based on what the consumer wants:
- Use the room speakers for normal music.
- Use the AVR or TV audio path when sound should come through the theater system.
- Use a patio or outdoor output for outside listening.
- Use a grouped output when the same music should follow people across rooms.
## RS90 and mobile control
On the HOS mobile app, open the Space and use the music player for that room. On RS90, map only the most common commands: volume, mute, play or pause, next, and one or two favorite music scenes.
## Daily use
Most users should not need to think about sources, outputs, and integration details. They should be able to open a Space, choose music, and control playback from the same place they control lights, climate, scenes, and media.
---
# Haptique Music Setup
Set up Haptique Music sources, outputs, Spaces, favorites, and first playback tests.
Source: https://haptique.io/docs/haptique-music/setup
Slug: docs/haptique-music/setup
Use Haptique Music after the HOS project has at least one Space and one usable audio output or media zone.
## Before you start
- Haptique OS is installed, licensed, and running.
- The project has at least one [Space](/docs/advanced-os/spaces).
- The audio device, receiver, streamer, or supported output is powered on and reachable.
- The music service, local library, or storage source is ready for use.
- The user has permission to control music in the target Space.
## Setup flow
1. Open Haptique OS.
2. Enable Haptique Music for the project if it is not already enabled.
3. Add at least one source: local library, uploaded songs, internet radio, or an available streaming service.
4. Discover or add one output, speaker, streamer, or media zone.
5. Assign that output to the correct Space.
6. Give the output a clear name, such as Kitchen Music or Theater Music.
7. Play one item from the source to the output.
8. Test play, pause, volume, mute, skip, and queue behavior from Haptique OS.
9. Test the same controls from the HOS mobile app.
## Add music sources
Start with one reliable source before adding the whole home.
- Uploaded songs: use this for a few tracks or a quick demo library.
- Local or NAS folder: use this when the home has an existing music collection.
- Internet radio: use this for fixed station streams the consumer plays often.
- Streaming services: connect only services that HOS shows as available for the project.
If a service appears as coming soon or unavailable, do not build scenes or favorites around it yet. Use a local library, radio station, or available service instead.
## Connect streaming services
Use the Services area to connect available music accounts. Apple Music and Spotify connection paths may be available depending on the release and project configuration.
Qobuz and Tidal may appear in the service model or roadmap, but do not treat them as full catalog sources unless HOS marks them available for the project.
## Scan a local library
For a local or NAS library:
1. Add the folder path or mounted music location.
2. Make sure the folder is enabled.
3. Start a scan.
4. Wait for albums, artists, tracks, and artwork to appear.
5. Play one track before adding more outputs or groups.
If the library is large, scan and test one output first. Add more folders only after the first scan is healthy.
## Add internet radio
For a station:
1. Add the station name.
2. Add the stream URL.
3. Save the station.
4. Play it on one nearby output.
5. Save it as a favorite if it works reliably.
Use names people recognize, such as Jazz FM, Morning News, or Patio Radio.
## Name outputs clearly
Consumers should see names that match the real room or listening area. Good output names make mobile control, scenes, RS90, and AI easier to use.
Good names:
- Kitchen Music.
- Living Room Speakers.
- Patio Speakers.
- Theater Music.
Avoid names like Output 1, HDMI 2, Receiver Zone B, or a device serial number unless the consumer already uses that name.
## Multiple outputs
If a room has more than one place where music can play, add each output separately and assign it to the right Space. For example, a Living Room can have Living Room Speakers and TV Soundbar as separate outputs.
If a whole-home audio system supports grouping, configure each output first, then test grouping after individual playback works.
## Discover and test outputs
Use output discovery to find supported speakers, streamers, AirPlay targets, Sonos players, UPnP/DLNA players, local HOS outputs, logical device targets, HOS Music Bridge endpoints, and other project-supported playback endpoints.
For each discovered output:
1. Confirm the name is clear.
2. Assign it to the correct Space.
3. Test one track or station.
4. Test volume and mute.
5. Confirm whether seek, queue, grouping, transfer, sync, and quality details are available.
Some outputs expose playback but not every control. If volume, grouping, queue, or transfer is missing, treat that as an output capability limit instead of a setup failure.
## Audio profiles and quality
Some projects may expose audio profiles, signal-path hints, headroom, EQ, or quality settings. Use only the options that HOS shows as available for the selected output.
Do not promise exclusive DAC control, bit-perfect local playback, or full runtime DSP unless the installed HOS release and output path explicitly support it.
## First working check
The first setup is ready when one Space can start playback, adjust volume, stop playback, browse or update the queue, and show the same music state from Haptique OS and the mobile app.
After that works, add more outputs, zones, favorites, and scene actions.
---
# Haptique Music Troubleshooting
Fix common Haptique Music setup, playback, zone, favorite, and scene issues.
Source: https://haptique.io/docs/haptique-music/troubleshooting
Slug: docs/haptique-music/troubleshooting
## Music output is missing
Confirm the device or integration is powered on, reachable, and assigned to a Space. If the output was just added, refresh the Haptique OS dashboard and reopen the mobile app.
If discovery is available, run discovery again and check whether the output appears under a different name, room, or provider.
## Playback does not start
Check that the selected source or library item is available, the output is online, and the target zone is not muted or already controlled by another source.
If playback fails only on one output, try the same track or station on a different output. If it works elsewhere, the issue is probably the selected output or that output's supported capabilities.
## Library is not updating
Confirm the folder is still mounted, reachable, and enabled. Run a new scan, then wait for albums, artists, tracks, and artwork to refresh.
If only some music appears, test with a small folder first. Large libraries and network folders can take longer to scan.
## Radio station does not play
Confirm the station stream URL is still valid and uses a supported stream format. Try the same station on one simple output before adding it to scenes, groups, or favorites.
## Streaming service is not available
Use only services that HOS shows as available and connected for the project. If a service is marked coming soon, unavailable, or disconnected, use local library, uploaded songs, or internet radio until the service is ready.
## Music starts on the wrong output
Check the Space and output name before starting playback. If the room has multiple outputs, choose the exact output, such as Living Room Speakers instead of TV Soundbar.
## Volume does not change
Confirm the output supports volume control through its integration. Some sources expose playback but rely on a receiver, amplifier, or another device for volume.
## Only one room changes volume in a group
The control may be changing one output instead of the group. Look for the group volume control if the connected system supports it. If group volume is not available, adjust each output separately.
## One player stops but another keeps playing
This is normal when music is playing as independent players in separate Spaces. Stop the specific player you want to silence, or stop the whole group if grouped playback is active.
## Grouped rooms are not exactly in sync
Mixed outputs and mixed providers may work as best-effort groups. For tighter sync, use outputs from the same audio system when that system supports native sync grouping.
If HOS shows sync-quality labels or warnings, follow those labels. A warning usually means the group can be controlled together but should not be treated as perfectly synchronized.
## Queue does not move to another output
Queue transfer depends on the source and destination output. If transfer is not available, start the same album, playlist, station, or favorite on the new output.
## Shuffle, repeat, or seek is missing
Not every source and output exposes every transport control. If a command is missing on one output, try the same source on another output to confirm whether it is a source limit or an output limit.
## Audio profile or quality setting is missing
Audio profiles, quality hints, and processing options depend on the selected output and installed HOS release. If the option is not shown, use the normal playback controls for that output.
## Favorite is missing
Check that the favorite was saved to the correct Space or user profile. Also confirm the signed-in user has permission to view and control that music source.
## Scene starts but music is wrong
Open the scene and confirm the target Space, output, source, favorite, and volume are correct. Test the music action by itself before testing the full scene.
## AI does not control music
Use clear names for Spaces, outputs, and favorites. Confirm AI control is enabled for the Space and that the current user has permission to run music actions.
---
# Adding Devices
Add supported devices to Haptique OS.
Source: https://haptique.io/docs/integrations/adding-devices
Slug: docs/integrations/adding-devices
Devices must be added to Haptique OS before they can appear in rooms, scenes, mobile apps, AI chat, RS90, or HomeKit.
## Add a device
1. Open Haptique OS.
2. Go to Devices or Integrations.
3. Choose Add Device.
4. Select the device type or driver.
5. Enter required details such as IP address or account information.
6. Test the connection.
7. Assign the device to a room.
8. Add it to scenes or favorites as needed.
## Naming
Use clear names. AI chat and mobile control work better with names people naturally say.
---
# AV Receivers
Add and control AV receivers in Haptique OS.
Source: https://haptique.io/docs/integrations/av-receivers
Slug: docs/integrations/av-receivers
AV receivers are central to media rooms and theaters. Haptique OS can use supported AVR integrations for power, input, volume, mute, and zone control.
## Setup basics
1. Put the AVR on the local network.
2. Reserve its IP address.
3. Add it in Haptique OS.
4. Test power, volume, mute, and source selection.
5. Assign it to the correct room.
6. Add it to scenes and media controls.
## Good scene examples
- Watch TV.
- Movie Night.
- Music.
- All Off.
## Troubleshooting
If commands are delayed or fail, confirm the AVR network control setting is enabled and that the receiver is not in a deep sleep mode that disables network access.
---
# HomeKit
Enable the Haptique OS HomeKit bridge and pair with Apple Home.
Source: https://haptique.io/docs/integrations/homekit
Slug: docs/integrations/homekit
HomeKit integration lets supported Haptique OS devices appear in Apple Home and Siri.
## Enable HomeKit bridge
1. Open Haptique OS.
2. Go to Integrations.
3. Open HomeKit.
4. Enable the bridge.
5. Confirm the bridge status is running.
6. Pair with Apple Home.
## Pair with Apple Home
1. Open the Home app.
2. Choose Add Accessory.
3. Scan or enter the Haptique OS pairing code.
4. Assign accessories to rooms.
5. Test a device and Siri command.
## Keep pairing stable
Do not delete HomeKit bridge data unless support asks you to. Resetting the bridge can require repairing accessories.
---
# IR Devices
Control infrared devices with Haptique OS and supported IR hardware.
Source: https://haptique.io/docs/integrations/ir-devices
Slug: docs/integrations/ir-devices
IR control helps integrate devices that do not provide a local IP API.
## When to use IR
- Legacy TVs.
- Projectors.
- Simple media devices.
- Air conditioners.
- Other remote-controlled equipment.
## Setup basics
1. Confirm you have supported IR hardware.
2. Add the IR device in Haptique OS.
3. Select or learn the required codes where supported.
4. Test each command.
5. Assign the device to a room.
## Reliability tips
IR often requires line of sight or careful emitter placement. Test commands from the real room position.
---
# Lighting and Climate
Use Haptique OS with lighting and climate devices.
Source: https://haptique.io/docs/integrations/lighting-and-climate
Slug: docs/integrations/lighting-and-climate
Lighting and climate are often the most visible parts of a smart home experience.
## Lighting
Use Haptique OS to group lights by room, add them to scenes, and expose supported lights to mobile apps, AI chat, RS90, and HomeKit.
## Climate
Climate controls can include target temperature, mode, fan, and room comfort settings depending on integration support.
## Scene examples
- Morning: warm lights and comfortable temperature.
- Movie Night: low lights and cooler room.
- Away: lights off and energy-saving climate.
## Safety
Avoid aggressive climate automations until you have tested device behavior.
---
# Supported Systems
Understand the types of systems Haptique OS can integrate with.
Source: https://haptique.io/docs/integrations/supported-systems
Slug: docs/integrations/supported-systems
Haptique OS is designed to bring different home and AV systems into one controller.
## Common categories
- AV receivers.
- TVs and projectors.
- Streamers and media players.
- Lighting.
- Climate.
- Shades.
- HomeKit.
- IP devices.
- IR devices.
- Bluetooth devices where supported.
- Professional AV equipment.
- ESPHome and Tasmota device ecosystems where supported by the current release.
## Confirm exact support
Specific brand and model support can vary by release. Check the integration list in your Haptique OS version or the [Developer Wiki](https://wiki.haptique.io) for technical integration details.
---
# Activation
Activate a Haptique OS license online or offline where supported.
Source: https://haptique.io/docs/licensing/activation
Slug: docs/licensing/activation
Activation links your local Haptique OS installation to a license. Start from a Haptique OS copy downloaded through the official [HOS downloads page](/downloads); licenses are issued and activated for that official download flow.
## Online activation
1. Open Haptique OS.
2. Go to License settings.
3. Use the myHOS email-link sign-in flow for the email address that owns the license, or enter your claim code.
4. Confirm activation.
5. Check that the license status is active.
You can review or claim licenses in [myHOS](https://myhos.haptique.io/login?return=/licenses).
myHOS does not use a separate password login in the production portal. If you open `/licenses` while signed out, myHOS redirects you to the email sign-in page and then returns you to the licenses page after the magic link is verified.
## Offline activation
If supported:
1. Generate the hardware identity from Haptique OS.
2. Use [myHOS](https://myhos.haptique.io/login?return=/licenses) or the supported license file request flow on an internet-connected device.
3. Download the license file.
4. Upload it in Haptique OS.
5. Confirm the system shows active status.
For the file-based workflow, see [Request a License File](/docs/licensing/request-license).
## Keep a copy
Keep your license account details available for transfer, support, or reinstall scenarios.
---
# License Transfer
Transfer or revoke a Haptique OS license when changing hardware.
Source: https://haptique.io/docs/licensing/license-transfer
Slug: docs/licensing/license-transfer
Machine-bound licenses may need transfer when you replace the local Haptique OS host.
## Before transferring
- Confirm you can access the old installation if possible.
- Back up configuration.
- Confirm the new host is ready.
- Check the license portal for current transfer rules.
## Typical transfer flow
1. Open the license portal and sign in from the email link sent to your inbox.
2. Revoke or release the old machine where supported.
3. Install Haptique OS on the new host.
4. Activate with the same license.
5. Restore or reconfigure your home.
Contact support if the old machine is unavailable.
---
# Plans
Understand Haptique OS license plans at a high level.
Source: https://haptique.io/docs/licensing/plans
Slug: docs/licensing/plans
Haptique OS licensing should be easy to understand: start with local control, then unlock advanced features when needed.
## Free
The free tier is intended for core local control and getting started with Haptique OS.
## Pro
Pro is intended for users who want advanced features such as native AI, priority updates, and other premium capabilities when available.
## Confirm current pricing
Pricing, promotions, and included features can change. Use the production license portal for the current offer before publishing fixed pricing in docs.
---
# Request a License File
Generate a signed Haptique OS license file (.lic) bound to your machine's hardware ID.
Source: https://haptique.io/docs/licensing/request-license
Slug: docs/licensing/request-license
Use this page to request a signed `.lic` license file for offline activation.
A license file is cryptographically bound to your machine's hardware UUID and cannot be used on a different machine.
---
## Step 1 — Find your Machine ID
Run the command for your platform:
```bash
system_profiler SPHardwareDataType | grep "Hardware UUID"
```
```powershell
(Get-WmiObject Win32_ComputerSystemProduct).UUID
```
Copy the UUID value — it looks like `26B8090A-BF7A-11EB-9259-744CA1A965A6`.
---
## Step 2 — Request your license
Paste your Machine ID below and click **Request License**. You will be taken to the license generation workflow on GitHub where you can confirm and run it.
---
## Step 3 — Run the workflow
On the GitHub Actions page:
1. Click **Run workflow**.
2. Paste your Machine ID into the **machine_id** field.
3. Optionally enter your name in the **customer** field.
4. Click **Run workflow** to confirm.
5. Once the run completes (usually under 30 seconds), open the run summary and download the **license artifact** — a `.lic` file.
---
## Step 4 — Activate
Place the downloaded `.lic` file on your Haptique OS machine at:
```
~/.haptique/license/license.json
```
Or upload it via the web UI at `http:// /os/license`.
:::note
The `.lic` file is bound to the machine ID you submitted. It will not activate on a different machine. If you replace your hardware, use the [License Transfer](/docs/licensing/license-transfer) page.
:::
---
# AI Chat on Mobile
Use Haptique OS AI chat from the mobile apps.
Source: https://haptique.io/docs/mobile/ai-chat-on-mobile
Slug: docs/mobile/ai-chat-on-mobile
AI chat on mobile lets you control the home without navigating through every device screen.
## What to try
- "Turn off the kitchen lights."
- "Start Movie Night in the theater."
- "Create a scene for reading in the bedroom."
- "Set the living room to evening mode."
- "Pause the music downstairs."
## Mobile advantages
Mobile AI chat is useful because the phone is usually nearby. You can ask for a room-level change, save a scene, or adjust media without finding the exact device screen.
Before using mobile chat broadly, complete the [AI Setup Guide](/docs/advanced-os/ai-setup-guide) so Spaces, logical devices, scenes, and permissions are ready.
## Confirm before running broad actions
If AI is about to affect many devices or create an automation, review the action before confirming.
---
# Favorites
Set up and use favorites in the Haptique mobile apps.
Source: https://haptique.io/docs/mobile/favorites
Slug: docs/mobile/favorites
Favorites put the most common actions in easy reach.
## What can be a favorite
- A room.
- A device.
- A scene.
- A media zone.
- A frequently used control action.
## Creating favorites
1. Open the mobile app.
2. Find the room, device, or scene you use often.
3. Choose Add to Favorites.
4. Reorder favorites so the most common controls are first.
5. Test each favorite.
## Favorite strategy
Keep favorites practical. A good home screen usually includes the main room, common scenes, active media zone, and a few high-frequency devices.
---
# Mobile Media Control
Control AV receivers, media zones, playback, and volume from Haptique mobile apps.
Source: https://haptique.io/docs/mobile/media-control
Slug: docs/mobile/media-control
Mobile media control brings AV and music systems into the same interface as rooms, scenes, and favorites.
## Common controls
- Play and pause.
- Previous and next.
- Volume and mute.
- Source selection.
- Zone selection.
- Power.
- Now playing metadata when supported.
## AV rooms
In a theater or living room, media control may combine multiple devices: TV or projector, AVR, streamer, lights, shades, and climate. Scenes can prepare the full room, while media controls handle playback.
## State sync
The mobile app should reflect backend-confirmed state, not just optimistic taps. If the receiver changes input or volume, the app should update from Haptique OS.
---
# Notifications and Presence
How mobile notifications and presence can fit into Haptique OS.
Source: https://haptique.io/docs/mobile/notifications-and-presence
Slug: docs/mobile/notifications-and-presence
Mobile devices can help Haptique OS become more useful when notifications and presence features are enabled.
## Notifications
Notifications may be used for:
- System status.
- License or update messages.
- Device offline alerts.
- Scene or automation confirmation.
- Security or critical home events where supported.
## Presence
Presence features can help personalize automations, but they should be optional and privacy-aware.
Examples:
- Run arrival scenes.
- Adjust climate when someone returns.
- Show personalized favorites.
## Privacy
Presence should be explained clearly before users enable it. Users should know what is tracked, where it is stored, and how to turn it off.
---
# Mobile Apps
Overview of Haptique OS mobile apps.
Source: https://haptique.io/docs/mobile/overview
Slug: docs/mobile/overview
The Haptique mobile apps are daily control surfaces for Haptique OS. They are not just setup utilities. They are how many users interact with rooms, favorites, devices, scenes, media, and AI chat.
## What mobile apps do
- Sign in with credentials created on the fleet server.
- Show rooms and devices.
- Trigger and edit scenes.
- Manage favorites.
- Control media and AV devices.
- Use AI chat for natural-language control.
- Reflect live state from the local controller.
## Access model
Users download the HOS mobile app from the App Store or Google Play Store, then sign in with credentials created on the fleet server. The signed-in account determines which Haptique OS site, rooms, devices, scenes, favorites, media zones, and AI features are available.
Haptique OS remains the source of truth for the project model and control state. Remote or local control depends on the configured site access and the user's permissions.
## Availability
The HOS mobile app is available for iPhone and iPad from the App Store, and for Android phones and tablets from the Google Play Store.
---
# HOS Mobile App
Download the HOS mobile app and sign in with fleet server credentials.
Source: https://haptique.io/docs/mobile/pairing-with-haptique-os
Slug: docs/mobile/pairing-with-haptique-os
The HOS mobile app works with Haptique OS after a user account is created on the fleet server. Normal mobile access is a download-and-sign-in flow.
## Download the app
- iPhone and iPad: download the HOS mobile app from the App Store.
- Android phones and tablets: download the HOS mobile app from the Google Play Store.
## Before signing in
- A fleet server admin or installer must create the user account.
- The user must have the correct credentials for the Haptique OS site or home.
- User permissions control which rooms, devices, scenes, favorites, media zones, and AI features appear in the app.
## Sign in
1. Install the HOS mobile app.
2. Open the app.
3. Enter the credentials created on the fleet server.
4. Select the assigned Haptique OS site or home if prompted.
5. Confirm that rooms, devices, scenes, favorites, and media zones appear.
6. Test one room, one scene, and one favorite.
## If sign-in fails
Confirm the account exists on the fleet server, the credentials are correct, and the user is assigned to the right Haptique OS site or home. If needed, ask the fleet server admin or installer to reset the password or update permissions.
---
# Rooms and Devices on Mobile
Navigate rooms and control devices from the Haptique mobile apps.
Source: https://haptique.io/docs/mobile/rooms-and-devices
Slug: docs/mobile/rooms-and-devices
The mobile app is organized around rooms so users can think by space instead of brand.
## Room view
A room can show:
- Lights.
- Climate devices.
- Shades.
- Media zones.
- AV controls.
- Favorite actions.
- Relevant scenes.
## Device control
Tap a device to open the right control surface. For example:
- Lights show brightness or color controls.
- Media devices show playback and volume controls.
- AV devices show source and power controls.
- Climate devices show temperature and mode controls.
## Naming tips
Use names people say naturally:
- Theater Projector.
- Living Room Lights.
- Kitchen Music.
- Bedroom AC.
---
# Scenes on Mobile
Trigger, create, edit, and organize Haptique OS scenes from mobile apps.
Source: https://haptique.io/docs/mobile/scenes
Slug: docs/mobile/scenes
Scenes let one tap change multiple devices together. Mobile apps make scenes easy to run, review, and edit.
## Triggering scenes
Open the Scenes area or a room page, then tap the scene. Confirm the affected room updates as expected.
## Creating scenes manually
1. Open Scenes.
2. Choose New Scene.
3. Name the scene.
4. Add rooms and devices.
5. Set each device state.
6. Save.
7. Test the scene.
## Creating scenes with AI
You can also ask AI chat to draft a scene:
> "Create a Dinner scene for the dining room with warm lights and soft music."
Review the proposed actions before saving.
## Organizing scenes
Use clear names and group by purpose: Morning, Evening, Away, Entertain, Movie, Sleep, Cleaning.
---
# Mobile Troubleshooting
Fix common Haptique OS mobile app sign-in and sync issues.
Source: https://haptique.io/docs/mobile/troubleshooting
Slug: docs/mobile/troubleshooting
## App cannot sign in
Confirm the user account exists on the fleet server, the credentials are correct, and the account is assigned to the right Haptique OS site or home.
## Rooms or scenes are missing
Refresh the app, confirm you are signed in to the correct site or home, and check user permissions on the fleet server.
## Controls do not update
Check that the Haptique OS service is running and that the signed-in user still has access to the site or home.
## AI chat does not respond
Check AI feature settings, license status, local runtime status, and network connection to the Haptique OS instance.
---
# RS90 Button Mapping
Map RS90 buttons to Haptique OS rooms, scenes, devices, and favorites.
Source: https://haptique.io/docs/rs90/button-mapping
Slug: docs/rs90/button-mapping
Button mapping decides what each RS90 button does.
## What buttons can map to
- A scene.
- A favorite.
- A device action.
- A media command.
- A room-level action.
- An AV source or input command.
## Recommended setup
1. Assign the remote to a primary room.
2. Map the most common scene to a top-level button.
3. Map volume and playback to the active media zone.
4. Add lighting controls for the room.
5. Add source selection for AV rooms.
6. Test every mapped button in the room.
## Keep mappings simple
Use RS90 for the actions people need most often. Put advanced or rare actions in the mobile app.
---
# RS90 Firmware Updates
Update RS90 firmware when supported by Haptique OS.
Source: https://haptique.io/docs/rs90/firmware-updates
Slug: docs/rs90/firmware-updates
Firmware updates keep RS90 current with the latest remote behavior, pairing improvements, and supported control features.
## Before updating
- Charge RS90.
- Keep it near the Haptique OS controller or on the required network.
- Do not power it off during update.
- Keep Haptique OS running.
## Update flow
1. Open Haptique OS.
2. Go to Remotes.
3. Select RS90.
4. Check firmware status.
5. Start update if available.
6. Wait for completion.
7. Test mapped buttons after restart.
:::note
Only publish firmware update instructions that match the shipping update mechanism.
:::
---
# RS90 with Licensed HOS
Use Haptique RS90 with a licensed Haptique OS controller and HOS devices exposed in Config App.
Source: https://haptique.io/docs/rs90/hoslicensed
Slug: docs/rs90/hoslicensed
After RS90 is paired with a licensed Haptique OS controller, HOS devices can appear inside the existing RS90 Config App. These devices are powered by HOS, but they are organized from the same mobile app RS90 users already use for rooms, favorites, and device setup.
This page assumes RS90 is already paired. If not, start with [Pair Haptique RS90](/docs/rs90/pairing).
Licensed HOS path
HOS owns the device logic. RS90 gets the control surface.
HOS devices show under the HOS device category.
Favorites decide what appears quickly on RS90.
Device actions still execute through the local HOS controller.
## What licensed HOS adds
A licensed HOS setup lets the local HOS controller expose supported [logical devices](/docs/advanced-os/logical-devices) to RS90 configuration. The Config App still manages the RS90 experience, but the device source is HOS.
| Area | What changes |
| :-- | :-- |
| Device source | Devices can come from HOS logical devices and integrations. |
| Config App | The existing RS90 Config App shows HOS devices in the device list. |
| Favorites | Heart icons mark devices that should be easier to reach from RS90. |
| Device actions | Commands route back through HOS for execution. |
| Setup model | HOS remains the controller. RS90 remains the remote. |
## Add Logical Devices via Fleet Release
Select stable Logical Devices, assign categories, then submit the release.
Use a Fleet Release to decide which HOS Logical Devices become available to RS90. If you need the concept first, start with [Logical Devices](/docs/advanced-os/logical-devices). Keep the release small at first: one room, a few proven devices, then expand after RS90 control is verified.
1. Open the Fleet Release for the licensed HOS controller.
2. Go to **Logical Devices**.
3. Select the devices RS90 should control.
4. Include only stable devices, scenes, bridges, or media endpoints.
5. Publish or sync the release.
6. Open Config App and check **My Devices** → **HOS**.
7. Mark the devices RS90 should surface quickly as favorites.
## HOS devices in Config App
Use **My Devices** in Config App to review devices exposed from the licensed HOS controller. Select the **HOS** category chip to focus the list on HOS-backed devices.
HOS-backed devices in Config App.
## How to use this screen
1. Open the existing RS90 Config App.
2. Confirm it is connected to the same local HOS server used during pairing.
3. Open **My Devices**.
4. Tap the **HOS** category chip.
5. Review the HOS-backed devices.
6. Tap the heart icon for devices you want to keep close on RS90.
7. Use the three-dot menu for device options.
8. Test the device from RS90 after changing favorites or assignments.
## What the HOS badge means
The HOS badge means the device is coming through the HOS path. The device may represent a TV, streamer, AVR, bridge, media endpoint, IR bridge, or another supported logical device.
The badge does not mean the command runs inside the mobile app. The mobile app configures RS90. HOS still owns device state, command execution, integration credentials, and local automation logic.
## Recommended first setup
Start with a small, proven set of HOS devices.
1. Add one room or Space in HOS.
2. Expose only the devices RS90 should control first.
3. Mark the main TV, streamer, AVR, or bridge as favorites.
4. Test each favorite from RS90.
5. Add more devices after the first room works.
Good first devices:
- Main TV or display.
- Primary streaming device.
- AVR or sound device.
- IR Device Bridge.
- One media endpoint.
- One scene or room-level control.
## Verification checklist
| Check | Expected result |
| :-- | :-- |
| HOS license | Controller is licensed and active. |
| Pairing | RS90 is paired to the same HOS server as Config App. |
| Device list | HOS category appears in My Devices. |
| Favorites | Hearted devices remain available after app refresh. |
| RS90 control | A real command works from the remote. |
| HOS state | HOS reflects the device state after RS90 sends a command. |
## If HOS devices are missing
- Confirm the HOS license is active.
- Confirm Config App is connected to the local HOS server, not cloud.
- Confirm RS90 is paired to the same HOS server.
- Confirm devices are visible and active in HOS.
- Confirm the device is exposed to the RS90-compatible path.
- Refresh Config App or sign out and back in.
- Restart RS90 if the device list does not update.
## Keep Fleet and HOS clear
Licensed HOS does not replace the hosted Fleet product. It adds a local HOS controller path for RS90. Fleet/cloud and HOS local can share concepts, but HOS remains the local controller and Config App remains the existing RS90 mobile configuration app.
---
# IR, IP, and Bluetooth Control
Understand RS90 control paths for IR, IP, and Bluetooth devices.
Source: https://haptique.io/docs/rs90/ir-ip-bluetooth-control
Slug: docs/rs90/ir-ip-bluetooth-control
RS90 may support different control paths depending on device type and product configuration.
## IP control
IP control sends commands over the local network. It is often preferred for AV receivers, TVs, streamers, and other networked devices when supported.
## IR control
IR control is useful for devices that do not have reliable network APIs. It requires line of sight or a compatible IR path.
## Bluetooth control
Bluetooth may be used for supported devices or pairing flows where available.
## Choosing the right path
Use IP control when available. Use IR for legacy devices or simple remotes. Use Bluetooth only when the device and RS90 workflow explicitly support it.
:::note
Exact RS90 radio and IR learning support should match the shipping hardware and firmware for your release.
:::
---
# RS90 Remote Overview
Connect Haptique RS90 to Haptique OS through Config App and your local server.
Source: https://haptique.io/docs/rs90/overview
Slug: docs/rs90/overview
Haptique RS90 connects to Haptique OS through your local HOS server. Config App and the RS90 must both point to the same server before pairing can work.
Use Config App from the App Store or Google Play Store to configure Haptique RS90. In local HOS setup, the app is used to select the local server, create the local user, sign in with credentials, scan the RS90 QR code, and confirm the pairing PIN.
## Required order
1. Start HOS and confirm the local server IP address.
2. Open Config App on iOS or Android.
3. Change the Config App server to the HOS server IP address using the Local server option.
4. Create a new user in Config App using email and password credentials.
5. Sign in to Config App with those credentials.
6. Reset the RS90 so it shows a fresh QR code.
7. On the RS90, use Change Server and enter the same HOS server IP address.
8. Scan the RS90 QR code from Config App.
9. Enter the 4-digit PIN shown during pairing.
After the PIN is accepted, Config App and RS90 are connected through the same local HOS server.
## Important sign-in notes
Google and Apple sign-in do not work for this local setup. The user is created locally on the selected HOS server, so use the credential account created in Config App.
If Config App or RS90 is still pointed at a different server, pairing will fail or the QR code will not connect through the expected local HOS server.
Continue with [Pairing RS90](/docs/rs90/pairing).
---
# Pair Haptique RS90
Pair Haptique RS90 with Haptique OS using Config App, the local HOS server, and the RS90 QR flow.
Source: https://haptique.io/docs/rs90/pairing
Slug: docs/rs90/pairing
Pairing works when **Config App**, **Haptique RS90**, and the **local Haptique OS server** all point to the same HOS address.
Use this page when the RS90 should work with a local HOS controller on your home or site network.
Target state
One local HOS server. One Config App login. One RS90 QR pairing.
Config App uses the local HOS server.
RS90 uses the same server address.
The QR scan binds RS90 to that local account.
## Start at the local HOS landing page
Open HOS from the machine running the server, or from another device on the same network.
- `http://haptique-os.local:8080`
- `http://localhost:8080`, only on the HOS machine itself
- `http://YOUR-HOS-IP:8080`, for phones, tablets, and RS90 setup
The HOS landing page has two workspaces. Use Config Server for RS90 configuration and pairing. Use Haptique OS for the local automation dashboard.
Config Server
Use this path for Config App, RS90 pairing, local user sign-in, room assignment, favorites, and RS90 control setup.
Haptique OS
Use this path for the HOS dashboard, local devices, logical devices, integrations, spaces, scenes, and automation setup.
For RS90 pairing, both paths matter. Configure the home in HOS first, then pair RS90 through Config Server and Config App.
## Config App server selection
Config App is the existing mobile app RS90 users already use to configure the remote. It is not the HOS dashboard and it is not a separate HOS mobile app. Before signing in or creating the local user, point Config App to the HOS server that RS90 will use.
1. Tap Change Server from the login screen.
2. Choose Local for a HOS server on your network.
3. Enter the HOS server IP address and port.
## Before pairing
- HOS is running and its local IP address is known.
- The phone or tablet running Config App can reach that server in a browser.
- RS90 is charged and powered on.
- Config App and RS90 are on the same network path as the HOS server.
- Guest Wi-Fi, isolated VLANs, VPNs, and firewall prompts are disabled or configured correctly.
- You are ready to create a local email and password user. Do not use Google or Apple sign-in for this local setup.
## Pairing map
1 Open HOS locally. Confirm the landing page loads at `haptique-os.local:8080`, `localhost:8080`, or the HOS machine IP.
2 Enter Config Server. This is the RS90 configuration workspace.
3 Point the existing RS90 Config App to Local. Use the same HOS IP and port that the RS90 will use.
4 Create the local user. Use email and password credentials on this HOS server.
5 Reset RS90 to setup. Generate a fresh QR code and change the RS90 server address.
6 Scan and confirm. Scan the QR code from Config App, enter the PIN, then test one real command.
## Pairing flow
1. Start HOS and confirm the local landing page opens.
2. Choose **Config Server** from the landing page.
3. Open the existing RS90 Config App from the App Store or Google Play Store.
4. In Config App, change the server to the IP address of the running HOS server.
5. Create a new local user in Config App with email and password credentials.
6. Sign in to Config App with those credentials. Do not use Google or Apple sign-in for this local-server setup.
7. Reset the RS90 so it shows a new QR code.
8. On the RS90, choose **Change Server** and enter the same HOS server IP address used in Config App.
9. When the RS90 is ready and shows its QR code, scan it from Config App.
10. Enter the 4-digit PIN generated during pairing.
11. Confirm Config App and RS90 show the paired connection.
12. Test one room, one device, or one favorite from RS90.
## RS90 setup screen
After Config App is pointed at the local HOS server, reset RS90 or return it to setup mode.
On RS90:
1. Open **Settings**.
2. Choose **Reset**, or return to the first setup screen.
3. Wait for the setup screen and QR code.
4. Choose **Change Server**.
5. Enter the same local HOS server address used in Config App.
6. Return to the QR code screen.
Use the numeric IP address if `haptique-os.local` does not resolve from RS90.
## What to verify after pairing
Do not stop at the QR success screen. Prove the local path with one real action.
| Check | Expected result |
| :-- | :-- |
| Config App server | Shows the local HOS address or local mode. |
| RS90 server | Matches the Config App server address. |
| Local account | Uses email and password created on the HOS server. |
| Room or device list | Shows the local HOS project content. |
| First command | A real device, scene, or favorite responds. |
If the UI updates but the physical device does not respond, pairing succeeded but the device integration or command mapping still needs work.
## If pairing fails
- Confirm HOS is still running.
- Confirm Config App and RS90 both use the same HOS server IP address.
- Confirm the Config App user was created locally with credentials.
- Confirm the phone can open `http://YOUR-HOS-IP:8080`.
- Confirm RS90 and the phone are not on guest Wi-Fi.
- Disable VPN while pairing.
- Reset RS90 again to generate a fresh QR code.
- Re-scan the QR code and enter the new 4-digit PIN.
## Common mistakes
| Mistake | Fix |
| :-- | :-- |
| Entering `localhost` on the phone | Use the HOS machine IP address instead. |
| Config App on cloud, RS90 on local | Change Config App to Local before signing in. |
| RS90 on old server address | Reset RS90 and use Change Server again. |
| Using Google or Apple sign-in | Create a local email and password user. |
| Guest Wi-Fi blocks pairing | Move HOS, phone, and RS90 to the main LAN. |
---
# RS90 Scenes and Favorites
Use RS90 to trigger Haptique OS scenes and favorites.
Source: https://haptique.io/docs/rs90/scenes-and-favorites
Slug: docs/rs90/scenes-and-favorites
RS90 works best when it exposes the same high-value scenes and favorites users already understand from the mobile app.
## Useful scene mappings
- Movie Night.
- Watch TV.
- Music.
- Dinner.
- Good Night.
- All Off.
## Favorite mappings
Favorites are useful for device actions that are too small to become a full scene:
- Toggle reading lamp.
- Mute AVR.
- Open shades.
- Switch to Apple TV.
- Pause media.
## Testing
After mapping scenes or favorites, test each button and confirm the Haptique OS dashboard and mobile apps reflect the updated state.
---
# RS90 Troubleshooting
Fix common RS90 pairing, control, and button mapping issues.
Source: https://haptique.io/docs/rs90/troubleshooting
Slug: docs/rs90/troubleshooting
## RS90 does not appear during pairing
Confirm RS90 is in pairing mode, charged, and near the Haptique OS instance. Check that both devices are on the required network.
## A button does nothing
Check the button mapping, assigned room, target device, and whether the target device is online.
## Media buttons control the wrong room
Confirm the RS90 is assigned to the correct room or active media zone.
## Remote state is out of sync
Reconnect RS90 and confirm Haptique OS shows it as connected. Test the same action from the mobile app to isolate whether the issue is RS90 or the device integration.
---
# Common Issues
Common Haptique OS setup, mobile app, device, licensing, and AI issues.
Source: https://haptique.io/docs/support/common-issues
Slug: docs/support/common-issues
## Haptique OS will not open
Restart the app, confirm the host meets system requirements, and check whether another service is using the required local port.
## Mobile app cannot sign in or sync
Confirm the user account exists on the fleet server, the credentials are correct, and the account is assigned to the right Haptique OS site or home.
## Device does not respond
Check the device is powered on, connected to the network, assigned to the correct room, and controllable from its integration page.
## License activation fails
Check your claim code, account, internet connection, and system clock. If using offline activation, confirm the license file matches the current machine.
## AI chat cannot control something
Confirm the device is configured, online, named clearly, and available to the current user.
---
# Contacting Support
How to prepare a useful Haptique OS support request.
Source: https://haptique.io/docs/support/contacting-support
Slug: docs/support/contacting-support
Good support requests include enough context to reproduce or diagnose the issue.
## Include
- What you expected to happen.
- What actually happened.
- The app or surface used: desktop, mobile, RS90, HomeKit, AI chat, or menu bar.
- Device or room affected.
- Approximate time of issue.
- Relevant logs or screenshots.
## Contact
For support, contact [bonjour@cantatacs.com](mailto:bonjour@cantatacs.com) or use the support channel provided with your license.
---
# LLM Access
Use llms.txt or the local Haptique docs MCP server to give AI assistants read-only access to the public Haptique OS documentation.
Source: https://haptique.io/docs/support/llm-access
Slug: docs/support/llm-access
Haptique publishes public docs in formats that AI assistants can read without copying pages by hand.
Use the normal docs site for people:
- [Haptique OS docs](/docs/)
- [Docs index for LLMs](/llms.txt)
- [Full docs text for LLMs](/llms-full.txt)
Use the local MCP server when an assistant supports Model Context Protocol and can run a command from this repository.
```json
{
"mcpServers": {
"haptique-docs": {
"command": "npm",
"args": ["run", "docs:mcp", "--prefix", "/path/to/hos-website"]
}
}
}
```
The MCP server is read-only. It exposes public docs pages as resources and provides tools to list, search, and read docs. It does not expose installer manifests, license records, customer data, project data, or private wiki content.
## Available MCP tools
- `list_docs` lists docs pages and accepts an optional section prefix such as `docs/rs90`.
- `search_docs` searches titles, descriptions, slugs, and page content.
- `read_doc` reads one docs page by slug, `haptique-docs://` resource URI, or `https://haptique.io` URL.
## Good prompts
- Search the Haptique docs for RS90 pairing help.
- Read the Haptique OS license activation docs.
- Find the Haptique docs page that explains AI setup.
- List all docs under `docs/mobile`.
---
# Logs and Diagnostics
Find logs and diagnostic information for Haptique OS support.
Source: https://haptique.io/docs/support/logs-and-diagnostics
Slug: docs/support/logs-and-diagnostics
Logs help support understand what happened when a device, app, license, AI, or integration does not behave as expected.
## What to collect
- Haptique OS version.
- Host operating system.
- License status.
- Device or integration name.
- Time of the issue.
- Relevant logs.
- Screenshots or screen recordings.
## Where to start
Open the desktop app or dashboard and look for Diagnostics, Logs, or Support. The Mac menu bar app may also provide a quick path to logs when supported.
Do not share sensitive tokens, passwords, or private network details unless support specifically asks through a secure channel.
---
# Network Checklist
Network checks for reliable Haptique OS local control.
Source: https://haptique.io/docs/support/network-checklist
Slug: docs/support/network-checklist
Reliable local control depends on a healthy local network.
## Check these first
- Haptique OS host has a stable IP address.
- Phone, RS90, and devices can reach the Haptique OS host.
- mDNS or local discovery works where required.
- Firewall rules allow local access.
- AV devices have network control enabled.
- Wi-Fi coverage is strong in rooms where mobile or RS90 control is used.
## Recommended
Use DHCP reservations or static IPs for critical devices such as the Haptique OS host, AV receivers, TVs, projectors, and bridges.
The myHOS Licenses and activation page where email links land and where you can pair Haptique OS or download a manual license file.
## Free and Pro plans
Promotions, free tiers, and Pro feature availability should always match the live portal. If the website mentions a limited offer, confirm it is still active before publishing.
## Next
Install Haptique OS from the official download, then activate from the desktop app, local dashboard, or [Activation](/docs/licensing/activation) flow.
---
# Licensing
Understand Haptique OS licensing during first setup.
Source: https://haptique.io/docs/getting-started/licensing
Slug: docs/getting-started/licensing
Haptique OS uses licensing to activate features on your local controller. The goal is to keep local home control reliable while still allowing account management, upgrades, and transfers through the license portal.
## During first setup
You may be asked to:
1. Enter your myHOS email address and use the sign-in link sent to your inbox.
2. Enter a claim code.
3. Upload a license file for offline activation where supported.
4. Confirm the license is active.
myHOS does not have a separate direct password login in production.
## What licensing controls
Licensing may control access to premium capabilities such as native AI, advanced account features, priority updates, or remote access features depending on the plan.
## Local operation
Once activated, Haptique OS should keep core local control available according to the license and product rules for your release.
See [Activation](/docs/licensing/activation) for the full activation guide.
---
# Setup Network Checklist
Prepare the local network before using Haptique OS.
Source: https://haptique.io/docs/getting-started/network-checklist
Slug: docs/getting-started/network-checklist
Before adding devices and testing app control, check the local network.
## Checklist
- Haptique OS host is connected to the home network.
- Host IP is reserved or static.
- Mobile devices have internet access for sign-in and the required network access for local control.
- Controlled devices are powered on and reachable.
- mDNS or discovery traffic is allowed where needed.
- Firewall allows local dashboard and app access.
- VPN, guest Wi-Fi, and client isolation are disabled for devices that must talk to the controller.
- The host will not sleep during normal control hours.
- AV, lighting, climate, HomeKit, RS90, and music endpoints are on reachable subnets.
## First test
After installation, test from the same network:
1. Open the Haptique OS dashboard from the host.
2. Open the dashboard from a phone, tablet, or second computer.
3. Add one integration or device.
4. Confirm state changes are visible after a real action.
5. Sign in to the mobile app and confirm the same project appears.
## Why this matters
Haptique OS is local-first. A stable LAN makes local mobile control, device discovery, RS90 control, HomeKit, Haptique Music, and AI-assisted control more reliable.
---
# With RS90
Add RS90 to a Haptique OS project, including Fleet release setup, licensing, room assignment, and button configuration.
Source: https://haptique.io/docs/getting-started/with-rs90
Slug: docs/getting-started/with-rs90
RS90 is optional. Haptique OS can be installed and used as software on a supported Mac, Linux, or Windows machine without owning RS90. Use this page only when the project includes the physical remote.
## Requirements
- A licensed Haptique OS controller.
- A working project with at least one Space and logical device.
- Network access between RS90 and the Haptique OS controller.
- A Fleet release assigned to the controller when RS90 configuration or HOS device definitions are delivered through Fleet.
## Fleet and license flow
Fleet releases are applied through Haptique OS. A valid Haptique OS license is required before the controller can receive or use licensed release content for the project.
1. Activate the Haptique OS license on the controller.
2. Assign the correct Fleet release to the site, device group, or controller.
3. Confirm Haptique OS receives the release.
4. Expose any Fleet-released HOS devices as logical devices.
5. Place those logical devices in Spaces.
6. Add scenes, favorites, or media zones that RS90 should control.
RS90 should not run the integration logic itself. Haptique OS receives the Fleet release, runs the integration, owns the project state, and publishes the relevant rooms, scenes, favorites, media zones, and button mappings to RS90.
## Configure RS90
1. Pair RS90 with the local Haptique OS controller.
2. Assign RS90 to the Space it should control first.
3. Map the primary buttons to common room actions.
4. Add media controls when the Space has a media zone.
5. Test each button from the room where RS90 will be used.
6. Confirm the mobile app reflects the same state after RS90 sends a command.
Good first mappings:
- Room on or off.
- Favorite scene.
- Volume, mute, and media transport.
- Lights, shades, or AV input.
- Space-level all off.
## How RS90 reacts
When someone presses RS90, the remote sends the action to Haptique OS. Haptique OS executes the integration command, updates the project state, and connected apps reflect the result.
If a mobile app or desktop app changes the same room state, RS90 should continue controlling the current Haptique OS project state for its assigned Space.
---
# Favorites and Scenes
Save Haptique Music favorites and use music inside HOS scenes.
Source: https://haptique.io/docs/haptique-music/favorites-and-scenes
Slug: docs/haptique-music/favorites-and-scenes
Favorites make repeated music actions fast. Scenes let music join the rest of the room setup.
## Create music favorites
Create favorites for music actions people use often:
- A playlist.
- A radio station.
- A saved filter or smart view.
- A frequently played album, artist, or track.
- A composer, composition, genre, or tagged collection.
- A source input.
- A common volume level.
- A preferred room or media zone.
Use names people would naturally say or tap, such as Morning Jazz, Dinner Playlist, Patio Radio, or Theater Intermission.
## Choose how specific a favorite should be
A music favorite can be broad or specific.
Use a broad favorite when the consumer should choose the output at the moment, such as Jazz Radio or Morning Playlist.
Use a specific favorite when the action should always play in the same place, such as Kitchen Morning Playlist or Patio Radio.
## Use bookmarks and saved filters
For large libraries, favorites are not the only shortcut.
- Use bookmarks for individual tracks, albums, stations, or playlists the consumer wants to return to.
- Use tags for personal groupings, such as Workout, Guests, Kids, Reference, or Late Night.
- Use saved filters for repeat searches, such as Jazz, Hi-res Albums, Kids Music, or Dinner.
- Use smart views when HOS can automatically group useful library shelves.
Keep these names short and human. They should work well in the mobile app, on RS90 labels, and in AI commands.
## Use presets carefully
When presets are available, use them for repeatable music setups such as a source, output, queue behavior, or preferred volume.
Use a scene when music should run with lights, climate, shades, or AV. Use a music preset when the shortcut is only about listening.
## Add music to a scene
1. Open the scene editor.
2. Choose the Space for the scene.
3. Add the lighting, climate, AV, or shade actions first.
4. Add the Haptique Music output or media zone.
5. Choose the favorite, source, or playback action.
6. Set a comfortable volume.
7. Save and test the scene from Haptique OS and the mobile app.
## Good first scenes
- Morning: kitchen lights on, Kitchen Music starts at low volume.
- Dinner: dining lights dim, Dinner Playlist starts.
- Party: selected zones start the same favorite playlist.
- Movie Night: music stops, AV scene starts, theater lights dim.
## Multi-room scenes
For multi-room scenes, decide whether the scene should start grouped playback or independent playback in each Space.
Use grouped playback when the same music should stay in sync across rooms, such as Party or Whole Home Morning.
Use independent playback when each Space may need separate volume, source, or stopping behavior.
## RS90 and AI
Map only the most common music actions to RS90 buttons. For AI, keep names short and specific so commands like "play Dinner Playlist in the kitchen" can resolve to the right Space and output.
---
# Haptique Music
Set up Haptique Music for services, libraries, outputs, rooms, mobile apps, RS90, and AI.
Source: https://haptique.io/docs/haptique-music/overview
Slug: docs/haptique-music/overview
Haptique Music is the music and media layer for Haptique OS. It should be configured as part of the home model, not as a separate app island.
## What you can do
- Use Music as the daily listening view after at least one source and one output are ready.
- Browse supported music sources and local libraries.
- Upload songs, add a local or NAS library folder, scan the library, and browse albums, artists, tracks, playlists, and artwork.
- Add internet radio stations for quick playback.
- Connect available streaming services where supported by the project.
- Discover and route playback to supported outputs, speaker groups, streamers, and media zones.
- Control volume, mute, play, pause, skip, and source selection.
- Build and edit queues with play now, play next, and append behavior where supported.
- See and control multiple active players when music is playing in more than one Space.
- Save common playlists, stations, albums, searches, or sources as favorites.
- Add music to scenes such as Dinner, Morning, or Movie Night.
- Control music from the HOS mobile app, RS90, scenes, and AI where enabled.
## Basic terms
- Source: where music comes from, such as a library, playlist, station, album, or service.
- Output: where music plays, such as a speaker, receiver, streamer, amplifier, or media endpoint.
- Zone: a room or listening area that contains one or more outputs.
- Player: the active playback control for one output or grouped set of outputs.
- Queue: the upcoming music for a player.
- Group: two or more outputs controlled together.
- Preset: a saved music setup, such as a source, output, volume, or queue behavior, when presets are enabled.
## Daily listening flow
After setup, most consumers should start with music selection, not configuration.
1. Open Music in Haptique OS or the HOS mobile app.
2. Choose a Space or output.
3. Browse the library, radio stations, connected services, favorites, or saved filters.
4. Start playback, add to the queue, or replace the current queue.
5. Use Now Playing for volume, mute, pause, skip, and queue changes.
Setup controls should still be available, but they should not crowd the normal listening path once the home has a working source and output.
## Main areas
Haptique Music is usually organized into these areas:
- Home: daily listening and Now Playing.
- Library: uploaded songs, local or NAS folders, scans, albums, artists, tracks, and playlists.
- Outputs: speakers, streamers, media zones, live rooms, and saved groups.
- Radio: custom internet radio stations.
- Services: available streaming-service connections.
- Advanced: pro setup details and technical state for installers.
## How it fits into HOS
Once Haptique Music is assigned to Spaces, it becomes part of the same control model as lights, climate, AV, scenes, and favorites.
- Mobile apps can show music controls for the active Space.
- RS90 can control playback and volume for the assigned media zone.
- Scenes can start music as part of a room setup.
- AI can help find music actions or create scenes when those controls are enabled.
## Where to go next
- [Setup](/docs/haptique-music/setup)
- [Outputs and Zones](/docs/haptique-music/playback-and-zones)
- [Favorites and Scenes](/docs/haptique-music/favorites-and-scenes)
- [Troubleshooting](/docs/haptique-music/troubleshooting)
---
# Outputs, Players, and Zones
Use Haptique Music outputs, players, zones, multi-room playback, and volume controls.
Source: https://haptique.io/docs/haptique-music/playback-and-zones
Slug: docs/haptique-music/playback-and-zones
Haptique Music works best when each output is assigned to the Space where people expect to control it.
## Understand outputs and players
An output is the destination where music plays. It may be a speaker pair, receiver zone, streamer, TV audio path, amplifier, or another supported media endpoint.
A player is the active playback control for an output. When music starts in the Kitchen, the Kitchen Music output has a player. When music also starts on the Patio, the Patio Speakers output has its own player.
In daily use, consumers usually think in this order:
1. Choose the room or Space.
2. Choose where music should play.
3. Choose what to play.
4. Control the player.
## Start music in one room
1. Open the Space that contains the music output.
2. Select the music control or media zone.
3. Choose the output if the Space has more than one.
4. Choose a source, favorite, playlist, station, album, or queue item.
5. Choose whether to play now, play next, append to the queue, or replace the current queue when those options are available.
6. Adjust volume to a comfortable level.
## Browse and play content
Haptique Music can show different shelves depending on what is enabled in the project:
- Local library albums, artists, tracks, playlists, and artwork.
- Uploaded songs.
- Internet radio stations.
- Connected streaming services.
- Favorites, bookmarks, saved filters, and smart views.
If the consumer cannot find music, first check that the source is connected, scanned, or saved. Then check that the user has permission to use that source.
## Use more than one player
When music is playing in multiple rooms, Haptique Music should show each active player separately. This lets a consumer pause the Patio without stopping the Kitchen, or lower the Living Room volume without changing the Bedroom.
Use the player for the specific output you want to control:
- Play and pause.
- Skip and previous where supported.
- Volume and mute.
- Source or favorite selection.
- Queue and play-next actions where supported.
- Current playback state.
If two players are visible, check the player name before changing volume or stopping playback.
## Queues
Queues are attached to the player or output that is playing. The available queue actions depend on the source and output.
Common queue actions:
- Play now or replace what is currently playing.
- Play next.
- Add to the end of the queue.
- Remove a track.
- Reorder tracks.
- Clear the queue.
- Select an item already in the queue.
- Toggle shuffle or repeat when supported.
Long queues may be shown in pages or with a summary so the player stays fast.
When moving playback to another output, Haptique Music can keep or copy the queue only when the source and target support it. If queue transfer is not available, start the same favorite, album, station, or playlist again on the new output.
## Multi-room playback
Some systems support grouped playback across more than one output. If grouping is available, use it when the same music should play in several Spaces at the same time.
Common multi-room actions:
- Start the same favorite in several Spaces.
- Add another output to the current playback group.
- Remove one output from a group.
- Change group volume.
- Change one output's volume inside the group, if supported.
- Stop the whole group.
If grouping is not supported by the connected system, start separate players in each Space instead.
There are two common group types:
- Same-system sync groups, where the connected audio system can keep rooms in time.
- Best-effort groups, where HOS sends commands to multiple outputs but exact sync is not guaranteed.
Use same-system sync groups for rooms where timing matters. Use best-effort groups for casual whole-home control, mixed systems, or places where slight timing differences are acceptable.
## Live rooms and saved groups
The Outputs area can show standalone rooms and saved groups as live playback rows.
- A standalone room controls one output or media zone.
- A saved group controls multiple outputs together.
- A group can show its member rooms.
- A group can also have a coordinator, which owns transport and queue behavior for that group.
Use the group row when the whole group should pause, resume, skip, or change queue. Use the member room control when only one room's volume should change.
For Sonos groups, HOS can use native join, leave, and coordinator-led playback behavior where supported. For mixed-provider groups, treat grouping as best-effort unless HOS labels it as synchronized.
## Volume behavior
Volume can work differently depending on the connected audio system.
For one output, the volume control should change that output only.
For grouped playback, there may be two levels:
- Group volume changes the overall group.
- Output volume changes one room or speaker inside the group.
If a receiver, amplifier, or speaker does not expose volume control to Haptique OS, the music player may show playback controls while volume is handled by another device.
## Move music to another output
To move music from one room to another:
1. Open the current player.
2. Stop or pause the current output.
3. Open the target Space.
4. Choose the target output.
5. Start the same source, favorite, or queue item.
If the connected system supports transfer or grouping, you may be able to add the target output first and then remove the original output.
When a Transfer action is available, use it instead of manually stopping and restarting. Transfer works best when Haptique Music owns the queue and the destination supports the same source.
## Choose the right output
Some rooms have more than one output. For example, a Theater may have Theater Music for casual listening and AVR Main for movie playback.
Choose the output based on what the consumer wants:
- Use the room speakers for normal music.
- Use the AVR or TV audio path when sound should come through the theater system.
- Use a patio or outdoor output for outside listening.
- Use a grouped output when the same music should follow people across rooms.
## RS90 and mobile control
On the HOS mobile app, open the Space and use the music player for that room. On RS90, map only the most common commands: volume, mute, play or pause, next, and one or two favorite music scenes.
## Daily use
Most users should not need to think about sources, outputs, and integration details. They should be able to open a Space, choose music, and control playback from the same place they control lights, climate, scenes, and media.
---
# Haptique Music Setup
Set up Haptique Music sources, outputs, Spaces, favorites, and first playback tests.
Source: https://haptique.io/docs/haptique-music/setup
Slug: docs/haptique-music/setup
Use Haptique Music after the HOS project has at least one Space and one usable audio output or media zone.
## Before you start
- Haptique OS is installed, licensed, and running.
- The project has at least one [Space](/docs/advanced-os/spaces).
- The audio device, receiver, streamer, or supported output is powered on and reachable.
- The music service, local library, or storage source is ready for use.
- The user has permission to control music in the target Space.
## Setup flow
1. Open Haptique OS.
2. Enable Haptique Music for the project if it is not already enabled.
3. Add at least one source: local library, uploaded songs, internet radio, or an available streaming service.
4. Discover or add one output, speaker, streamer, or media zone.
5. Assign that output to the correct Space.
6. Give the output a clear name, such as Kitchen Music or Theater Music.
7. Play one item from the source to the output.
8. Test play, pause, volume, mute, skip, and queue behavior from Haptique OS.
9. Test the same controls from the HOS mobile app.
## Add music sources
Start with one reliable source before adding the whole home.
- Uploaded songs: use this for a few tracks or a quick demo library.
- Local or NAS folder: use this when the home has an existing music collection.
- Internet radio: use this for fixed station streams the consumer plays often.
- Streaming services: connect only services that HOS shows as available for the project.
If a service appears as coming soon or unavailable, do not build scenes or favorites around it yet. Use a local library, radio station, or available service instead.
## Connect streaming services
Use the Services area to connect available music accounts. Apple Music and Spotify connection paths may be available depending on the release and project configuration.
Qobuz and Tidal may appear in the service model or roadmap, but do not treat them as full catalog sources unless HOS marks them available for the project.
## Scan a local library
For a local or NAS library:
1. Add the folder path or mounted music location.
2. Make sure the folder is enabled.
3. Start a scan.
4. Wait for albums, artists, tracks, and artwork to appear.
5. Play one track before adding more outputs or groups.
If the library is large, scan and test one output first. Add more folders only after the first scan is healthy.
## Add internet radio
For a station:
1. Add the station name.
2. Add the stream URL.
3. Save the station.
4. Play it on one nearby output.
5. Save it as a favorite if it works reliably.
Use names people recognize, such as Jazz FM, Morning News, or Patio Radio.
## Name outputs clearly
Consumers should see names that match the real room or listening area. Good output names make mobile control, scenes, RS90, and AI easier to use.
Good names:
- Kitchen Music.
- Living Room Speakers.
- Patio Speakers.
- Theater Music.
Avoid names like Output 1, HDMI 2, Receiver Zone B, or a device serial number unless the consumer already uses that name.
## Multiple outputs
If a room has more than one place where music can play, add each output separately and assign it to the right Space. For example, a Living Room can have Living Room Speakers and TV Soundbar as separate outputs.
If a whole-home audio system supports grouping, configure each output first, then test grouping after individual playback works.
## Discover and test outputs
Use output discovery to find supported speakers, streamers, AirPlay targets, Sonos players, UPnP/DLNA players, local HOS outputs, logical device targets, HOS Music Bridge endpoints, and other project-supported playback endpoints.
For each discovered output:
1. Confirm the name is clear.
2. Assign it to the correct Space.
3. Test one track or station.
4. Test volume and mute.
5. Confirm whether seek, queue, grouping, transfer, sync, and quality details are available.
Some outputs expose playback but not every control. If volume, grouping, queue, or transfer is missing, treat that as an output capability limit instead of a setup failure.
## Audio profiles and quality
Some projects may expose audio profiles, signal-path hints, headroom, EQ, or quality settings. Use only the options that HOS shows as available for the selected output.
Do not promise exclusive DAC control, bit-perfect local playback, or full runtime DSP unless the installed HOS release and output path explicitly support it.
## First working check
The first setup is ready when one Space can start playback, adjust volume, stop playback, browse or update the queue, and show the same music state from Haptique OS and the mobile app.
After that works, add more outputs, zones, favorites, and scene actions.
---
# Haptique Music Troubleshooting
Fix common Haptique Music setup, playback, zone, favorite, and scene issues.
Source: https://haptique.io/docs/haptique-music/troubleshooting
Slug: docs/haptique-music/troubleshooting
## Music output is missing
Confirm the device or integration is powered on, reachable, and assigned to a Space. If the output was just added, refresh the Haptique OS dashboard and reopen the mobile app.
If discovery is available, run discovery again and check whether the output appears under a different name, room, or provider.
## Playback does not start
Check that the selected source or library item is available, the output is online, and the target zone is not muted or already controlled by another source.
If playback fails only on one output, try the same track or station on a different output. If it works elsewhere, the issue is probably the selected output or that output's supported capabilities.
## Library is not updating
Confirm the folder is still mounted, reachable, and enabled. Run a new scan, then wait for albums, artists, tracks, and artwork to refresh.
If only some music appears, test with a small folder first. Large libraries and network folders can take longer to scan.
## Radio station does not play
Confirm the station stream URL is still valid and uses a supported stream format. Try the same station on one simple output before adding it to scenes, groups, or favorites.
## Streaming service is not available
Use only services that HOS shows as available and connected for the project. If a service is marked coming soon, unavailable, or disconnected, use local library, uploaded songs, or internet radio until the service is ready.
## Music starts on the wrong output
Check the Space and output name before starting playback. If the room has multiple outputs, choose the exact output, such as Living Room Speakers instead of TV Soundbar.
## Volume does not change
Confirm the output supports volume control through its integration. Some sources expose playback but rely on a receiver, amplifier, or another device for volume.
## Only one room changes volume in a group
The control may be changing one output instead of the group. Look for the group volume control if the connected system supports it. If group volume is not available, adjust each output separately.
## One player stops but another keeps playing
This is normal when music is playing as independent players in separate Spaces. Stop the specific player you want to silence, or stop the whole group if grouped playback is active.
## Grouped rooms are not exactly in sync
Mixed outputs and mixed providers may work as best-effort groups. For tighter sync, use outputs from the same audio system when that system supports native sync grouping.
If HOS shows sync-quality labels or warnings, follow those labels. A warning usually means the group can be controlled together but should not be treated as perfectly synchronized.
## Queue does not move to another output
Queue transfer depends on the source and destination output. If transfer is not available, start the same album, playlist, station, or favorite on the new output.
## Shuffle, repeat, or seek is missing
Not every source and output exposes every transport control. If a command is missing on one output, try the same source on another output to confirm whether it is a source limit or an output limit.
## Audio profile or quality setting is missing
Audio profiles, quality hints, and processing options depend on the selected output and installed HOS release. If the option is not shown, use the normal playback controls for that output.
## Favorite is missing
Check that the favorite was saved to the correct Space or user profile. Also confirm the signed-in user has permission to view and control that music source.
## Scene starts but music is wrong
Open the scene and confirm the target Space, output, source, favorite, and volume are correct. Test the music action by itself before testing the full scene.
## AI does not control music
Use clear names for Spaces, outputs, and favorites. Confirm AI control is enabled for the Space and that the current user has permission to run music actions.
---
# Adding Devices
Add supported devices to Haptique OS.
Source: https://haptique.io/docs/integrations/adding-devices
Slug: docs/integrations/adding-devices
Devices must be added to Haptique OS before they can appear in rooms, scenes, mobile apps, AI chat, RS90, or HomeKit.
## Add a device
1. Open Haptique OS.
2. Go to Devices or Integrations.
3. Choose Add Device.
4. Select the device type or driver.
5. Enter required details such as IP address or account information.
6. Test the connection.
7. Assign the device to a room.
8. Add it to scenes or favorites as needed.
## Naming
Use clear names. AI chat and mobile control work better with names people naturally say.
---
# AV Receivers
Add and control AV receivers in Haptique OS.
Source: https://haptique.io/docs/integrations/av-receivers
Slug: docs/integrations/av-receivers
AV receivers are central to media rooms and theaters. Haptique OS can use supported AVR integrations for power, input, volume, mute, and zone control.
## Setup basics
1. Put the AVR on the local network.
2. Reserve its IP address.
3. Add it in Haptique OS.
4. Test power, volume, mute, and source selection.
5. Assign it to the correct room.
6. Add it to scenes and media controls.
## Good scene examples
- Watch TV.
- Movie Night.
- Music.
- All Off.
## Troubleshooting
If commands are delayed or fail, confirm the AVR network control setting is enabled and that the receiver is not in a deep sleep mode that disables network access.
---
# HomeKit
Enable the Haptique OS HomeKit bridge and pair with Apple Home.
Source: https://haptique.io/docs/integrations/homekit
Slug: docs/integrations/homekit
HomeKit integration lets supported Haptique OS devices appear in Apple Home and Siri.
## Enable HomeKit bridge
1. Open Haptique OS.
2. Go to Integrations.
3. Open HomeKit.
4. Enable the bridge.
5. Confirm the bridge status is running.
6. Pair with Apple Home.
## Pair with Apple Home
1. Open the Home app.
2. Choose Add Accessory.
3. Scan or enter the Haptique OS pairing code.
4. Assign accessories to rooms.
5. Test a device and Siri command.
## Keep pairing stable
Do not delete HomeKit bridge data unless support asks you to. Resetting the bridge can require repairing accessories.
---
# IR Devices
Control infrared devices with Haptique OS and supported IR hardware.
Source: https://haptique.io/docs/integrations/ir-devices
Slug: docs/integrations/ir-devices
IR control helps integrate devices that do not provide a local IP API.
## When to use IR
- Legacy TVs.
- Projectors.
- Simple media devices.
- Air conditioners.
- Other remote-controlled equipment.
## Setup basics
1. Confirm you have supported IR hardware.
2. Add the IR device in Haptique OS.
3. Select or learn the required codes where supported.
4. Test each command.
5. Assign the device to a room.
## Reliability tips
IR often requires line of sight or careful emitter placement. Test commands from the real room position.
---
# Lighting and Climate
Use Haptique OS with lighting and climate devices.
Source: https://haptique.io/docs/integrations/lighting-and-climate
Slug: docs/integrations/lighting-and-climate
Lighting and climate are often the most visible parts of a smart home experience.
## Lighting
Use Haptique OS to group lights by room, add them to scenes, and expose supported lights to mobile apps, AI chat, RS90, and HomeKit.
## Climate
Climate controls can include target temperature, mode, fan, and room comfort settings depending on integration support.
## Scene examples
- Morning: warm lights and comfortable temperature.
- Movie Night: low lights and cooler room.
- Away: lights off and energy-saving climate.
## Safety
Avoid aggressive climate automations until you have tested device behavior.
---
# Supported Systems
Understand the types of systems Haptique OS can integrate with.
Source: https://haptique.io/docs/integrations/supported-systems
Slug: docs/integrations/supported-systems
Haptique OS is designed to bring different home and AV systems into one controller.
## Common categories
- AV receivers.
- TVs and projectors.
- Streamers and media players.
- Lighting.
- Climate.
- Shades.
- HomeKit.
- IP devices.
- IR devices.
- Bluetooth devices where supported.
- Professional AV equipment.
- ESPHome and Tasmota device ecosystems where supported by the current release.
## Confirm exact support
Specific brand and model support can vary by release. Check the integration list in your Haptique OS version or the [Developer Wiki](https://wiki.haptique.io) for technical integration details.
---
# Activation
Activate a Haptique OS license online or offline where supported.
Source: https://haptique.io/docs/licensing/activation
Slug: docs/licensing/activation
Activation links your local Haptique OS installation to a license. Start from a Haptique OS copy downloaded through the official [HOS downloads page](/downloads); licenses are issued and activated for that official download flow.
## Online activation
1. Open Haptique OS.
2. Go to License settings.
3. Use the myHOS email-link sign-in flow for the email address that owns the license, or enter your claim code.
4. Confirm activation.
5. Check that the license status is active.
You can review or claim licenses in [myHOS](https://myhos.haptique.io/login?return=/licenses).
myHOS does not use a separate password login in the production portal. If you open `/licenses` while signed out, myHOS redirects you to the email sign-in page and then returns you to the licenses page after the magic link is verified.
## Offline activation
If supported:
1. Generate the hardware identity from Haptique OS.
2. Use [myHOS](https://myhos.haptique.io/login?return=/licenses) or the supported license file request flow on an internet-connected device.
3. Download the license file.
4. Upload it in Haptique OS.
5. Confirm the system shows active status.
For the file-based workflow, see [Request a License File](/docs/licensing/request-license).
## Keep a copy
Keep your license account details available for transfer, support, or reinstall scenarios.
---
# License Transfer
Transfer or revoke a Haptique OS license when changing hardware.
Source: https://haptique.io/docs/licensing/license-transfer
Slug: docs/licensing/license-transfer
Machine-bound licenses may need transfer when you replace the local Haptique OS host.
## Before transferring
- Confirm you can access the old installation if possible.
- Back up configuration.
- Confirm the new host is ready.
- Check the license portal for current transfer rules.
## Typical transfer flow
1. Open the license portal and sign in from the email link sent to your inbox.
2. Revoke or release the old machine where supported.
3. Install Haptique OS on the new host.
4. Activate with the same license.
5. Restore or reconfigure your home.
Contact support if the old machine is unavailable.
---
# Plans
Understand Haptique OS license plans at a high level.
Source: https://haptique.io/docs/licensing/plans
Slug: docs/licensing/plans
Haptique OS licensing should be easy to understand: start with local control, then unlock advanced features when needed.
## Free
The free tier is intended for core local control and getting started with Haptique OS.
## Pro
Pro is intended for users who want advanced features such as native AI, priority updates, and other premium capabilities when available.
## Confirm current pricing
Pricing, promotions, and included features can change. Use the production license portal for the current offer before publishing fixed pricing in docs.
---
# Request a License File
Generate a signed Haptique OS license file (.lic) bound to your machine's hardware ID.
Source: https://haptique.io/docs/licensing/request-license
Slug: docs/licensing/request-license
Use this page to request a signed `.lic` license file for offline activation.
A license file is cryptographically bound to your machine's hardware UUID and cannot be used on a different machine.
---
## Step 1 — Find your Machine ID
Run the command for your platform:
```bash
system_profiler SPHardwareDataType | grep "Hardware UUID"
```
```powershell
(Get-WmiObject Win32_ComputerSystemProduct).UUID
```
Copy the UUID value — it looks like `26B8090A-BF7A-11EB-9259-744CA1A965A6`.
---
## Step 2 — Request your license
Paste your Machine ID below and click **Request License**. You will be taken to the license generation workflow on GitHub where you can confirm and run it.
---
## Step 3 — Run the workflow
On the GitHub Actions page:
1. Click **Run workflow**.
2. Paste your Machine ID into the **machine_id** field.
3. Optionally enter your name in the **customer** field.
4. Click **Run workflow** to confirm.
5. Once the run completes (usually under 30 seconds), open the run summary and download the **license artifact** — a `.lic` file.
---
## Step 4 — Activate
Place the downloaded `.lic` file on your Haptique OS machine at:
```
~/.haptique/license/license.json
```
Or upload it via the web UI at `http:// /os/license`.
:::note
The `.lic` file is bound to the machine ID you submitted. It will not activate on a different machine. If you replace your hardware, use the [License Transfer](/docs/licensing/license-transfer) page.
:::
---
# AI Chat on Mobile
Use Haptique OS AI chat from the mobile apps.
Source: https://haptique.io/docs/mobile/ai-chat-on-mobile
Slug: docs/mobile/ai-chat-on-mobile
AI chat on mobile lets you control the home without navigating through every device screen.
## What to try
- "Turn off the kitchen lights."
- "Start Movie Night in the theater."
- "Create a scene for reading in the bedroom."
- "Set the living room to evening mode."
- "Pause the music downstairs."
## Mobile advantages
Mobile AI chat is useful because the phone is usually nearby. You can ask for a room-level change, save a scene, or adjust media without finding the exact device screen.
Before using mobile chat broadly, complete the [AI Setup Guide](/docs/advanced-os/ai-setup-guide) so Spaces, logical devices, scenes, and permissions are ready.
## Confirm before running broad actions
If AI is about to affect many devices or create an automation, review the action before confirming.
---
# Favorites
Set up and use favorites in the Haptique mobile apps.
Source: https://haptique.io/docs/mobile/favorites
Slug: docs/mobile/favorites
Favorites put the most common actions in easy reach.
## What can be a favorite
- A room.
- A device.
- A scene.
- A media zone.
- A frequently used control action.
## Creating favorites
1. Open the mobile app.
2. Find the room, device, or scene you use often.
3. Choose Add to Favorites.
4. Reorder favorites so the most common controls are first.
5. Test each favorite.
## Favorite strategy
Keep favorites practical. A good home screen usually includes the main room, common scenes, active media zone, and a few high-frequency devices.
---
# Mobile Media Control
Control AV receivers, media zones, playback, and volume from Haptique mobile apps.
Source: https://haptique.io/docs/mobile/media-control
Slug: docs/mobile/media-control
Mobile media control brings AV and music systems into the same interface as rooms, scenes, and favorites.
## Common controls
- Play and pause.
- Previous and next.
- Volume and mute.
- Source selection.
- Zone selection.
- Power.
- Now playing metadata when supported.
## AV rooms
In a theater or living room, media control may combine multiple devices: TV or projector, AVR, streamer, lights, shades, and climate. Scenes can prepare the full room, while media controls handle playback.
## State sync
The mobile app should reflect backend-confirmed state, not just optimistic taps. If the receiver changes input or volume, the app should update from Haptique OS.
---
# Notifications and Presence
How mobile notifications and presence can fit into Haptique OS.
Source: https://haptique.io/docs/mobile/notifications-and-presence
Slug: docs/mobile/notifications-and-presence
Mobile devices can help Haptique OS become more useful when notifications and presence features are enabled.
## Notifications
Notifications may be used for:
- System status.
- License or update messages.
- Device offline alerts.
- Scene or automation confirmation.
- Security or critical home events where supported.
## Presence
Presence features can help personalize automations, but they should be optional and privacy-aware.
Examples:
- Run arrival scenes.
- Adjust climate when someone returns.
- Show personalized favorites.
## Privacy
Presence should be explained clearly before users enable it. Users should know what is tracked, where it is stored, and how to turn it off.
---
# Mobile Apps
Overview of Haptique OS mobile apps.
Source: https://haptique.io/docs/mobile/overview
Slug: docs/mobile/overview
The Haptique mobile apps are daily control surfaces for Haptique OS. They are not just setup utilities. They are how many users interact with rooms, favorites, devices, scenes, media, and AI chat.
## What mobile apps do
- Sign in with credentials created on the fleet server.
- Show rooms and devices.
- Trigger and edit scenes.
- Manage favorites.
- Control media and AV devices.
- Use AI chat for natural-language control.
- Reflect live state from the local controller.
## Access model
Users download the HOS mobile app from the App Store or Google Play Store, then sign in with credentials created on the fleet server. The signed-in account determines which Haptique OS site, rooms, devices, scenes, favorites, media zones, and AI features are available.
Haptique OS remains the source of truth for the project model and control state. Remote or local control depends on the configured site access and the user's permissions.
## Availability
The HOS mobile app is available for iPhone and iPad from the App Store, and for Android phones and tablets from the Google Play Store.
---
# HOS Mobile App
Download the HOS mobile app and sign in with fleet server credentials.
Source: https://haptique.io/docs/mobile/pairing-with-haptique-os
Slug: docs/mobile/pairing-with-haptique-os
The HOS mobile app works with Haptique OS after a user account is created on the fleet server. Normal mobile access is a download-and-sign-in flow.
## Download the app
- iPhone and iPad: download the HOS mobile app from the App Store.
- Android phones and tablets: download the HOS mobile app from the Google Play Store.
## Before signing in
- A fleet server admin or installer must create the user account.
- The user must have the correct credentials for the Haptique OS site or home.
- User permissions control which rooms, devices, scenes, favorites, media zones, and AI features appear in the app.
## Sign in
1. Install the HOS mobile app.
2. Open the app.
3. Enter the credentials created on the fleet server.
4. Select the assigned Haptique OS site or home if prompted.
5. Confirm that rooms, devices, scenes, favorites, and media zones appear.
6. Test one room, one scene, and one favorite.
## If sign-in fails
Confirm the account exists on the fleet server, the credentials are correct, and the user is assigned to the right Haptique OS site or home. If needed, ask the fleet server admin or installer to reset the password or update permissions.
---
# Rooms and Devices on Mobile
Navigate rooms and control devices from the Haptique mobile apps.
Source: https://haptique.io/docs/mobile/rooms-and-devices
Slug: docs/mobile/rooms-and-devices
The mobile app is organized around rooms so users can think by space instead of brand.
## Room view
A room can show:
- Lights.
- Climate devices.
- Shades.
- Media zones.
- AV controls.
- Favorite actions.
- Relevant scenes.
## Device control
Tap a device to open the right control surface. For example:
- Lights show brightness or color controls.
- Media devices show playback and volume controls.
- AV devices show source and power controls.
- Climate devices show temperature and mode controls.
## Naming tips
Use names people say naturally:
- Theater Projector.
- Living Room Lights.
- Kitchen Music.
- Bedroom AC.
---
# Scenes on Mobile
Trigger, create, edit, and organize Haptique OS scenes from mobile apps.
Source: https://haptique.io/docs/mobile/scenes
Slug: docs/mobile/scenes
Scenes let one tap change multiple devices together. Mobile apps make scenes easy to run, review, and edit.
## Triggering scenes
Open the Scenes area or a room page, then tap the scene. Confirm the affected room updates as expected.
## Creating scenes manually
1. Open Scenes.
2. Choose New Scene.
3. Name the scene.
4. Add rooms and devices.
5. Set each device state.
6. Save.
7. Test the scene.
## Creating scenes with AI
You can also ask AI chat to draft a scene:
> "Create a Dinner scene for the dining room with warm lights and soft music."
Review the proposed actions before saving.
## Organizing scenes
Use clear names and group by purpose: Morning, Evening, Away, Entertain, Movie, Sleep, Cleaning.
---
# Mobile Troubleshooting
Fix common Haptique OS mobile app sign-in and sync issues.
Source: https://haptique.io/docs/mobile/troubleshooting
Slug: docs/mobile/troubleshooting
## App cannot sign in
Confirm the user account exists on the fleet server, the credentials are correct, and the account is assigned to the right Haptique OS site or home.
## Rooms or scenes are missing
Refresh the app, confirm you are signed in to the correct site or home, and check user permissions on the fleet server.
## Controls do not update
Check that the Haptique OS service is running and that the signed-in user still has access to the site or home.
## AI chat does not respond
Check AI feature settings, license status, local runtime status, and network connection to the Haptique OS instance.
---
# RS90 Button Mapping
Map RS90 buttons to Haptique OS rooms, scenes, devices, and favorites.
Source: https://haptique.io/docs/rs90/button-mapping
Slug: docs/rs90/button-mapping
Button mapping decides what each RS90 button does.
## What buttons can map to
- A scene.
- A favorite.
- A device action.
- A media command.
- A room-level action.
- An AV source or input command.
## Recommended setup
1. Assign the remote to a primary room.
2. Map the most common scene to a top-level button.
3. Map volume and playback to the active media zone.
4. Add lighting controls for the room.
5. Add source selection for AV rooms.
6. Test every mapped button in the room.
## Keep mappings simple
Use RS90 for the actions people need most often. Put advanced or rare actions in the mobile app.
---
# RS90 Firmware Updates
Update RS90 firmware when supported by Haptique OS.
Source: https://haptique.io/docs/rs90/firmware-updates
Slug: docs/rs90/firmware-updates
Firmware updates keep RS90 current with the latest remote behavior, pairing improvements, and supported control features.
## Before updating
- Charge RS90.
- Keep it near the Haptique OS controller or on the required network.
- Do not power it off during update.
- Keep Haptique OS running.
## Update flow
1. Open Haptique OS.
2. Go to Remotes.
3. Select RS90.
4. Check firmware status.
5. Start update if available.
6. Wait for completion.
7. Test mapped buttons after restart.
:::note
Only publish firmware update instructions that match the shipping update mechanism.
:::
---
# RS90 with Licensed HOS
Use Haptique RS90 with a licensed Haptique OS controller and HOS devices exposed in Config App.
Source: https://haptique.io/docs/rs90/hoslicensed
Slug: docs/rs90/hoslicensed
After RS90 is paired with a licensed Haptique OS controller, HOS devices can appear inside the existing RS90 Config App. These devices are powered by HOS, but they are organized from the same mobile app RS90 users already use for rooms, favorites, and device setup.
This page assumes RS90 is already paired. If not, start with [Pair Haptique RS90](/docs/rs90/pairing).
Licensed HOS path
HOS owns the device logic. RS90 gets the control surface.
HOS devices show under the HOS device category.
Favorites decide what appears quickly on RS90.
Device actions still execute through the local HOS controller.
## What licensed HOS adds
A licensed HOS setup lets the local HOS controller expose supported [logical devices](/docs/advanced-os/logical-devices) to RS90 configuration. The Config App still manages the RS90 experience, but the device source is HOS.
| Area | What changes |
| :-- | :-- |
| Device source | Devices can come from HOS logical devices and integrations. |
| Config App | The existing RS90 Config App shows HOS devices in the device list. |
| Favorites | Heart icons mark devices that should be easier to reach from RS90. |
| Device actions | Commands route back through HOS for execution. |
| Setup model | HOS remains the controller. RS90 remains the remote. |
## Add Logical Devices via Fleet Release
Select stable Logical Devices, assign categories, then submit the release.
Use a Fleet Release to decide which HOS Logical Devices become available to RS90. If you need the concept first, start with [Logical Devices](/docs/advanced-os/logical-devices). Keep the release small at first: one room, a few proven devices, then expand after RS90 control is verified.
1. Open the Fleet Release for the licensed HOS controller.
2. Go to **Logical Devices**.
3. Select the devices RS90 should control.
4. Include only stable devices, scenes, bridges, or media endpoints.
5. Publish or sync the release.
6. Open Config App and check **My Devices** → **HOS**.
7. Mark the devices RS90 should surface quickly as favorites.
## HOS devices in Config App
Use **My Devices** in Config App to review devices exposed from the licensed HOS controller. Select the **HOS** category chip to focus the list on HOS-backed devices.
HOS-backed devices in Config App.
## How to use this screen
1. Open the existing RS90 Config App.
2. Confirm it is connected to the same local HOS server used during pairing.
3. Open **My Devices**.
4. Tap the **HOS** category chip.
5. Review the HOS-backed devices.
6. Tap the heart icon for devices you want to keep close on RS90.
7. Use the three-dot menu for device options.
8. Test the device from RS90 after changing favorites or assignments.
## What the HOS badge means
The HOS badge means the device is coming through the HOS path. The device may represent a TV, streamer, AVR, bridge, media endpoint, IR bridge, or another supported logical device.
The badge does not mean the command runs inside the mobile app. The mobile app configures RS90. HOS still owns device state, command execution, integration credentials, and local automation logic.
## Recommended first setup
Start with a small, proven set of HOS devices.
1. Add one room or Space in HOS.
2. Expose only the devices RS90 should control first.
3. Mark the main TV, streamer, AVR, or bridge as favorites.
4. Test each favorite from RS90.
5. Add more devices after the first room works.
Good first devices:
- Main TV or display.
- Primary streaming device.
- AVR or sound device.
- IR Device Bridge.
- One media endpoint.
- One scene or room-level control.
## Verification checklist
| Check | Expected result |
| :-- | :-- |
| HOS license | Controller is licensed and active. |
| Pairing | RS90 is paired to the same HOS server as Config App. |
| Device list | HOS category appears in My Devices. |
| Favorites | Hearted devices remain available after app refresh. |
| RS90 control | A real command works from the remote. |
| HOS state | HOS reflects the device state after RS90 sends a command. |
## If HOS devices are missing
- Confirm the HOS license is active.
- Confirm Config App is connected to the local HOS server, not cloud.
- Confirm RS90 is paired to the same HOS server.
- Confirm devices are visible and active in HOS.
- Confirm the device is exposed to the RS90-compatible path.
- Refresh Config App or sign out and back in.
- Restart RS90 if the device list does not update.
## Keep Fleet and HOS clear
Licensed HOS does not replace the hosted Fleet product. It adds a local HOS controller path for RS90. Fleet/cloud and HOS local can share concepts, but HOS remains the local controller and Config App remains the existing RS90 mobile configuration app.
---
# IR, IP, and Bluetooth Control
Understand RS90 control paths for IR, IP, and Bluetooth devices.
Source: https://haptique.io/docs/rs90/ir-ip-bluetooth-control
Slug: docs/rs90/ir-ip-bluetooth-control
RS90 may support different control paths depending on device type and product configuration.
## IP control
IP control sends commands over the local network. It is often preferred for AV receivers, TVs, streamers, and other networked devices when supported.
## IR control
IR control is useful for devices that do not have reliable network APIs. It requires line of sight or a compatible IR path.
## Bluetooth control
Bluetooth may be used for supported devices or pairing flows where available.
## Choosing the right path
Use IP control when available. Use IR for legacy devices or simple remotes. Use Bluetooth only when the device and RS90 workflow explicitly support it.
:::note
Exact RS90 radio and IR learning support should match the shipping hardware and firmware for your release.
:::
---
# RS90 Remote Overview
Connect Haptique RS90 to Haptique OS through Config App and your local server.
Source: https://haptique.io/docs/rs90/overview
Slug: docs/rs90/overview
Haptique RS90 connects to Haptique OS through your local HOS server. Config App and the RS90 must both point to the same server before pairing can work.
Use Config App from the App Store or Google Play Store to configure Haptique RS90. In local HOS setup, the app is used to select the local server, create the local user, sign in with credentials, scan the RS90 QR code, and confirm the pairing PIN.
## Required order
1. Start HOS and confirm the local server IP address.
2. Open Config App on iOS or Android.
3. Change the Config App server to the HOS server IP address using the Local server option.
4. Create a new user in Config App using email and password credentials.
5. Sign in to Config App with those credentials.
6. Reset the RS90 so it shows a fresh QR code.
7. On the RS90, use Change Server and enter the same HOS server IP address.
8. Scan the RS90 QR code from Config App.
9. Enter the 4-digit PIN shown during pairing.
After the PIN is accepted, Config App and RS90 are connected through the same local HOS server.
## Important sign-in notes
Google and Apple sign-in do not work for this local setup. The user is created locally on the selected HOS server, so use the credential account created in Config App.
If Config App or RS90 is still pointed at a different server, pairing will fail or the QR code will not connect through the expected local HOS server.
Continue with [Pairing RS90](/docs/rs90/pairing).
---
# Pair Haptique RS90
Pair Haptique RS90 with Haptique OS using Config App, the local HOS server, and the RS90 QR flow.
Source: https://haptique.io/docs/rs90/pairing
Slug: docs/rs90/pairing
Pairing works when **Config App**, **Haptique RS90**, and the **local Haptique OS server** all point to the same HOS address.
Use this page when the RS90 should work with a local HOS controller on your home or site network.
Target state
One local HOS server. One Config App login. One RS90 QR pairing.
Config App uses the local HOS server.
RS90 uses the same server address.
The QR scan binds RS90 to that local account.
## Start at the local HOS landing page
Open HOS from the machine running the server, or from another device on the same network.
- `http://haptique-os.local:8080`
- `http://localhost:8080`, only on the HOS machine itself
- `http://YOUR-HOS-IP:8080`, for phones, tablets, and RS90 setup
The HOS landing page has two workspaces. Use Config Server for RS90 configuration and pairing. Use Haptique OS for the local automation dashboard.
Config Server
Use this path for Config App, RS90 pairing, local user sign-in, room assignment, favorites, and RS90 control setup.
Haptique OS
Use this path for the HOS dashboard, local devices, logical devices, integrations, spaces, scenes, and automation setup.
For RS90 pairing, both paths matter. Configure the home in HOS first, then pair RS90 through Config Server and Config App.
## Config App server selection
Config App is the existing mobile app RS90 users already use to configure the remote. It is not the HOS dashboard and it is not a separate HOS mobile app. Before signing in or creating the local user, point Config App to the HOS server that RS90 will use.
1. Tap Change Server from the login screen.
2. Choose Local for a HOS server on your network.
3. Enter the HOS server IP address and port.
## Before pairing
- HOS is running and its local IP address is known.
- The phone or tablet running Config App can reach that server in a browser.
- RS90 is charged and powered on.
- Config App and RS90 are on the same network path as the HOS server.
- Guest Wi-Fi, isolated VLANs, VPNs, and firewall prompts are disabled or configured correctly.
- You are ready to create a local email and password user. Do not use Google or Apple sign-in for this local setup.
## Pairing map
1 Open HOS locally. Confirm the landing page loads at `haptique-os.local:8080`, `localhost:8080`, or the HOS machine IP.
2 Enter Config Server. This is the RS90 configuration workspace.
3 Point the existing RS90 Config App to Local. Use the same HOS IP and port that the RS90 will use.
4 Create the local user. Use email and password credentials on this HOS server.
5 Reset RS90 to setup. Generate a fresh QR code and change the RS90 server address.
6 Scan and confirm. Scan the QR code from Config App, enter the PIN, then test one real command.
## Pairing flow
1. Start HOS and confirm the local landing page opens.
2. Choose **Config Server** from the landing page.
3. Open the existing RS90 Config App from the App Store or Google Play Store.
4. In Config App, change the server to the IP address of the running HOS server.
5. Create a new local user in Config App with email and password credentials.
6. Sign in to Config App with those credentials. Do not use Google or Apple sign-in for this local-server setup.
7. Reset the RS90 so it shows a new QR code.
8. On the RS90, choose **Change Server** and enter the same HOS server IP address used in Config App.
9. When the RS90 is ready and shows its QR code, scan it from Config App.
10. Enter the 4-digit PIN generated during pairing.
11. Confirm Config App and RS90 show the paired connection.
12. Test one room, one device, or one favorite from RS90.
## RS90 setup screen
After Config App is pointed at the local HOS server, reset RS90 or return it to setup mode.
On RS90:
1. Open **Settings**.
2. Choose **Reset**, or return to the first setup screen.
3. Wait for the setup screen and QR code.
4. Choose **Change Server**.
5. Enter the same local HOS server address used in Config App.
6. Return to the QR code screen.
Use the numeric IP address if `haptique-os.local` does not resolve from RS90.
## What to verify after pairing
Do not stop at the QR success screen. Prove the local path with one real action.
| Check | Expected result |
| :-- | :-- |
| Config App server | Shows the local HOS address or local mode. |
| RS90 server | Matches the Config App server address. |
| Local account | Uses email and password created on the HOS server. |
| Room or device list | Shows the local HOS project content. |
| First command | A real device, scene, or favorite responds. |
If the UI updates but the physical device does not respond, pairing succeeded but the device integration or command mapping still needs work.
## If pairing fails
- Confirm HOS is still running.
- Confirm Config App and RS90 both use the same HOS server IP address.
- Confirm the Config App user was created locally with credentials.
- Confirm the phone can open `http://YOUR-HOS-IP:8080`.
- Confirm RS90 and the phone are not on guest Wi-Fi.
- Disable VPN while pairing.
- Reset RS90 again to generate a fresh QR code.
- Re-scan the QR code and enter the new 4-digit PIN.
## Common mistakes
| Mistake | Fix |
| :-- | :-- |
| Entering `localhost` on the phone | Use the HOS machine IP address instead. |
| Config App on cloud, RS90 on local | Change Config App to Local before signing in. |
| RS90 on old server address | Reset RS90 and use Change Server again. |
| Using Google or Apple sign-in | Create a local email and password user. |
| Guest Wi-Fi blocks pairing | Move HOS, phone, and RS90 to the main LAN. |
---
# RS90 Scenes and Favorites
Use RS90 to trigger Haptique OS scenes and favorites.
Source: https://haptique.io/docs/rs90/scenes-and-favorites
Slug: docs/rs90/scenes-and-favorites
RS90 works best when it exposes the same high-value scenes and favorites users already understand from the mobile app.
## Useful scene mappings
- Movie Night.
- Watch TV.
- Music.
- Dinner.
- Good Night.
- All Off.
## Favorite mappings
Favorites are useful for device actions that are too small to become a full scene:
- Toggle reading lamp.
- Mute AVR.
- Open shades.
- Switch to Apple TV.
- Pause media.
## Testing
After mapping scenes or favorites, test each button and confirm the Haptique OS dashboard and mobile apps reflect the updated state.
---
# RS90 Troubleshooting
Fix common RS90 pairing, control, and button mapping issues.
Source: https://haptique.io/docs/rs90/troubleshooting
Slug: docs/rs90/troubleshooting
## RS90 does not appear during pairing
Confirm RS90 is in pairing mode, charged, and near the Haptique OS instance. Check that both devices are on the required network.
## A button does nothing
Check the button mapping, assigned room, target device, and whether the target device is online.
## Media buttons control the wrong room
Confirm the RS90 is assigned to the correct room or active media zone.
## Remote state is out of sync
Reconnect RS90 and confirm Haptique OS shows it as connected. Test the same action from the mobile app to isolate whether the issue is RS90 or the device integration.
---
# Common Issues
Common Haptique OS setup, mobile app, device, licensing, and AI issues.
Source: https://haptique.io/docs/support/common-issues
Slug: docs/support/common-issues
## Haptique OS will not open
Restart the app, confirm the host meets system requirements, and check whether another service is using the required local port.
## Mobile app cannot sign in or sync
Confirm the user account exists on the fleet server, the credentials are correct, and the account is assigned to the right Haptique OS site or home.
## Device does not respond
Check the device is powered on, connected to the network, assigned to the correct room, and controllable from its integration page.
## License activation fails
Check your claim code, account, internet connection, and system clock. If using offline activation, confirm the license file matches the current machine.
## AI chat cannot control something
Confirm the device is configured, online, named clearly, and available to the current user.
---
# Contacting Support
How to prepare a useful Haptique OS support request.
Source: https://haptique.io/docs/support/contacting-support
Slug: docs/support/contacting-support
Good support requests include enough context to reproduce or diagnose the issue.
## Include
- What you expected to happen.
- What actually happened.
- The app or surface used: desktop, mobile, RS90, HomeKit, AI chat, or menu bar.
- Device or room affected.
- Approximate time of issue.
- Relevant logs or screenshots.
## Contact
For support, contact [bonjour@cantatacs.com](mailto:bonjour@cantatacs.com) or use the support channel provided with your license.
---
# LLM Access
Use llms.txt or the local Haptique docs MCP server to give AI assistants read-only access to the public Haptique OS documentation.
Source: https://haptique.io/docs/support/llm-access
Slug: docs/support/llm-access
Haptique publishes public docs in formats that AI assistants can read without copying pages by hand.
Use the normal docs site for people:
- [Haptique OS docs](/docs/)
- [Docs index for LLMs](/llms.txt)
- [Full docs text for LLMs](/llms-full.txt)
Use the local MCP server when an assistant supports Model Context Protocol and can run a command from this repository.
```json
{
"mcpServers": {
"haptique-docs": {
"command": "npm",
"args": ["run", "docs:mcp", "--prefix", "/path/to/hos-website"]
}
}
}
```
The MCP server is read-only. It exposes public docs pages as resources and provides tools to list, search, and read docs. It does not expose installer manifests, license records, customer data, project data, or private wiki content.
## Available MCP tools
- `list_docs` lists docs pages and accepts an optional section prefix such as `docs/rs90`.
- `search_docs` searches titles, descriptions, slugs, and page content.
- `read_doc` reads one docs page by slug, `haptique-docs://` resource URI, or `https://haptique.io` URL.
## Good prompts
- Search the Haptique docs for RS90 pairing help.
- Read the Haptique OS license activation docs.
- Find the Haptique docs page that explains AI setup.
- List all docs under `docs/mobile`.
---
# Logs and Diagnostics
Find logs and diagnostic information for Haptique OS support.
Source: https://haptique.io/docs/support/logs-and-diagnostics
Slug: docs/support/logs-and-diagnostics
Logs help support understand what happened when a device, app, license, AI, or integration does not behave as expected.
## What to collect
- Haptique OS version.
- Host operating system.
- License status.
- Device or integration name.
- Time of the issue.
- Relevant logs.
- Screenshots or screen recordings.
## Where to start
Open the desktop app or dashboard and look for Diagnostics, Logs, or Support. The Mac menu bar app may also provide a quick path to logs when supported.
Do not share sensitive tokens, passwords, or private network details unless support specifically asks through a secure channel.
---
# Network Checklist
Network checks for reliable Haptique OS local control.
Source: https://haptique.io/docs/support/network-checklist
Slug: docs/support/network-checklist
Reliable local control depends on a healthy local network.
## Check these first
- Haptique OS host has a stable IP address.
- Phone, RS90, and devices can reach the Haptique OS host.
- mDNS or local discovery works where required.
- Firewall rules allow local access.
- AV devices have network control enabled.
- Wi-Fi coverage is strong in rooms where mobile or RS90 control is used.
## Recommended
Use DHCP reservations or static IPs for critical devices such as the Haptique OS host, AV receivers, TVs, projectors, and bridges.